Pre-translation checklist: What to prepare before every translation cycle
You've decided to localize a new feature, a new release, or a new language. Before you hand off strings to translators or trigger auto-translation, there's work to do.
Not the big strategic questions, those belong in your localization strategy and the Localization readiness checklist that supports it. This checklist is narrower and more immediate...
Think of it as a pre-flight check. The plane may be airworthy (your product is i18n-ready), but you still run through the cockpit sequence before every departure.
Teams that skip pre-translation preparation pay for it twice: once in rework, once in translator confusion.
What this checklist covers (and what it doesn't)
This checklist is for:
- Dev and product teams preparing a feature, release, or sprint for translation
- Localization managers doing a final review before strings go out
- Teams working with translators (human or AI) on recurring cycles
This checklist is not about:
- Evaluating whether to localize (see Localization strategy guide)
- Assessing your team's overall i18n maturity (see Localization readiness checklist)
- Choosing which languages to target (see how to plan your first 5 languages)
Step 1: Audit the strings going out
Before anything else, look at exactly what you're about to translate.
Remove untranslatable strings
Not everything in your translation files should be translated. Before sending to translators, strip out:
- Hardcoded brand names: "SimpleLocalize", "Stripe", "Slack" should rarely be translated
- URLs and paths:
/settings/billingshould stay as-is unless you have localized routes - Email addresses and phone numbers: translate the label, not the value
- Technical placeholders: used as internal identifiers
Example: If your JSON file contains this:
{
  "support_email": "contact@yourapp.com",
  "support_label": "Contact our team"
}
Only support_label goes to translation. support_email should be excluded or marked as non-translatable in your TMS.
Most TMS platforms, including SimpleLocalize, let you mark keys as non-translatable or read-only to prevent accidental changes.
Check for hardcoded strings that slipped through
Run a quick grep or use your i18n linter before export:
# Example: find hardcoded English text in JSX files
grep -rn '"[A-Z][a-z]' src/components --include="*.tsx" | grep -v t\(
Hardcoded strings sent to translation are eventually useless, they'll never render from the translation file. Catch them now, not after review.
Identify duplicate keys
Duplicate translation keys inflate word count and cost. Two keys that say "Save changes" in English but are in different namespaces may legitimately differ in other languages, but often they're just copy-paste artifacts. Before each cycle:
- Check for semantic duplicates (same meaning, different keys)
- Decide whether to consolidate or keep separate, and document why
See also: How to manage shared translation keys across projects
Step 2: Prepare context for every string
The single biggest driver of translation quality is context. Without it, translators (human or AI) make assumptions that produce technically correct but situationally wrong translations.
The classic example: "Home". Is it a house or a navigation button? Without context, Spanish translators may write "Casa" (a dwelling) when you need "Inicio" (a start/home page).
For each batch of strings, prepare:
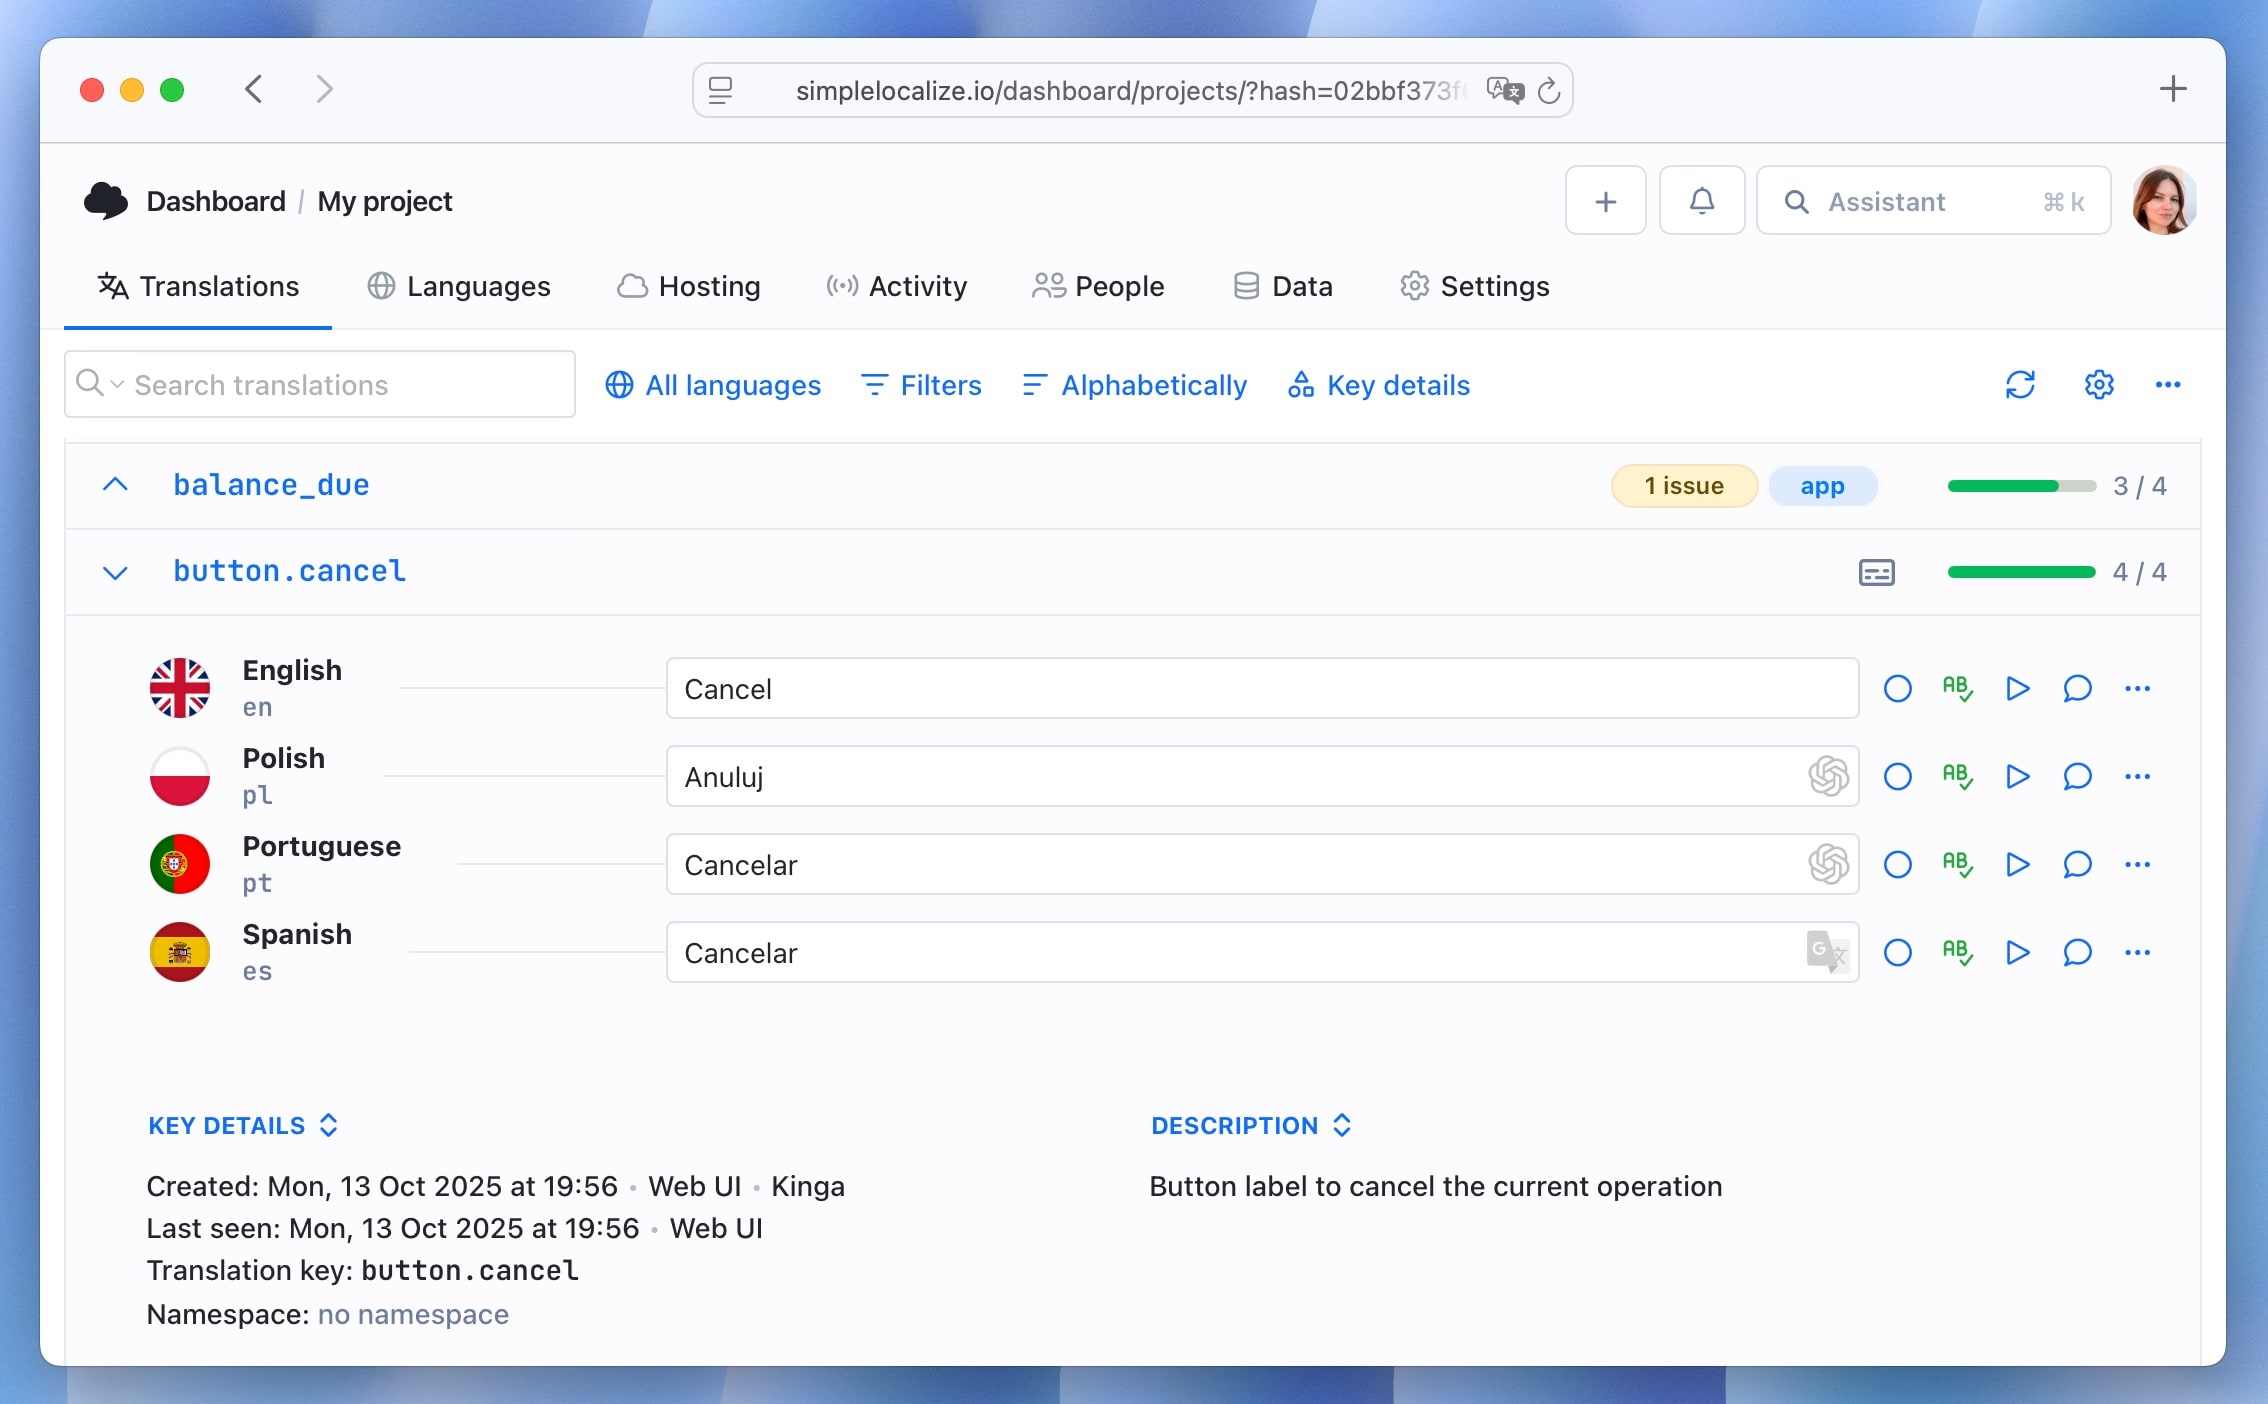
Key-level descriptions
For any string that is ambiguous, short, or UI-specific, add a description before translation:
| Key | Value | Description |
|---|---|---|
nav.home | Home | Navigation button in the top menu, not a building |
modal.save | Save | Saves the current form state and closes the modal |
status.active | Active | Describes a subscription plan that is currently billing |
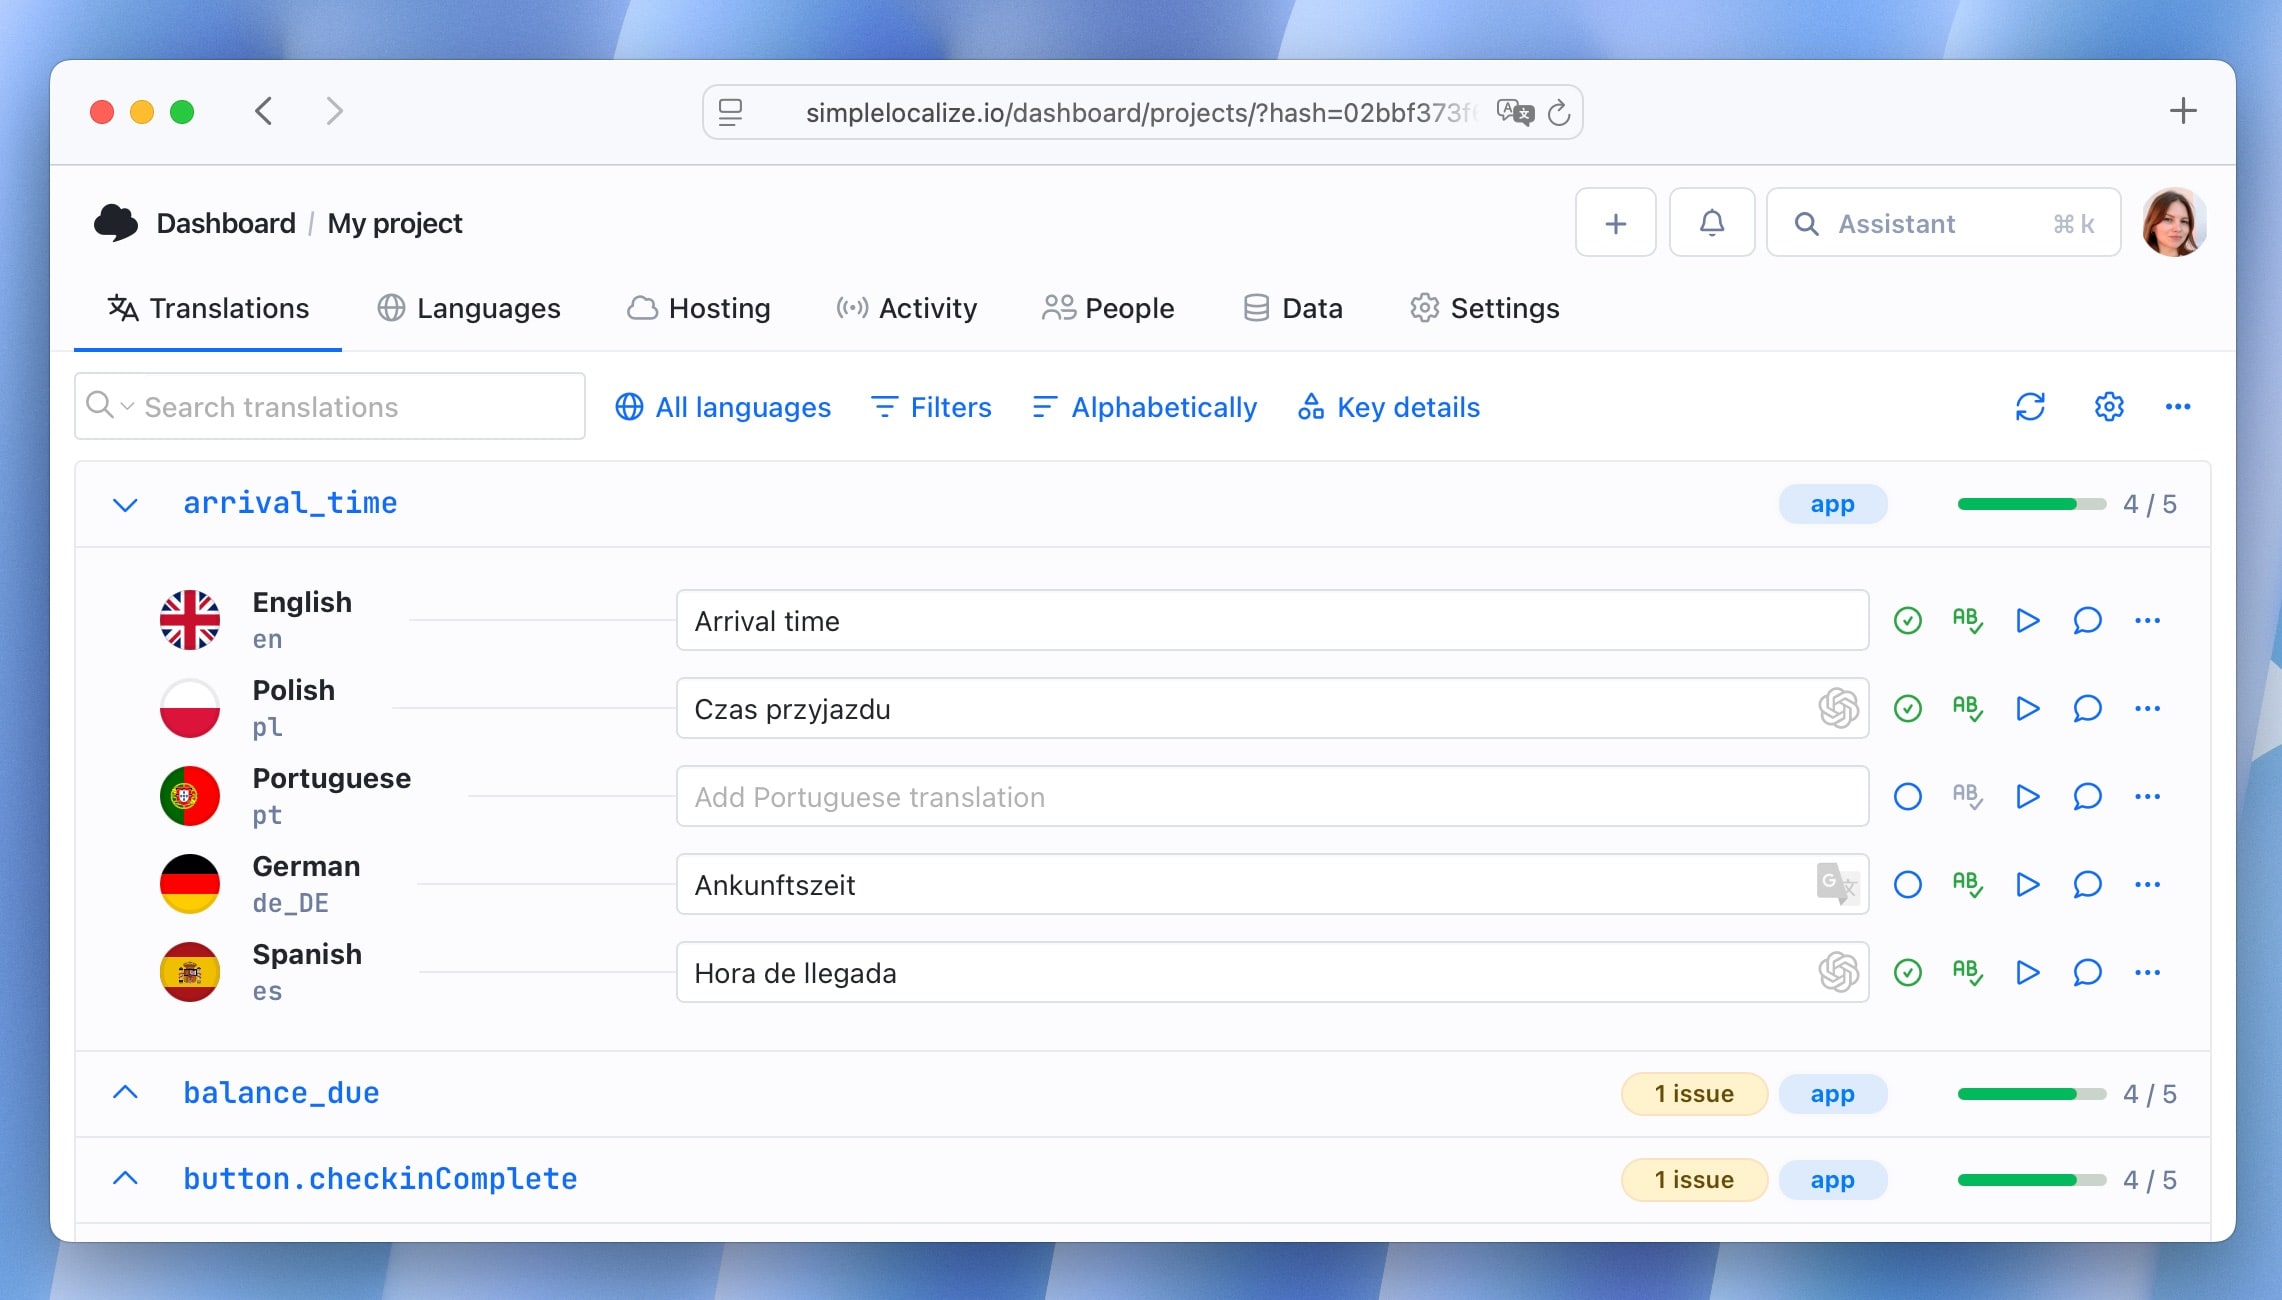
In SimpleLocalize, you can add descriptions directly in the editor or via the API. These are passed automatically to AI translation engines like DeepL and OpenAI, improving translation quality without extra work for the translator.
Learn more about context in localization.
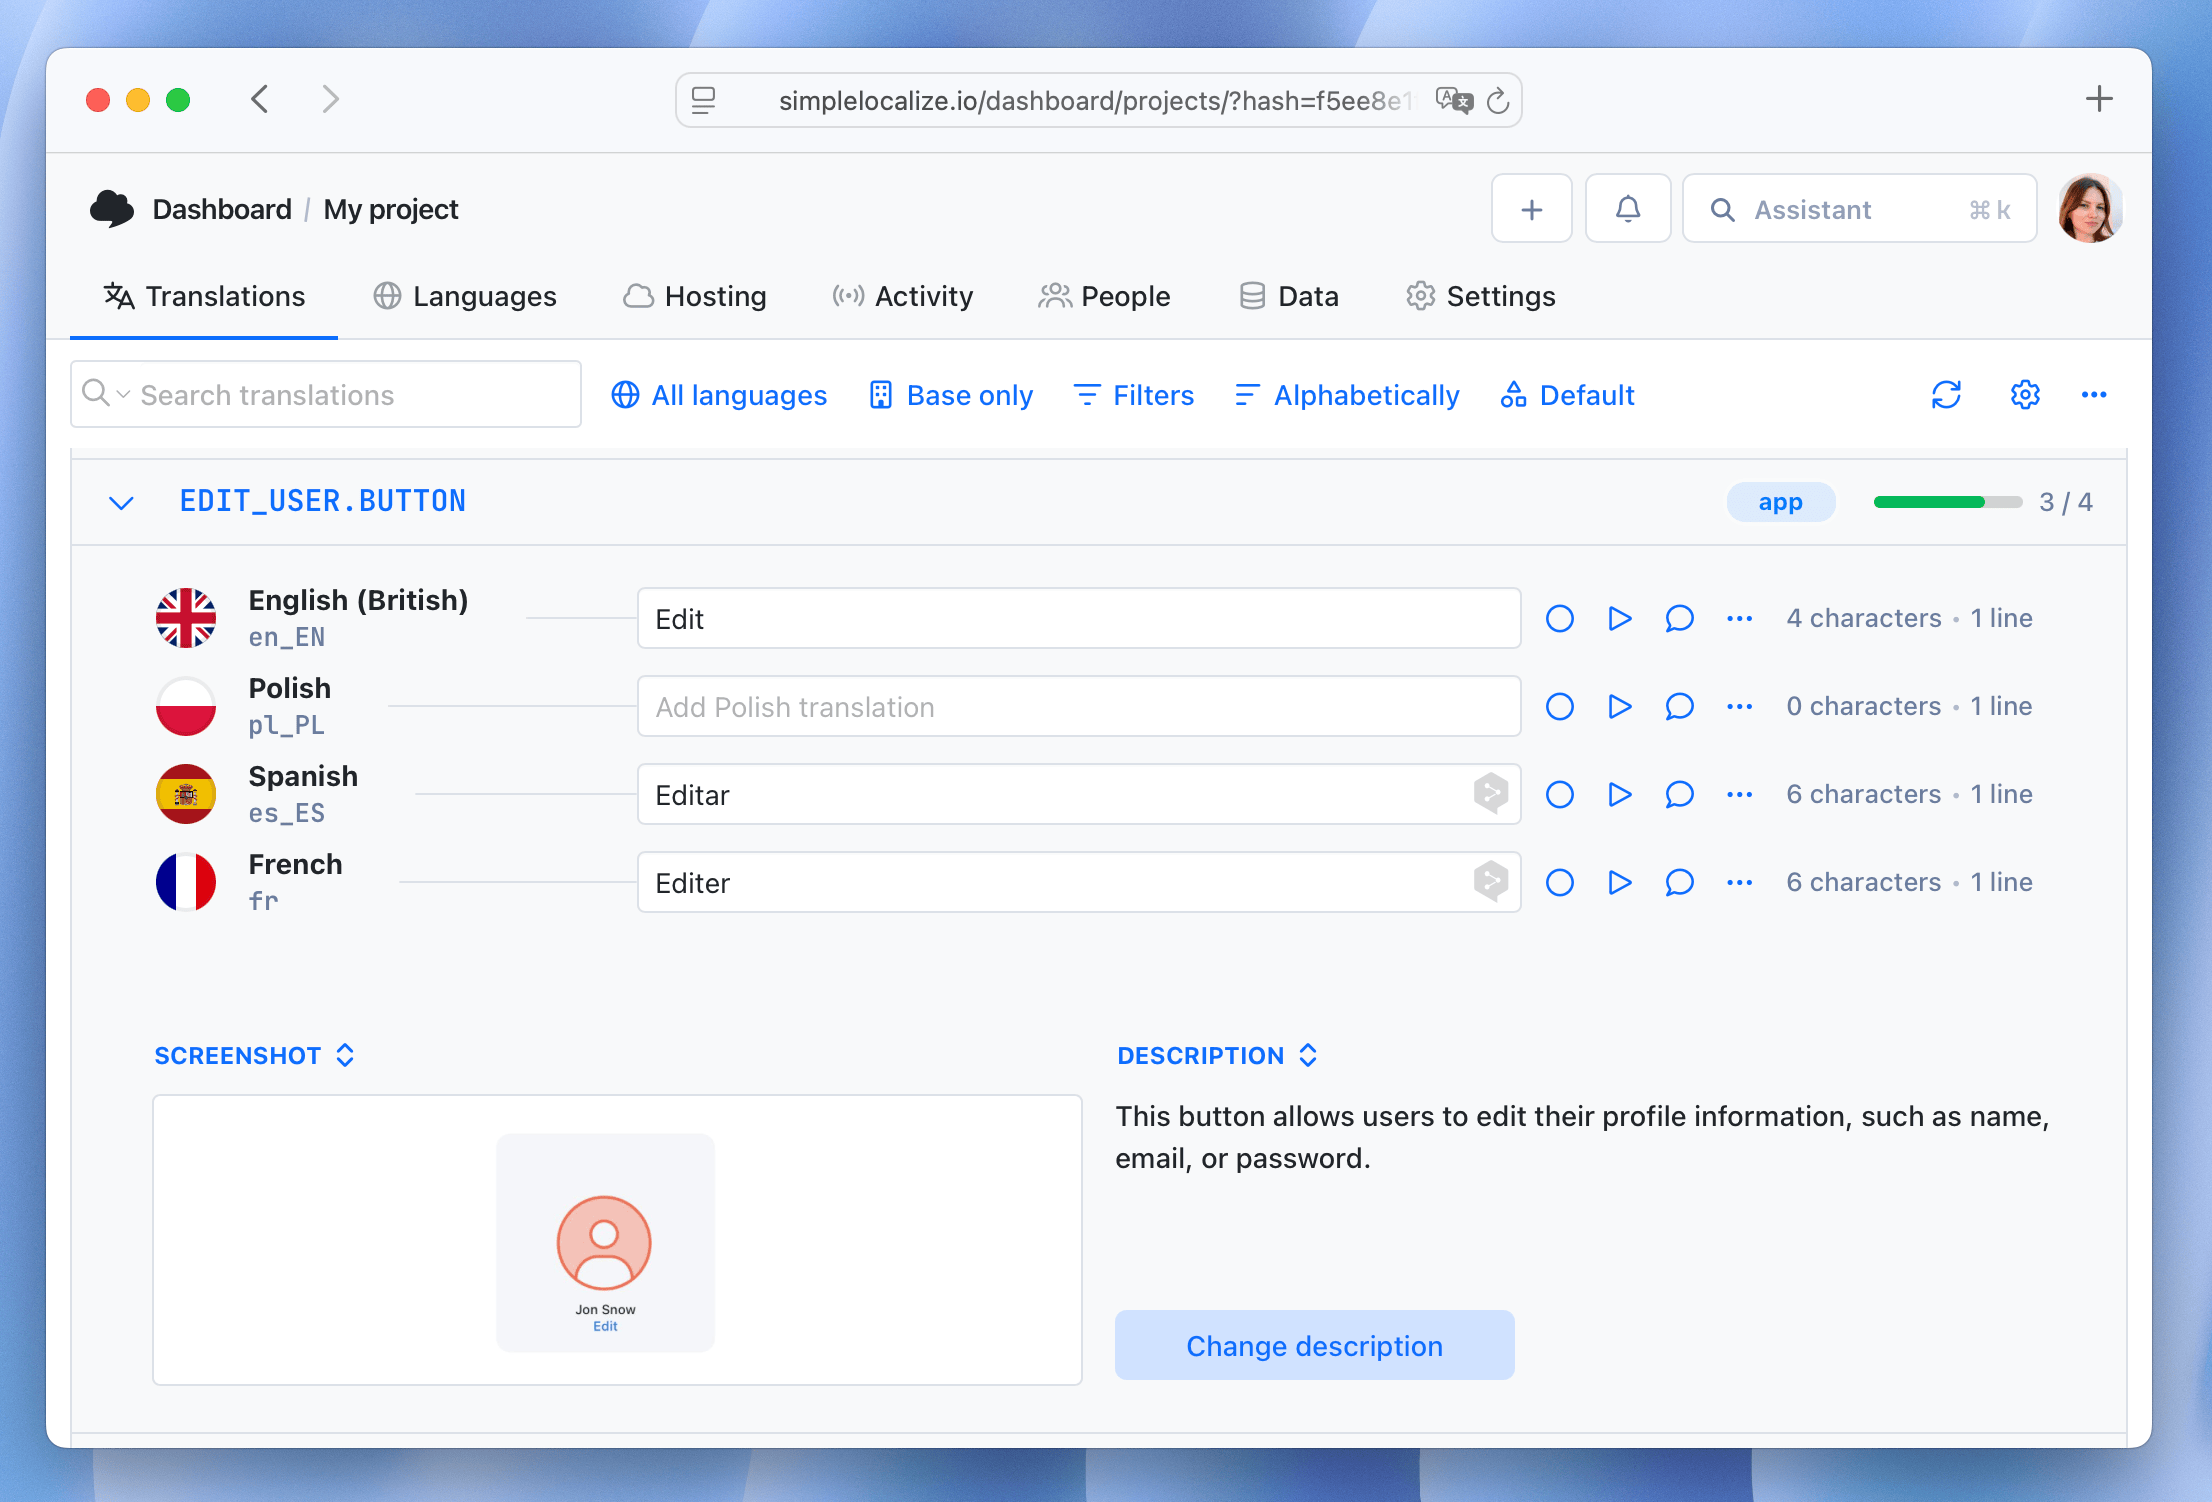
Screenshots or UI references
Where possible, attach a screenshot or Figma link to the key. A translator who can see that modal.save lives inside a payment confirmation modal will write very differently than one who only sees the word "Save."
The SimpleLocalize Figma plugin makes attaching design context significantly easier, you can extract strings and attach their visual context in one step.
Character limits
If a string appears inside a button, a table cell, or a mobile notification, it has a maximum length. Define it before translation, not after:
nav.home → max 12 characters
push.notification.title → max 65 characters
button.checkout → max 20 characters
Without character limits, translators produce correct copy that breaks your layout. French and German text frequently runs 30-40% longer than English equivalents. Defining limits upfront eliminates a full round of revisions.
Step 3: Define tone and formality per language
The same sentence can be translated formally or informally depending on the language and your brand. This matters most in languages that grammatically encode formality:
- German: "du" (informal) vs "Sie" (formal). Tech startups targeting Germany typically use "du". Enterprise tools use "Sie". Mixing them in the same product looks unprofessional.
- French: "tu" vs "vous". Same dynamic.
- Japanese: Multiple formality registers that change vocabulary, not just pronouns.
- Spanish: "tú" vs "usted", plus regional vocabulary differences between Latin America and Spain.
Before each language goes out, confirm:
- Which formality register applies
- Any regional variant decisions (es-MX vs es-ES, pt-BR vs pt-PT)
- Product-specific terminology preferences (see Step 4)
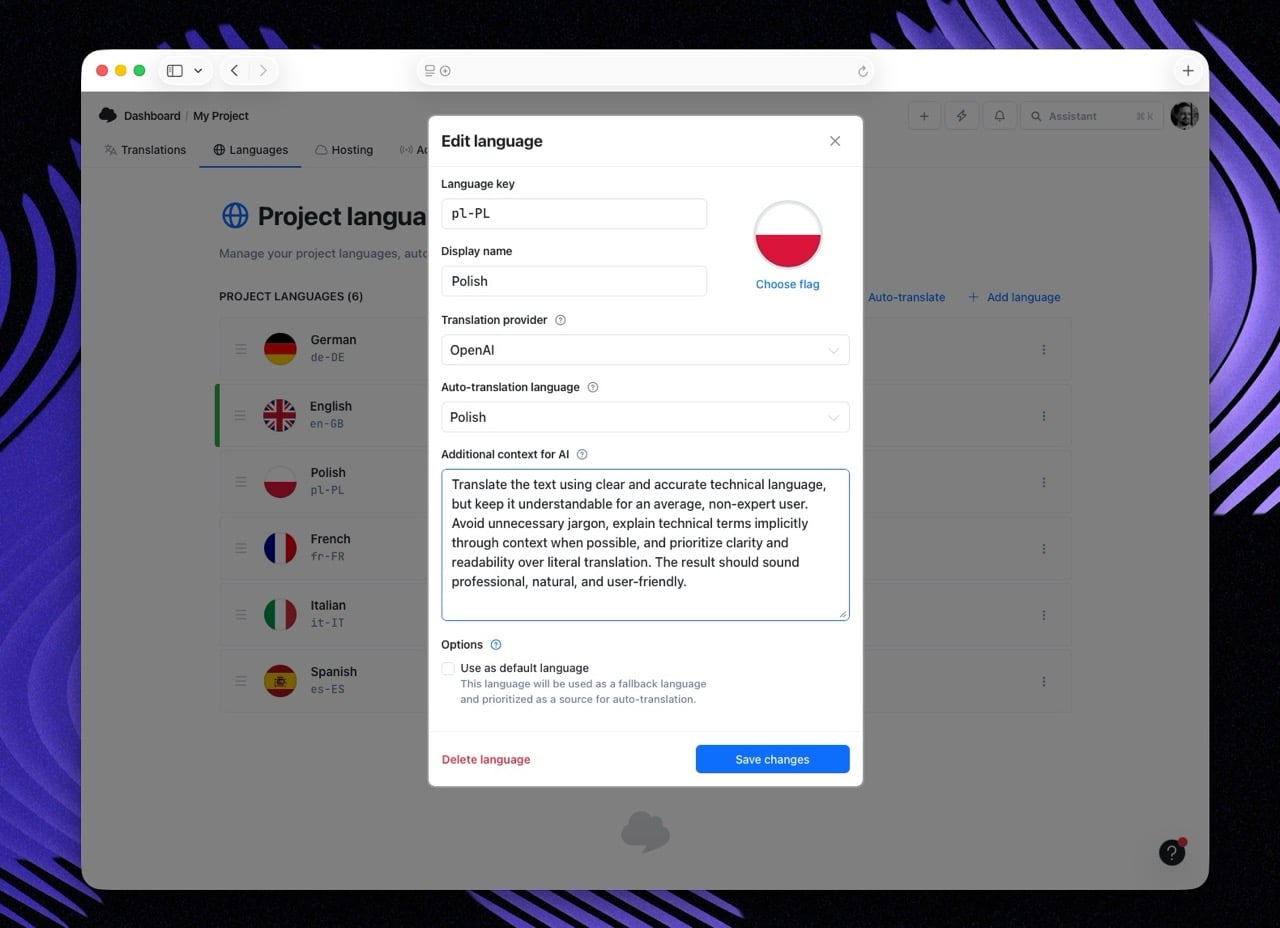
If you're using AI translation, specify tone and formality at the project level once so it's applied automatically. In SimpleLocalize, you can also apply it as a language context override for specific languages:
Step 4: Check your glossary and terminology
If your product has established terminology, features with specific names, industry jargon, brand language, define it before translation starts.
Build (or review) your glossary
A localization glossary maps source terms to their approved translations:
| English | German | French | Notes |
|---|---|---|---|
| Workspace | Arbeitsbereich | Espace de travail | Never translate as "Büro" |
| Namespace | Namespace | Namespace | Do not translate, keep in English |
| Translation key | Übersetzungsschlüssel | Clé de traduction | Consistent with docs |
Without a glossary, different translators or AI runs will translate the same term differently across your product. Users notice inconsistency faster than they notice imperfect grammar.
In SimpleLocalize, glossaries integrate directly with DeepL via DeepL Glossary support, so approved terms are enforced automatically during machine translation.
Flag terminology changes
If a feature was renamed since the last translation cycle, add a note or add a task to the affected keys. Translators and MT systems will translate what they receive, they don't know that "Workspaces" is now "Projects" unless you tell them.
Step 5: Confirm file format and delivery method
Before starting, align on exactly how translations will be delivered and imported.
Verify the file format matches your codebase
Check that your exported files match what your i18n library expects. Common mismatches:
- Nested vs flat JSON (
settings.billing.titlevssettings_billing_title) - XLIFF version (1.2 vs 2.0) for enterprise handoffs
- Encoding (UTF-8 without BOM is standard; Windows tools occasionally add BOM)
- Plural key format (ICU vs i18next format for plural rules)
If you're using the SimpleLocalize CLI, format configuration lives in simplelocalize.yml and is applied consistently on every push and pull. But confirm it's still correct when adding a new language or changing your i18n library.
Confirm import behavior for existing translations
If translators are updating an existing file, what happens to:
- Keys that already have approved translations?
- Keys that were manually edited since the last AI run?
Decide this before the run, not after. In SimpleLocalize, review statuses let you mark approved translations as locked so AI or bulk operations don't overwrite them.
Step 6: Run a delta check. Translate only what changed
Re-translating your entire file on every cycle wastes time and money, and introduces risk. Correct, approved translations can "drift" when re-processed by a language model.
Before triggering any auto-translation:
- Identify new keys (added since last cycle)
- Identify changed source strings (English value modified)
- Identify keys with empty or missing translations for the target languages
Only these should go to translation. Everything else should stay locked.
SimpleLocalize handles this automatically via smart caching, the system identifies the delta and only processes new or changed strings. But if you're working with manual files or external translators, build a diff step into your workflow:
git diff HEAD~1 -- locales/en/translation.json
This shows exactly what changed in the source file since the last release. Send only these changes to translation.
Step 7: Define review and approval requirements
Not all translations need the same review depth. Define this upfront:
| Content type | Translation method | Review required? |
|---|---|---|
| Core UI labels | AI (DeepL/OpenAI) | Light QA check |
| Error messages | AI | Light QA check |
| Legal / compliance | Human translator | Full legal review |
| Marketing copy | Human or AI + human | Brand review |
| Onboarding flows | AI + human | UX review |
| Admin / internal | AI | No review |
Setting this upfront means your QA effort is proportional to the risk. Reviewing every AI-generated button label with a professional translator is expensive overkill. Shipping legal terms without review is a liability.
Use review statuses in SimpleLocalize to track which keys are auto-translated, under review, and approved, and set up automations to move keys through the workflow automatically.
Step 8: Check pluralization and special formatting
Before strings go to translation, make sure they're structured to support translation correctly.
Pluralization
If a string contains a count, it must use ICU plural format, not a hardcoded English assumption:
Wrong:
{
  "files_selected": "{{count}} files selected"
}
This breaks for languages like Polish (4 plural forms) or Arabic (6 plural forms).
Correct (ICU format):
{
  "files_selected": "{count, plural, one {# file selected} other {# files selected}}"
}
Translators can then add the forms their language requires. If the source string isn't structured correctly, the translation will be wrong regardless of quality.
See: How to handle pluralization across languages
Interpolated variables
Make sure all placeholders are preserved correctly:
{{name}}in i18next format{name}in ICU / FormatJS format%sin printf-style strings
Translators should never translate variable names. If your TMS doesn't automatically flag variables, add a pre-translation QA check.
HTML and rich text
If translation strings contain HTML (<strong>, <a href>, <br>), confirm:
- Translators know which tags should be preserved
- Your TMS handles tag validation (SimpleLocalize's QA checks flag malformed tags automatically)
- Tags containing translatable text (like link anchors) are handled correctly
Step 9: Verify your CI/CD integration (for continuous localization teams)
If translations are managed as part of a continuous localization pipeline, confirm before each release:
-
simplelocalize.ymlpoints to the correct project and environment - Pull command fetches the correct language codes
- Missing translation behavior is defined (fallback to English, or block release?)
- CI pipeline has a completeness check before merge/deploy
- Webhook or notification is set up so the team knows when translations are ready
# Example: SimpleLocalize CLI config
projectToken: ${SIMPLELOCALIZE_PROJECT_TOKEN}
uploadPath: ./locales/en/translation.json
downloadPath: ./locales/{lang}/translation.json
downloadLanguages:
  - de
  - fr
  - ja
  - es
For missing translations in production, a clear fallback strategy matters more than you'd expect.
The full pre-translation checklist
Run through this before each translation cycle:
Strings audit
- Non-translatable strings excluded or marked
- No hardcoded strings in UI components for this release
- Duplicate keys identified and resolved
- Only delta (new/changed) strings flagged for translation
Context preparation
- Key-level descriptions added for ambiguous or short strings
- UI screenshots or Figma references attached where available
- Character limits defined for constrained fields
Tone and terminology
- Formality register confirmed per target language
- Regional variants decided (es-MX vs es-ES, pt-BR vs pt-PT, etc.)
- Glossary reviewed and updated for new or renamed features
Technical format
- File format matches i18n library expectations
- Encoding is UTF-8 (without BOM)
- Plural forms use ICU or correct library format
- Interpolated variables follow consistent syntax
- HTML tags in strings are correct and validated
Review and delivery
- Review requirements defined per content type
- Translation method selected (AI / human / hybrid) per content type
- Approved translations locked against overwrite
- CI/CD pipeline config verified for this release
Common mistakes this checklist prevents
-
"We translated the whole file again and our approved strings changed"
→ Prevented by: Step 6 (delta check) and locking approved strings before running AI
-
"The German button text doesn't fit and we need a retranslation"
→ Prevented by: Step 2 (character limits)
-
"Our feature is called 'Projects' in English but 'Workspaces' in French because the translator used an old file"
→ Prevented by: Step 4 (glossary review)
-
"The translator translated our variable name
{{user_name}}as{{Benutzername}}"→ Prevented by: Step 8 (placeholder validation)
-
"We shipped the release but translations weren't ready, English showed for 40% of German users"
→ Prevented by: Step 9 (CI completeness check)
How this fits your localization workflow
The pre-translation checklist runs at the preparation stage of each translation cycle, after development, before handoff.
A complete localization workflow looks like this:
- Development: i18n-aware code, externalized strings
- Pre-translation preparation ← this checklist
- Translation: AI, human, or hybrid
- Review and QA: completeness check, visual review
- Release: publish via CDN or file export
Most localization problems are discovered in stage 4 or 5. This checklist moves them to stage 2, where they're cheap to fix.
Related resources
- Localization Readiness Checklist: strategic readiness before going global
- Continuous Localization Guide: automating the full pipeline
- Step-by-step Localization Workflow for Developers: CLI and CI/CD setup
- How to Handle Pluralization Across Languages: ICU format guide
- How to control translation quality with QA checks: automated validation in SimpleLocalize
- ChatGPT and DeepL translation context: why context improves AI translation quality


 & Software localization")

")
