What is a localization workflow? A practical guide for software teams

Every software team eventually hits the same wall: translations are missing, strings are outdated, someone is manually copying files between tools, and the release is blocked.
That's not a translation problem. It's a workflow problem.
A localization workflow is how your team moves translated content from your source code to your users, reliably and repeatedly. The workflow you choose shapes how fast you can ship and how much pain you absorb along the way. This applies to solo developers adding a second language and SaaS teams supporting twenty locales alike.
This guide explains what a localization workflow is, what stages it involves, what patterns exist, and how to pick the right one for your team.
What is a localization workflow?
A localization workflow is the repeatable process your team uses to:
- Identify content that needs to be translated
- Get that content translated (by humans, AI, or a combination)
- Review and validate translations
- Deliver them back to the product for release
The key word is repeatable. A one-time translation job is not a workflow. A workflow is what happens every time you ship a new feature, add a string, fix a typo, or expand into a new market.
Localization workflows exist at the intersection of three concerns:
- Development: how strings are extracted and managed in code
- Translation: how content gets translated and reviewed
- Delivery: how translated files get back into the app and reach users
Getting all three aligned is what makes a localization workflow work.
Related: Step-by-step localization workflow for developers | Continuous localization: What it is, why it matters, and how to implement it
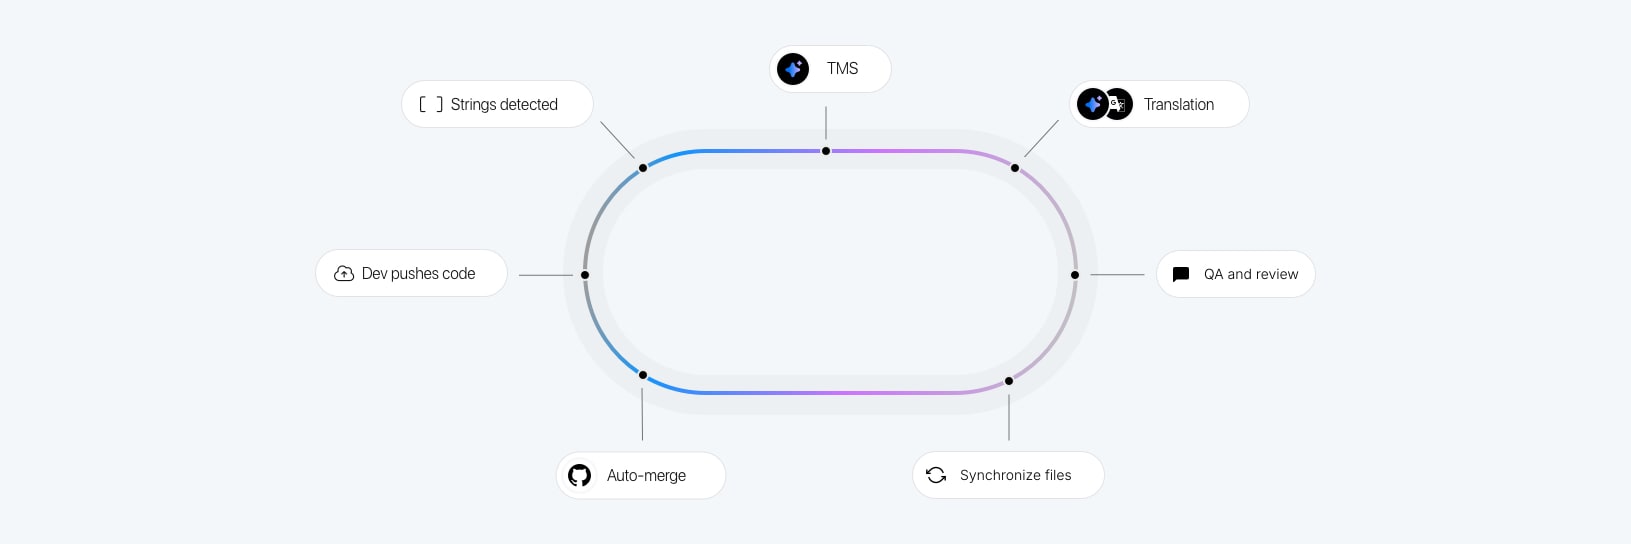
The core stages of a localization workflow
Most localization workflows share the same fundamental stages, even if the tooling and automation level varies:
1. String extraction
New user-facing text is written in source code. The first step is identifying and extracting these strings so they can be translated. This can be done manually, using CLI tools like FormatJS, or automatically through AI-powered extraction tools.
Common problem here: strings get written in code but never extracted — or extracted inconsistently — leaving gaps that surface later as missing translations.
2. Upload to translation management
Extracted strings are sent to a central location, usually a Translation Management System (TMS), where they can be managed, assigned, and tracked across languages.
Without a central TMS, teams often work across scattered spreadsheets, email threads, or shared folders, which becomes chaotic at scale.
Related: How to get started with a Translation Management System (TMS)
3. Translation
The actual translation step. This can be:
- Human translation: professional translators or internal bilingual team members
- Machine translation (MT): services like DeepL or Google Translate
- AI translation: LLMs like OpenAI's GPT models, with context-aware results
- Hybrid: machine-translated draft + human review
The right mix depends on your content type, quality requirements, and budget.
4. Review and QA
Not all translation workflows include a review step, but they should, especially for anything customer-facing. Review can range from a quick human scan to systematic QA checks for missing placeholders, formatting issues, or terminology inconsistencies.
Related: What is localization QA? Definition, benefits & best practices
5. Download and delivery
Once translations are ready, they need to get back into the app. This might mean downloading updated files, committing them to a repository, or serving them dynamically from a CDN.
How this step works — and how automated it is — has a major effect on how quickly localized updates reach users.
6. Maintenance
Localization is not a one-time event. New strings appear with every release, old strings change or are removed, and new languages get added. Maintenance is the ongoing work of keeping everything in sync.
Teams that skip this stage end up with translation debt: outdated strings, orphaned keys, and inconsistent terminology that compounds over time.
Related: How to find and delete unused translation keys | How to keep translations up to date with every release?
Manual vs automated localization workflows
Workflows fall on a spectrum from fully manual to fully automated.
| Approach | How it works | Best for |
|---|---|---|
| Fully manual | Strings extracted by hand, files sent by email or shared drive | Very early stage, 1-2 languages |
| Spreadsheet-based | Translation managed in Excel or CSV, synced manually | Solo devs, simple projects |
| TMS-based | Central platform for managing strings, assignments, and downloads | Growing SaaS, multiple languages |
| CLI-integrated | CLI tools sync files between code and TMS on demand | Developer-led teams |
| CI/CD-integrated | Translation sync runs automatically on every push or merge | Mature product teams |
| Fully automated | Strings extracted, translated, and published without human steps | High-velocity teams, validated content |
There's no universally correct answer. A solo developer validating a new market doesn't need a CI/CD pipeline for translations. A SaaS team shipping in 15 languages every two weeks can't afford manual file management.
Related: The complete guide to managing translation projects with Excel | How to manage translations in CSV files: Best practices, examples & workflow
Common localization workflow patterns
Here are the most common workflow patterns software teams use in practice, from simple to sophisticated.
Pattern 1: Manual TMS workflow
The simplest structured workflow. Strings are extracted and uploaded to a TMS manually. Translators work in the editor. Files are downloaded and committed when ready.
Flow: Extract strings → Upload to TMS → Translate in editor → Download → Commit to repo → Deploy
Best for: Small teams adding their first 2–3 languages, infrequent releases.
Trade-off: Every step requires a human trigger. Works fine at low volume but becomes a bottleneck as release frequency increases.
Pattern 2: CLI-driven workflow
The developer triggers translation sync through CLI commands, typically as part of a pre-release checklist. This gives more control than a fully automated pipeline while still reducing manual file handling.
Flow: Push new strings with CLI → Translate (manually or via auto-translate command) → Pull updated files with CLI → Commit → Deploy

Best for: Developer-led teams who want reproducible, scriptable workflows without full CI/CD integration.
Trade-off: Still requires someone to remember to run the sync. Easy to skip under deadline pressure.
Pattern 3: GitHub App workflow
SimpleLocalize's GitHub App integration connects your repository directly to your translation project. When you push to a configured branch, source strings are automatically uploaded. When translations are updated, a pull request is created with the new files ready for review and merge.
Flow: Push to main → GitHub App uploads new strings → Translators/AI translate in SimpleLocalize → SimpleLocalize opens a PR with updated translation files → Review and merge → Deploy
Best for: GitHub-native teams who want the benefits of CI/CD-style automation without writing custom pipeline scripts.
Trade-off: Less flexible than a custom CLI pipeline for complex, multi-repo setups. Currently covers the most common cases; custom edge cases may still need the CLI.
A minimal configuration looks like this:
upload:
  files:
    - path: "src/locales/en.json"
      format: "single-language-json"
      language-key: "en"
      options:
        - REPLACE_TRANSLATION_IF_FOUND

download:
  files:
    - path: "src/locales/{lang}.json"
      format: "single-language-json"
You add this simplelocalize-github.yml file to your repository root, install the GitHub App, and the workflow runs automatically on every push.
Pattern 4: CI/CD pipeline workflow
Localization sync steps are embedded in your CI/CD pipeline (GitHub Actions, GitLab CI, Bitbucket, etc.), running automatically on push. This ensures translations are always in sync with your source code without manual intervention.
Flow: Push code → CI extracts strings → CI uploads to SimpleLocalize → AI translation runs → CI downloads translations → Build and deploy
Best for: Teams with established CI/CD practices who want localization treated as just another build step.
Trade-off: Requires upfront pipeline setup. Review may be skipped if fully automated, so content quality needs to be monitored.
Pattern 5: Fully automated AI workflow
The most hands-off approach. SimpleLocalize automations detect new strings and trigger AI translation automatically. Combined with Translation Hosting, the app can serve updated translations without a redeploy.
Flow: Push new strings → SimpleLocalize detects changes → AI translation triggered automatically → Translations published to CDN → App receives updates without redeployment
Best for: Teams prioritizing speed over perfect accuracy, or those who have validated that AI translation quality is sufficient for their content and audience.
Trade-off: Translations go live without human review. Works well for product UI copy; riskier for marketing or regulated content.
For a deeper look at each of these patterns with code examples and diagrams, see our guide on AI-powered localization workflows for software translation.
What makes a localization workflow "good"?
The best localization workflow for your team has four properties:
1. It runs without heroics. No single person should need to remember to trigger it, and missing a step shouldn't cascade into a broken release.
2. It has a clear owner. Who uploads strings? Who triggers translation? Who reviews before merge? Unanswered ownership questions are where workflows silently break.
3. It scales with your release cadence. A workflow that works for monthly releases will break under weekly or daily deploys. Build for where you're going, not just where you are today.
4. It has a review gate that matches your quality bar. Full automation is fast, but review matters for customer-facing content. Know which strings need human eyes and which don't.
How your workflow choice affects localization ROI
Workflow efficiency has a direct impact on localization cost and ROI. Manual workflows have lower upfront setup cost but higher per-release labor cost. Automated pipelines have higher setup investment but dramatically lower ongoing cost per language, per release.
As you add languages, the cost difference compounds. A team managing 10 languages manually may spend ten times more per release than a team with the same language footprint running an automated pipeline.
Related: Localization ROI: How to measure revenue impact (framework + examples) | Localization maturity model: 5 stages of scalable global growth for SaaS
Choosing the right workflow for your team
The right workflow depends on three factors:
Team size and structure: Solo developers and small teams need simplicity. Manual TMS workflows or CLI-driven syncs are usually sufficient. Larger teams with dedicated engineering resources benefit from CI/CD integration.
Release frequency: Monthly releases can tolerate manual workflows. Weekly or continuous deployment demands automation. If your development cycle outpaces your translation cycle, you'll ship with missing strings.
Content type and quality requirements: Product UI with short strings is well-suited to AI translation with minimal review. Marketing copy, legal text, or regulated content needs human review regardless of how strings are delivered.
A useful starting heuristic:
- 1–2 languages, infrequent releases: Manual TMS workflow is fine.
- 3–5 languages, regular releases: Move to CLI-driven or GitHub App workflow.
- 5+ languages, frequent releases: CI/CD or fully automated workflow with selective review.
If you're a solo developer or small team deciding between DIY and tooling, see our upcoming guide: How to pick a translation workflow for small teams and solo devs.
Common workflow anti-patterns to avoid
-
No central source of truth. Translations scattered across spreadsheets, email attachments, and Slack threads. No one knows which version is current. Fix: use a TMS from day one.
-
Translation step as a release blocker. The sprint is done, the feature is built, but the release is held waiting for translations. Fix: run localization in parallel with development, not after it.
-
Shipping with placeholder strings. "TODO: translate this" in production is worse than showing the source language. Fix: set up automated checks that fail the build on missing translations.
-
Manual file copying. Developers downloading ZIP files and committing them to the repo by hand. This is error-prone, slow, and doesn't scale. Fix: use CLI, GitHub App, or API-based sync.
-
No QA step for any content. AI and MT are good but not perfect. A completely unreviewed translation pipeline will eventually ship something embarrassing or wrong. Fix: add QA checks for at least high-visibility strings.
Related: 11 common localization mistakes (and how to avoid them) | 15 tips to make your localization workflow more productive
Summary
A localization workflow is the repeatable process that moves translations from code to users. It covers string extraction, upload, translation, review, delivery, and maintenance.
The right workflow depends on your team size, release cadence, and quality requirements. Most teams start simple and graduate to more automated approaches as they add languages and increase release frequency.
The highest-leverage improvement most teams can make is replacing ad-hoc manual steps with a repeatable, tooling-supported workflow — even a basic one. Predictability beats optimization at every stage of localization maturity.
Related:
Localization strategy for SaaS: The complete guide for product & dev teams
Continuous localization: What it is, why it matters, and how to implement it
Step-by-step localization workflow for developers
How to pick a translation workflow for small teams


")

