How to auto-translate JSON files for app localization (2026 guide)
JSON is the de facto standard for storing translation strings in modern web and mobile apps. React with i18next, Next.js, Vue i18n, Angular, they all use JSON translation files by default. When your app supports one language, managing a few JSON files is easy. When it supports ten, it becomes a serious maintenance problem.
This guide covers how to auto-translate JSON files effectively: manually for small projects, with CLI tools for teams that want automation, and with a full CI/CD pipeline for products where translation is part of every release. It also covers the mistakes that cause JSON translation workflows to break at scale, which is why many teams end up re-solving this problem every year.
If you are earlier in the process and haven't yet set up i18n in your codebase, start with our complete technical guide to internationalization and software localization first.
Check also our quick video guide about auto-translating JSON files:
Why JSON translation files become hard to manage
The appeal of JSON for localization is obvious: every developer already knows it, no special tooling is required to get started, and it integrates directly with every major i18n library. For a project with one or two languages, a folder of JSON files is a perfectly reasonable approach.
The problems start around the time you add a third or fourth language:
- Key drift: a developer adds a new key to
en.json, butde.json,fr.json, andes.jsonnever get updated. The app silently falls back to English for those strings, and nobody notices until a user in Germany files a support ticket. - Structure mismatches: nested JSON files can diverge between locales, causing parse errors or missing translations in unexpected places.
- Context loss: a key named
titleorbutton_okgives a human translator nothing to work with. Without context, translations are guesses. - Re-translation waste: many teams periodically dump their entire JSON file into ChatGPT or DeepL and translate everything, including strings that haven't changed. This is slow, expensive, and introduces "translation drift": previously correct translations silently changing between runs.
- No review process: auto-translated strings go straight to production with no human check, and errors only surface when real users encounter them.
Understanding these failure modes is more useful than any specific tool recommendation, because they determine what kind of workflow you actually need.
JSON translation file formats: What you are working with
Before automating anything, it helps to know which JSON format your project uses, since different i18n libraries expect different structures.
Flat JSON
The simplest format: a single object with string keys and string values. Used by many lightweight i18n setups.
{
  "welcome_message": "Welcome to our app!",
  "login_button": "Log in",
  "logout_button": "Log out"
}
Check format details: Single-language JSON, SimpleLocalize JSON
Nested JSON (most common)
Keys are organized into namespaces using nested objects. Used by i18next, next-i18next, and most React localization libraries.
{
  "auth": {
    "login": "Log in",
    "logout": "Log out",
    "signup": "Sign up"
  },
  "dashboard": {
    "title": "Dashboard",
    "welcome": "Welcome back, {{name}}!"
  }
}
ICU message format in JSON
Used by FormatJS / react-intl. Values contain ICU syntax for plurals, gender, and interpolation. The structure is flat or nested JSON, but the values are more complex.
{
  "items_in_cart": "{count, plural, one {You have # item in your cart} other {You have # items in your cart}}",
  "greeting": "Hello, {name}!"
}
When auto-translating ICU messages, preserving the ICU syntax inside the values
is critical. A translation engine that treats {count, plural, one {...} other {...}}
as literal text to translate will break your pluralization entirely. See our guide on
ICU message format for details on how to handle this correctly.
Multi-language JSON
All locales in a single file, keyed by locale code. Less common in large projects but used in some setups.
{
  "en": {
    "welcome": "Welcome"
  },
  "de": {
    "welcome": "Willkommen"
  }
}
Knowing your format matters because different tools handle these differently, and some auto-translation approaches only work with specific structures.
Check format details: Multi-language JSON
How to auto-translate JSON files: Four approaches
Approach 1: Script-based translation (small projects, full control)
For solo developers or very small projects, a script that calls a translation API directly gives you complete control with minimal dependencies.
A basic Node.js script using the DeepL API:
import fs from "fs";
import Anthropic from "@anthropic-ai/sdk"; // or DeepL, OpenAI, etc.

const source = JSON.parse(fs.readFileSync("en.json", "utf8"));

async function translateValues(obj, targetLocale) {
  const result = {};
  for (const [key, value] of Object.entries(obj)) {
    if (typeof value === "object") {
      result[key] = await translateValues(value, targetLocale);
    } else {
      // Call your translation API here
      result[key] = await translateString(value, targetLocale);
    }
  }
  return result;
}

const translated = await translateValues(source, "de");
fs.writeFileSync("de.json", JSON.stringify(translated, null, 2));
What this handles well: straightforward flat or nested JSON with simple string values.
What it does not handle well: ICU message format (the API will translate the syntax, not just the text), placeholders like {{name}} (may get
translated), and detecting which keys already exist versus which are new (requires additional logic).
When to use it: prototypes, internal tools, single-developer projects where you can review every output before it ships.
Approach 2: CLI-based translation with a TMS
For teams that want automation without building infrastructure from scratch, a translation management system (TMS) with a CLI tool handles the file format complexity and key syncing for you.
With SimpleLocalize CLI, the workflow looks like this:
# Install the CLI
npm install @simplelocalize/cli

# Push your source JSON to SimpleLocalize
simplelocalize upload \
  --apiKey YOUR_API_KEY \
  --uploadPath "locales/en.json" \
  --uploadFormat single-language-json

# Auto-translate missing keys for all languages
simplelocalize auto-translate --apiKey YOUR_API_KEY

# Pull translated files back
simplelocalize download \
  --apiKey YOUR_API_KEY \
  --downloadPath "locales/{lang}.json" \
  --downloadFormat single-language-json
The key difference from a script: the CLI only sends keys that are new or changed to the translation API. Keys that already have translations are not re-translated, which prevents drift and keeps costs predictable.
It also handles placeholder protection out of the box: {{name}}, {count},
and ICU message syntax are preserved rather than passed to the translation engine
as text to translate.
Approach 3: CI/CD integration (recommended for teams shipping regularly)
For products where translation is part of every release, the translation workflow should run automatically on every push. New keys get detected, translated, and synced back without any manual steps.
A GitHub Actions workflow that does this:
name: 'Localization sync'

on:
  push:
    branches: [main]

jobs:
  sync-translations:
    runs-on: ubuntu-latest
    steps:
      - uses: actions/checkout@v4

      - name: Install SimpleLocalize CLI
        run: npm install -g simplelocalize-cli

      - name: Upload source strings
        run: |
          simplelocalize upload \
            --apiKey ${{ secrets.SIMPLELOCALIZE_API_KEY }} \
            --uploadPath "locales/en.json" \
            --uploadFormat single-language-json

      - name: Auto-translate missing keys
        run: simplelocalize auto-translate --apiKey ${{ secrets.SIMPLELOCALIZE_API_KEY }}

      - name: Download translated files
        run: |
          simplelocalize download \
            --apiKey ${{ secrets.SIMPLELOCALIZE_API_KEY }} \
            --downloadPath "locales/{lang}.json" \
            --downloadFormat single-language-json

      - name: Commit updated translations
        run: |
          git config --global user.email "ci@yourapp.com"
          git config --global user.name "Translation Bot"
          git add locales/
          git diff --staged --quiet || git commit -m "chore: update translations"
          git push
This workflow triggers only when en.json changes, uploads new strings,
auto-translates them, and commits the updated locale files back. Your
developers add a key to en.json; by the time the PR is merged, translated
versions are already ready.
For a deeper look at CI/CD-based localization pipelines, see our guide on continuous localization and the step-by-step localization workflow for developers.
Approach 4: Translation editor with manual review
Fully automated translation is appropriate for some content (UI labels, error messages, navigation items) but not others (marketing copy, onboarding flows, anything with tone requirements). For content where quality matters more than speed, the right workflow is: auto-translate as a first draft, then human review.
SimpleLocalize's translation editor provides this workflow out of the box. Auto-translated strings get a "needs review" status, and translators or product writers can review and approve them before they ship. You can also add descriptions and screenshots to each key so translators have context for what they are translating.
Working with specific JSON formats
How to auto-translate flat JSON
Flat JSON is the easiest case. Upload your source file, run auto-translation, download the result. If you're using SimpleLocalize:
- Import your
en.json(choosesingle-language JSONas the format). - Go to Languages and add your target languages.
- Click Auto-translate all: missing translations are filled in.
- Export each language as its own flat JSON file.
How to auto-translate nested JSON
Nested JSON works the same way as flat JSON in SimpleLocalize: the nesting
is preserved on export. The platform stores keys as paths (e.g., auth.login, dashboard.title) and reconstructs the nested structure
when you download.
If you are rolling your own script, you will need to flatten the JSON before sending to the translation API, then reconstruct the nesting afterward.
Libraries like flat make this straightforward:
import flat from "flat";
import { unflatten } from "flat";

const nested = { auth: { login: "Log in" } };
const flattened = flat(nested); // { "auth.login": "Log in" }
// ... translate flattened values ...
const reconstructed = unflatten(translated);
How to auto-translate JSON with ICU messages
ICU message format requires careful handling. The syntax inside values
({count, plural, ...}, {name}, {0}) must survive the translation
unchanged. Only the text portions should be translated.
Most general-purpose translation APIs do not handle ICU natively. If you pass an ICU string directly to DeepL or Google Translate, the variable names and plural keywords may be translated.
The safest approach: use a TMS that understands ICU format and strips the syntax before sending to the translation engine, then re-inserts it in the translated output. SimpleLocalize handles this automatically for you. See our pluralization guide for more detail on how plural forms work across languages.
Common problems and how to fix them
Placeholders get translated
Problem: your {{name}} becomes {{nom}} in French, {{名前}} in Japanese.
Fix: use a TMS that protects placeholder syntax before sending strings to the translation engine. If using a script, extract and mask placeholders before translating, then restore them after:
function maskPlaceholders(str) {
  const placeholders = [];
  const masked = str.replace(/\{\{[^}]+\}\}/g, (match) => {
    placeholders.push(match);
    return `PLACEHOLDER_${placeholders.length - 1}`;
  });
  return { masked, placeholders };
}

function restorePlaceholders(str, placeholders) {
  return str.replace(/PLACEHOLDER_(\d+)/g, (_, i) => placeholders[i]);
}
Keys go missing between locales
Problem: en.json has 200 keys. de.json has 180. The 20 missing keys
silently fall back to English and nobody notices.
Fix: use a TMS or CLI tool that only sends new keys to the translation engine, and flags missing keys in the target locale. This way, you can catch missing translations before they go to production.
Alternatively, a simple script that compares key sets between locales catches this before deployment.
Translations drift between runs
Problem: you re-translate everything from scratch each time. A string that was reviewed and approved last month now has a different (possibly worse) translation.
Fix: treat translated strings as persistent state, not generated output. Only send new or changed keys to the translation engine. A TMS with translation memory does this automatically. If rolling your own, store a hash of the source string alongside each translation and only re-translate when the hash changes.
JSON structure is invalid after editing
Problem: a translator edits JSON files directly and introduces a syntax error, like a missing comma, an unclosed quote. The app fails to parse the file at runtime.
Fix: never have translators edit JSON files directly. Use a translation editor that stores strings in a database and exports valid JSON. If you must use raw files, add a JSON lint step to your CI pipeline that fails the build on invalid syntax.
Choosing a translation engine for JSON files
The translation engine you connect to your workflow affects both quality and cost. A few practical notes:
- DeepL produces the best output for European languages (German, French, Spanish, Dutch, Polish, etc.) and is fast. Less strong for Asian languages. Has issues with ICU message format and placeholders if not used through a TMS that handles those.
- Google Translate has the broadest language coverage and is reliable for Asian and less common languages.
- OpenAI / Claude / Gemini produce better results when context is provided (project description, tone instructions, key-level descriptions). Slower and more expensive per string than MT engines, but the quality ceiling is higher.
For most SaaS teams, a practical approach is: use DeepL or Google Translate as the default engine for UI strings and use an LLM for high-stakes content (onboarding, marketing, any user-facing copy where tone matters). See our full auto-translation comparison with examples.
Check also out our list of MT and AI translation engines.
Step-by-step: Auto-translating JSON files with SimpleLocalize
If you want to get started quickly without building a pipeline from scratch:
Step 1. Import your JSON file
Start by creating a project in SimpleLocalize and importing your existing translation files, en.json and any other locale files you have. They will serve as a base for further translations.
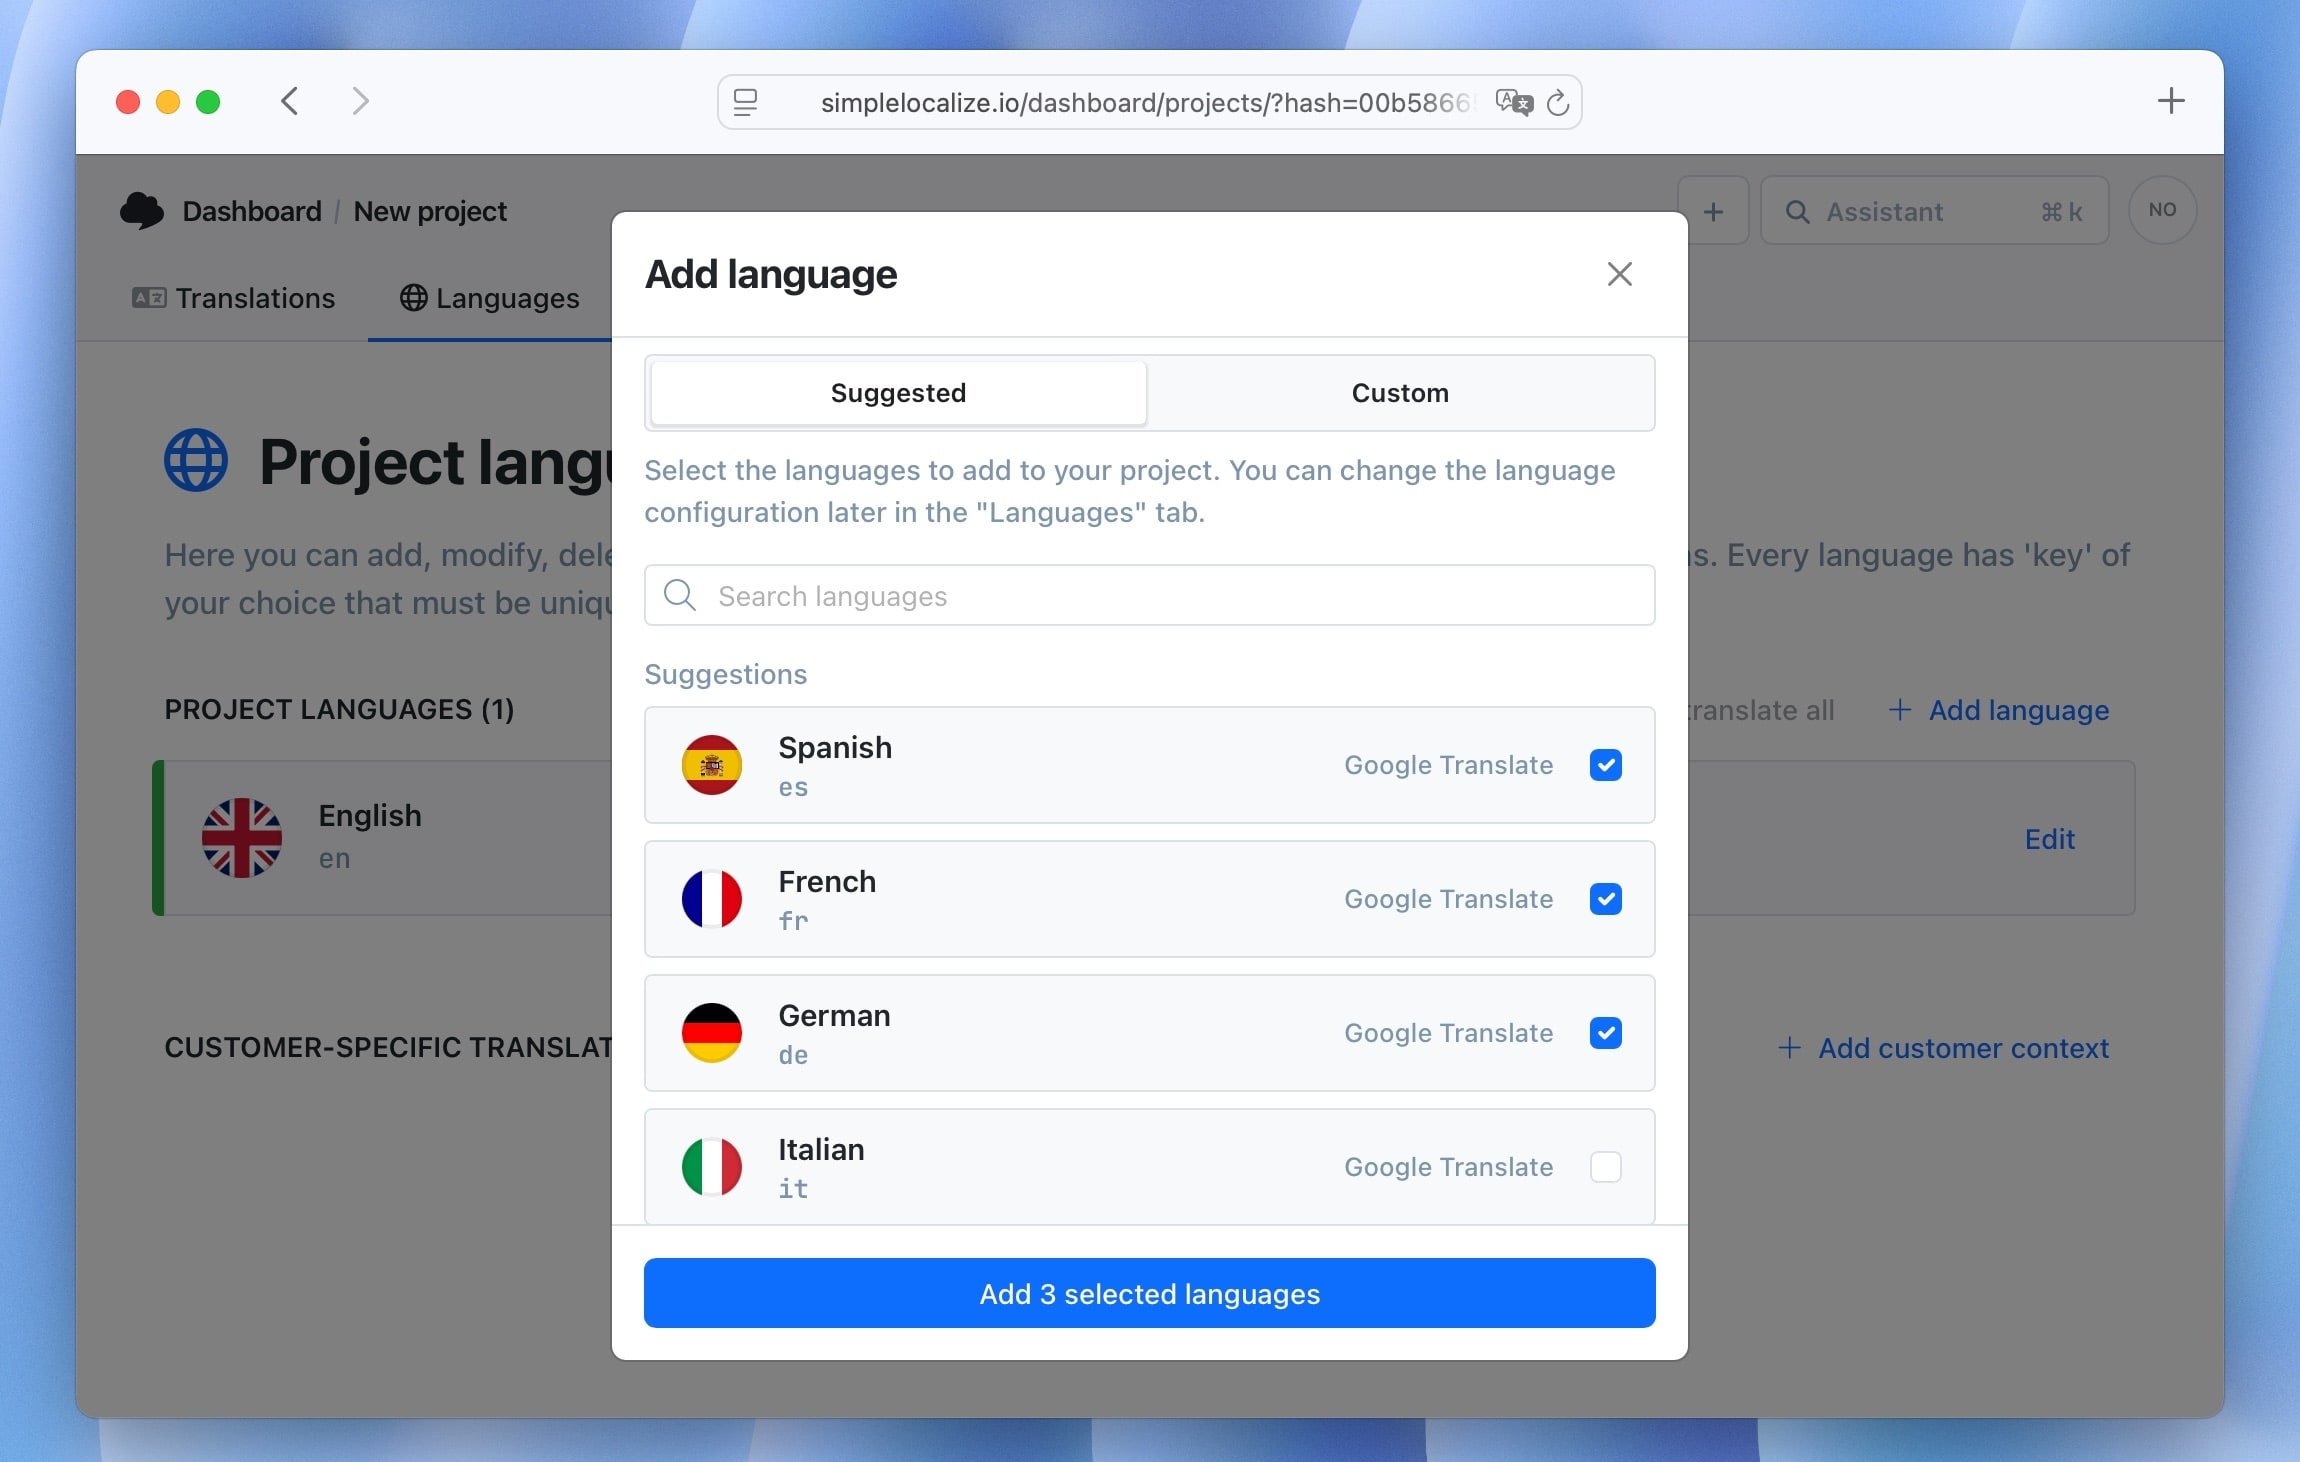
Step 2. Add target languages
Go to the Languages tab and add the languages you want to translate into. You can add as many as you need at once.
Step 3. Auto-translate
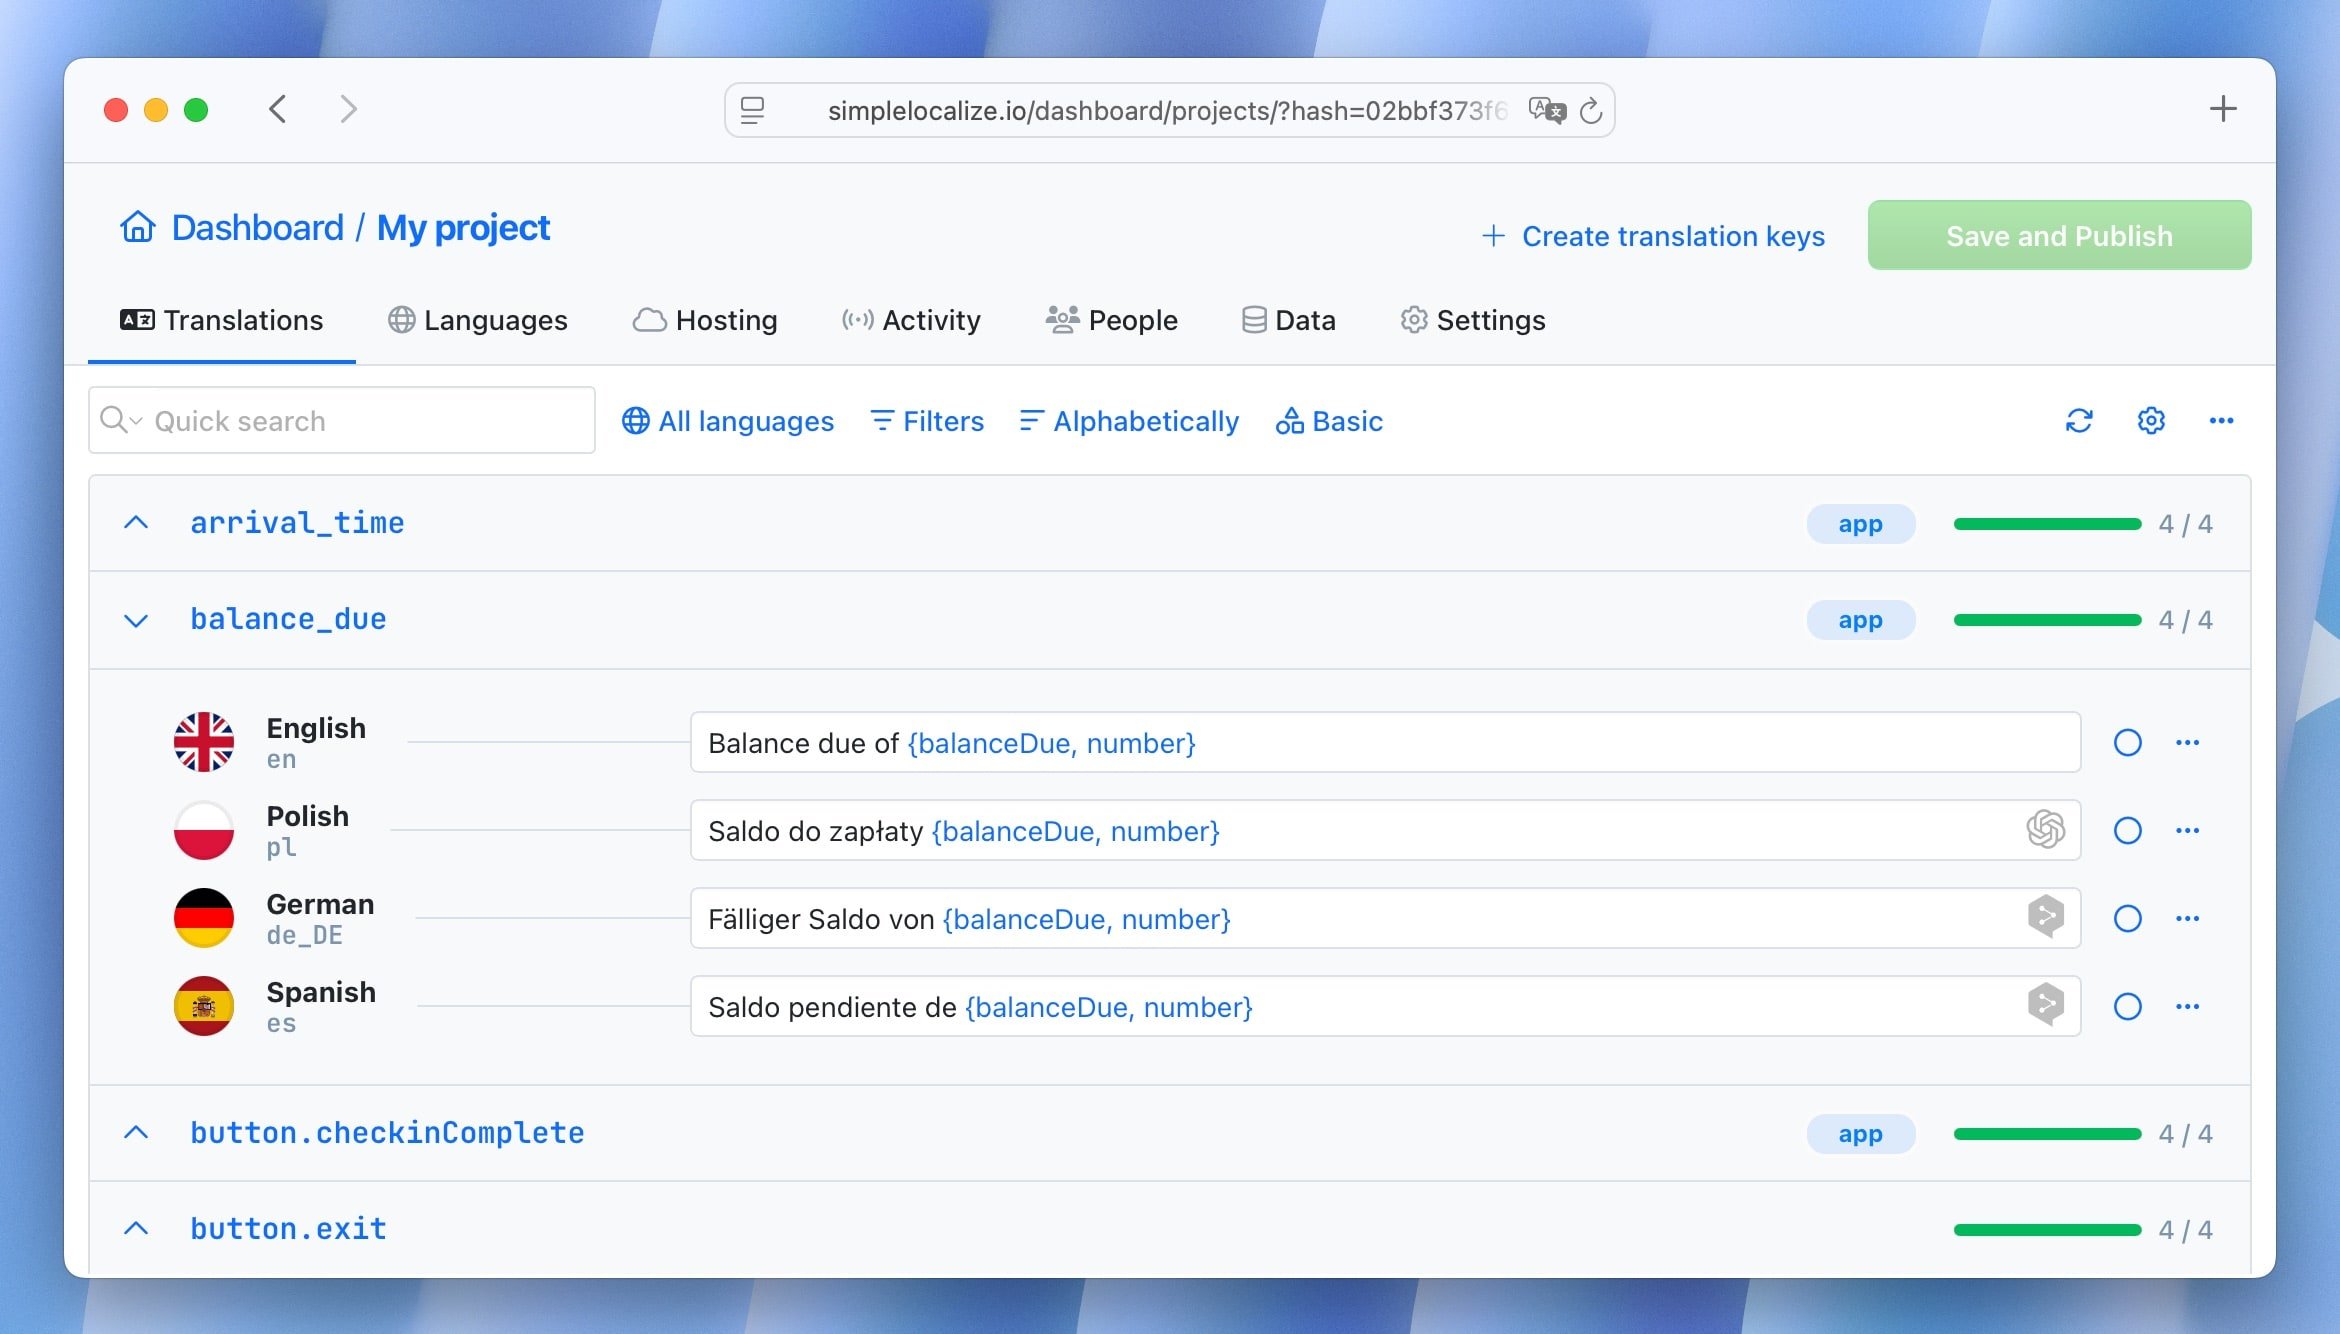
Click Auto-translate all to fill in missing translations for all languages using your chosen translation engine (DeepL, Google Translate, OpenAI, or others). Translation only runs on keys that don't already have a value, so existing translations are not touched.
Step 4. Review in the editor
Use the translation editor to review auto-generated translations, add context, and approve strings before they ship. For any key where the auto-translation is uncertain, you can flag it for human review.
Step 5. Export
Go to the Data tab and export your translations as JSON. Choose single-language JSON (one file per locale) or multi-language JSON depending on your project structure.
Once this is working, replace the manual upload and download steps with CLI commands in your CI pipeline to make the workflow continuous.
Summary
| Approach | Best for | Key limitation |
|---|---|---|
| Script + API | Solo devs, full control | You handle everything manually |
| CLI + TMS | Teams, automation | Requires TMS setup |
| CI/CD pipeline | Regular releases, scale | Initial pipeline work |
| Editor + human review | Quality-critical content | Slower, needs reviewers |
The biggest improvement most teams can make to their JSON translation workflow is not switching tools, but adding delta detection so only changed keys are translated, and adding a missing-key check so gaps never reach production silently. Everything else builds on those two things.
For broader context on how JSON translation fits into a full i18n architecture, including key naming, namespace design, fallback strategies, and deployment, see our complete technical guide to internationalization. Once your JSON files are translated, you can lazy load them with dynamic imports so only the active locale is fetched at runtime.


: The complete guide for iOS localization")
