How to create a multi-language website in GatsbyJS?
Background
In this article, I will show you how to create a multi-language landing page in GatsbyJS. I assume you already have a Gatsby project set up, and we'll start right from adding multi-language pages.
If you'd like to understand the i18n concepts and architectural patterns behind what we'll build, our complete technical guide to internationalization and software localization is a solid foundation before diving into framework specifics.
Check our template repository on GitHub.
Install dependencies
I will use FormatJS library as it's one of the most popular React library for internationalization, and it plays nice with a Gatsby plugin system.
# Npm users
npm install --save react-intl

# Yarn users
yarn add react react-intl
Create i18n configuration file
Create a i18n.js file in your src directory to keep all i18n configuration in one place.
const languages = ['en', 'pl', 'es'];
const defaultLanguage = 'en';

exports.defaultLanguage = defaultLanguage;
exports.languages = languages;
Add utility functions
Create a new file with utility functions. I named it linkUtils.js and I put this next to i18n.js file in the src directory.
import {defaultLanguage, languages} from "./i18n";

const getTranslatedPath = (pathname, to) => {
  const currentPageLanguage = getCurrentPageLanguage(pathname);

  let languagePath = '';
  const isDefaultLanguage = defaultLanguage === currentPageLanguage;
  if (!isDefaultLanguage) {
    languagePath = '/' + currentPageLanguage
  }


  let outputPath = `${languagePath}${to}`;

  const hasTrailingSlash = outputPath.endsWith("/");
  if (!hasTrailingSlash) {
    outputPath += "/";
  }

  return outputPath;
}

const getCurrentPageLanguage = (pathname) => {
  const pathElements = pathname.split("/");
  for (let element of pathElements) {
    for (let language of languages) {
      if (element === language) {
        return language;
      }
    }
  }
  return defaultLanguage;
};

export {getTranslatedPath, getCurrentPageLanguage};
getTranslatedPathFunction returns a route to a page with the same language as the current page.getCurrentPageLanguageFunction returns language from current page path.
Create custom link component
To give a user to navigate through our website and keep the page language, we need to create a custom <a/> element.
import React from "react";
import {Location} from '@reach/router';
import {getCurrentPageLanguage, getTranslatedPath} from "./linkUtils";

const LinkTranslated = ({children = [], className = "", href = "/"}) => {
  return (
    <Location>
      {locationProps => {
        const {pathname = ""} = locationProps.location;
        return <a className={className}
                  href={getTranslatedPath(pathname, href)}
                  hrefLang={getCurrentPageLanguage(pathname)}
        >
          {children}
        </a>;
      }}
    </Location>
  );
};

export default LinkTranslated;
Now we can use LinkTranslated same as a regular <a/> tag from HTML.
We can pass a href property with base link to some page, and it will be converted into a translated link.
Learn more about hrefLang attribute.
I used
Locationcomponent from@reach/router, to get access to thelocationobject.
Add a wrapper for IntlProvider
import React from "react";
import {IntlProvider} from "react-intl";

function SimpleLocalize(props) {
  const language = props.pageContext.language;
  const messages = props.pageContext.messages;
  return (
    <IntlProvider
      locale={language}
      messages={messages}>
      {props.children}
    </IntlProvider>
  );
}

export default SimpleLocalize;
The main role of this component is to simplify a usage of <IntlProvider/> on every page.
Add translations
Create a i18n-translations.json file with translations for all languages.
{
"en" : {
"welcome-on-our-website" : "Welcome on our multi-language website",
"hello-world" : "Hello World!",
"about-us" : "About us",
"learn-more-about-us" : "Learn more about us",
"homepage" : "Homepage"
},
"pl" : {
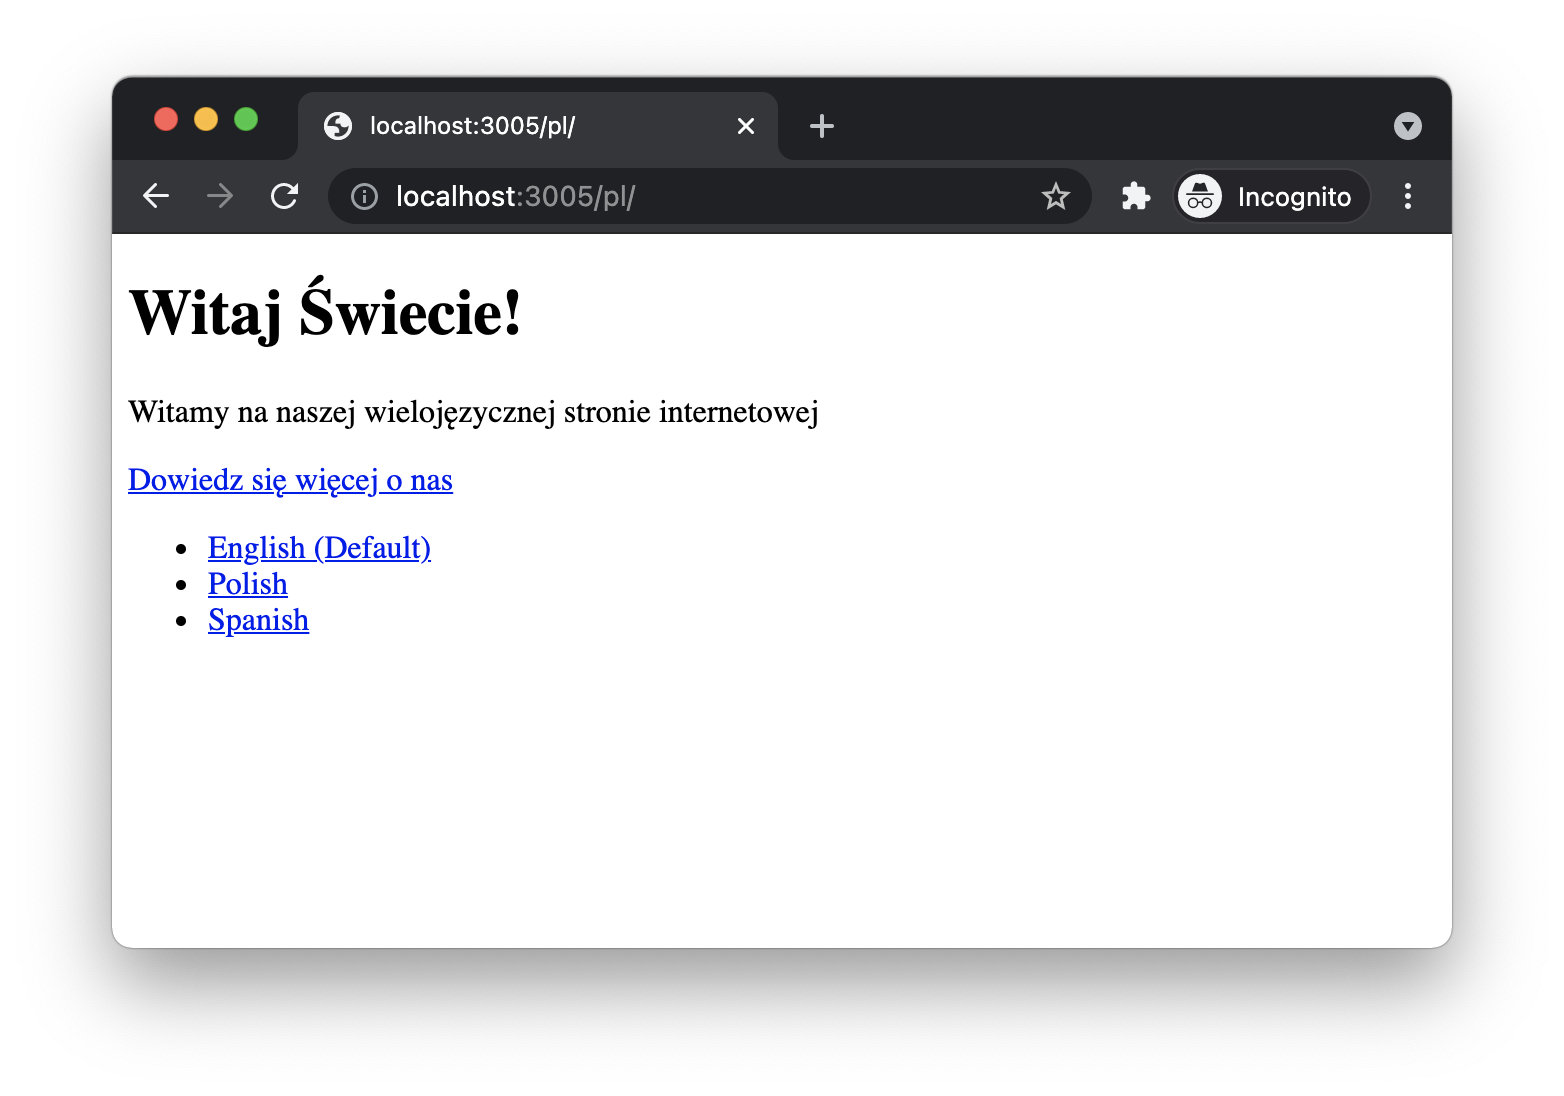
"welcome-on-our-website" : "Witamy na naszej wielojęzycznej stronie internetowej",
"hello-world" : "Witaj Świecie!",
"about-us" : "O nas",
"learn-more-about-us" : "Dowiedz się więcej o nas",
"homepage" : "Strona główna"
},
"es" : {
"welcome-on-our-website" : "Bienvenido a nuestro sitio web multilingüe",
"hello-world" : "Hola, mundo.",
"about-us" : "Sobre nosotros",
"learn-more-about-us" : "Más información sobre nosotros",
"homepage" : "Página web"
}
}
Managing a big JSON file like this might be hard and done only by a software team. This is the reason we created SimpleLocalize where you can manage JSON files like this with ease, automatically upload and download them and use OpenAI, Google Translate or DeepL to auto-translate the texts. Try it for free now
Configure multi-language page generation
Now, edit your gatsby-node.js configuration file and override onCreatePage function like below.
const messages = require("./i18n-translations.json")
const {languages, defaultLanguage} = require("./src/i18n");

exports.onCreatePage = async ({page, actions}) => {
  const {createPage, deletePage} = actions;
  return new Promise((resolve) => {
    let path = page.path;
    deletePage(page);

    for (let language of languages) {
      const isDefaultLanguage = language === defaultLanguage;
      if (!isDefaultLanguage) {
        path = '/' + language + page.path;
      }

      const pageForLanguage = Object.assign({}, page, {
        originalPath: page.path,
        path: path,
        context: {
          language,
          messages: messages[language]
        }
      });
      createPage(pageForLanguage)
    }
    resolve()
  })
};
Many things are happening here, right? Let start from the beginning.
- First of all, import
translations.jsonfile from root directory - Use
deletePageto remove default page created by Gatsby - Iterate over all
languagesfromi18n.js - Add
/{language}to path if the language is not the default one - Get translations for given
languagefrommessagesobject - Add language and messages to a page context
- Use
createPageto recreate a page with a new path and translations
Create a first multi-language page
Create index.js in /src/pages directory and paste code below:
import React from "react";
import {FormattedMessage} from "react-intl";
import LinkTranslated from "../LinkTranslated";
import SimpleLocalize from "../SimpleLocalize";

function IndexPage(props) {
  return (
    <SimpleLocalize {...props}>
      <h1>
        <FormattedMessage
          id="hello-world"
          defaultMessage="Hello World!"
        />
      </h1>

      <p>
        <FormattedMessage
          id="welcome-on-our-website"
          defaultMessage="Welcome on our multi-language website"
        />
      </p>

      <LinkTranslated
        className="btn btn-link"
        href="/about"
      >
        <FormattedMessage
          id="learn-more-about-us"
          defaultMessage="Learn more about us"
        />
      </LinkTranslated>
      <ul>
        <li><a href="/">English (Default)</a></li>
        <li><a href="/pl/">Polish</a></li>
        <li><a href="/es/">Spanish</a></li>
      </ul>

    </SimpleLocalize>
  );
}
export default IndexPage
SimpleLocalize Component will provide a <IntlProvider/> and intl object for <FormattedMessage/> components.
Create second multi-language page
Create file about.js in /src/pages directory and paste code like below:
import React from "react";
import SimpleLocalize from "../SimpleLocalize";
import {FormattedMessage} from "react-intl";
import LinkTranslated from "../LinkTranslated";

function AboutPage(props) {
  return (
    <SimpleLocalize {...props}>
      <h1>
        <FormattedMessage
          id="about-us"
          defaultMessage="About us"
        />
      </h1>

      <LinkTranslated
        className="btn btn-link"
        href="/"
      >
        <FormattedMessage
          id="homepage"
          defaultMessage="Homepage"
        />
      </LinkTranslated>
    </SimpleLocalize>
  );
}
export default AboutPage;
Result
Now, start your project with npm run develop and you should see
Full code can be found on GitHub: github.com/simplelocalize/multi-language-gatsby-example
Message extraction
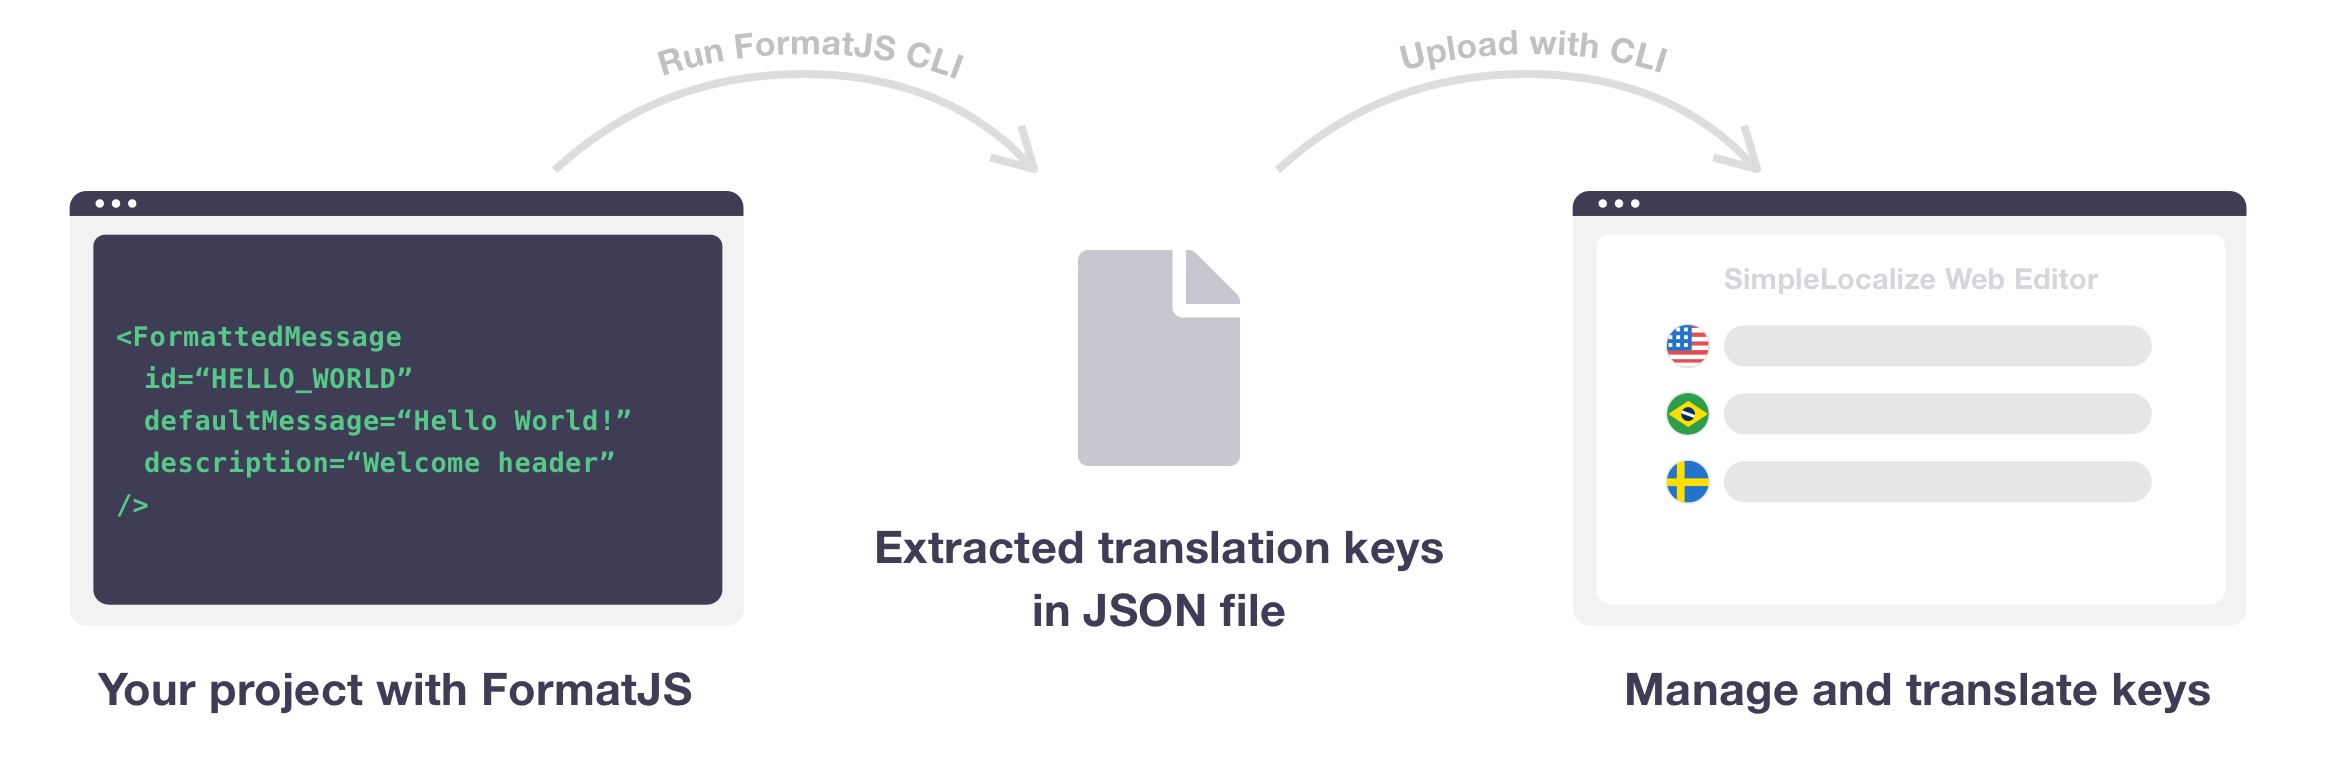
In the repository, you will also find additional scripts in package.json.
I installed @formatjs/cli as a devDependency to extract all translations and IDs from <FormattedMessage/> components.
## npm
npm install --save-dev @formatjs/cli

## yarn
yarn add -D @formatjs/cli
I used simplelocalize-cli to upload found IDs and download ready-to-use translations.
Scripts explanation:
npm run extractscript will extract translations to i18n-extracted.jsonnpm run syncscript will upload found translation keys from i18n-extracted.json and download the latest translations from the server to i18n-translations.json
Once you change a translation in JSON file, you need to restart GatsbyJS to see the effect. Sometimes you might not see a changed translation, then you need to run
npm run cleanbeforenpm run develop.
Editing translations in SimpleLocalize
Below you see a screenshot from a sample project which I pushed on GitHub. Now, I can manage all translations from one place, add more languages and use OpenAI ChatGPT, DeepL or Google Translate to automatically translate them and use in my Gatsby page.
Multi-language content with properly used hrefLang attributes will score much higher in SEO results.


