How to localize a React app using i18next (Next.js App Router guide)
React app internationalization is a prerequisite for any product that wants to reach a global audience. This step-by-step guide shows how to localize a Next.js App Router project using i18next and react-i18next, with translations managed through SimpleLocalize.
If you want to understand the broader i18n architecture and design decisions behind what we build here, the complete technical guide to internationalization and software localization is the right place to start first.
This guide covers:
- Setting up a Next.js App Router project with a
[lang]dynamic segment - Installing and configuring i18next for both Server and Client Components
- Middleware-based locale detection for SEO-friendly URLs
- Adding
hreflangtags to prevent localized pages competing in search - Managing translations with the SimpleLocalize CLI and CDN hosting
- Switching between languages, namespaces, variables, and plurals
React app internationalization and localization
Internationalization (i18n) prepares your codebase for multiple languages; localization (l10n) fills it with translated content. We will use i18next for the former and SimpleLocalize for the latter.

React localization is most commonly implemented with i18next and its React binding react-i18next. For Next.js App Router projects there are two solid approaches:
- i18next + react-i18next directly: explicit but requires wiring the server/client split yourself
- next-i18next v16: a thin wrapper that handles the Next.js-specific plumbing (
getT()for Server Components,useT()for Client Components, built-in middleware proxy)
This guide uses i18next and react-i18next directly because it keeps the dependency surface small and the patterns fully visible. The concepts transfer directly to next-i18next if you prefer that abstraction later.
For an overview of other React i18n library options, see best i18n libraries for React, React Native & Next.js.
Project structure: App Router with a [lang] segment
The recommended pattern for Next.js App Router localization is a dynamic [lang] segment at the top of the app directory. Every route is nested under it, so the locale is always part of the URL:
/en/rooms
/de/rooms
/es/rooms
This structure is crawlable by search engines, shareable as links, and cacheable at the CDN level, the same reasons URL-based locale detection is the recommended approach in the locale detection strategies guide.
Create the folder structure:
app/
  [lang]/
    layout.tsx      ← Root layout; sets <html lang> and wraps children in I18nProvider
    page.tsx        ← Home page (Server Component)
    rooms/
      page.tsx
    contact/
      page.tsx
Translation files live in public/locales:
public/
  locales/
    en/
      common.json
      rooms.json
    es/
      common.json
      rooms.json
    de/
      common.json
      rooms.json
Setting up the project
If you are starting from scratch:
npx create-next-app@latest pillow-hostel --typescript --tailwind --app
cd pillow-hostel
If you already have a Next.js project on the Pages Router and want to keep it working alongside the App Router, next-i18next v16 supports a mixed-router configuration. This guide focuses on App Router only.
Installing i18next and react-i18next
Install the necessary packages:
npm install react-i18next i18next i18next-resources-to-backend accept-language
Note: axios and i18next-http-backend are not needed in this setup. For App Router projects, i18next-resources-to-backend is the correct backend, it uses dynamic imports to load JSON files during SSR, which is compatible with both the Edge Runtime and Node.js. The SimpleLocalize CDN is used separately via the CLI workflow described below.
Configuring i18next
Now, let's configure i18next for our Next.js App Router project. We will set up i18next to work with both Server and Client Components, and we will create a simple API for loading translations in each context.
Settings file
Create app/i18n/settings.ts to define supported locales in one place:
// app/i18n/settings.ts
export const fallbackLng = 'en';
export const languages = ['en', 'es', 'de'];
export const defaultNS = 'common';

export function getOptions(lng = fallbackLng, ns: string | string[] = defaultNS) {
  return {
    supportedLngs: languages,
    fallbackLng,
    lng,
    fallbackNS: defaultNS,
    defaultNS,
    ns,
  };
}
Server-side i18n initializer
Create app/i18n/index.ts. This function is called from Server Components. It creates a fresh i18next instance per request (no shared global state on the server):
// app/i18n/index.ts
import { createInstance } from 'i18next';
import resourcesToBackend from 'i18next-resources-to-backend';
import { initReactI18next } from 'react-i18next/initReactI18next';
import { getOptions } from './settings';

const initI18next = async (lng: string, ns: string | string[]) => {
  const i18nInstance = createInstance();
  await i18nInstance
    .use(initReactI18next)
    .use(
      resourcesToBackend(
        (language: string, namespace: string) =>
          import(`../../public/locales/${language}/${namespace}.json`)
      )
    )
    .init(getOptions(lng, ns));
  return i18nInstance;
};

export async function useTranslation(
  lng: string,
  ns: string | string[] = 'common',
  options: { keyPrefix?: string } = {}
) {
  const i18nextInstance = await initI18next(lng, ns);
  return {
    t: i18nextInstance.getFixedT(
      lng,
      Array.isArray(ns) ? ns[0] : ns,
      options.keyPrefix
    ),
    i18n: i18nextInstance,
  };
}
This useTranslation is an async server function, not the hook from react-i18next. The naming is intentional because it mirrors the client-side hook so the calling pattern stays consistent across component types.
Client-side i18n provider
Client Components need a regular (synchronous) i18next instance. Create a provider that receives the already-loaded resources from the server layout and hydrates i18next on the client without making additional network requests:
We call the custom hook useT to keep it concise and to distinguish it from the standard react-i18next useTranslation hook imported internally as useTranslationOrg.
// app/i18n/client.ts
'use client';

import i18next from 'i18next';
import { initReactI18next, useTranslation as useTranslationOrg } from 'react-i18next';
import resourcesToBackend from 'i18next-resources-to-backend';
import LanguageDetector from 'i18next-browser-languagedetector';
import { getOptions, languages } from './settings';

const runsOnServerSide = typeof window === 'undefined';

// Initialize once; subsequent calls use the same instance
i18next
  .use(initReactI18next)
  .use(LanguageDetector)
  .use(
    resourcesToBackend(
      (language: string, namespace: string) =>
        import(`../../public/locales/${language}/${namespace}.json`)
    )
  )
  .init({
    ...getOptions(),
    lng: undefined, // detect from browser
    detection: { order: ['path', 'htmlTag', 'navigator'] },
    preload: runsOnServerSide ? languages : [],
  });

export function useT(lng: string, ns: string, options?: { keyPrefix?: string }) {
  const ret = useTranslationOrg(ns, options);
  const { i18n } = ret;
  if (runsOnServerSide && lng && i18n.resolvedLanguage !== lng) {
    i18n.changeLanguage(lng);
  } else {
    // eslint-disable-next-line react-hooks/rules-of-hooks
    if (i18n.resolvedLanguage !== lng) i18n.changeLanguage(lng);
  }
  return ret;
}
Middleware: locale detection and URL redirects
Without middleware, a user hitting /rooms gets no locale in the URL and search engines see a single un-localized page. Middleware fixes both problems by inspecting the Accept-Language header and redirecting to the appropriate locale path.
Create middleware.ts in the project root (or src/middleware.ts if using a src directory):
// middleware.ts
import { NextResponse } from 'next/server';
import type { NextRequest } from 'next/server';
import acceptLanguage from 'accept-language';
import { fallbackLng, languages } from './app/i18n/settings';

acceptLanguage.languages(languages);

export const config = {
  // Skip Next.js internals and static files
  matcher: ['/((?!api|_next/static|_next/image|favicon.ico|icons|images|locales).*)'],
};

const COOKIE_NAME = 'NEXT_LOCALE';

export function middleware(req: NextRequest) {
  let lng: string | undefined;

  // 1. Check cookie (user has explicitly chosen a language)
  const cookieLng = req.cookies.get(COOKIE_NAME)?.value;
  if (cookieLng && languages.includes(cookieLng)) {
    lng = cookieLng;
  }

  // 2. Fall back to Accept-Language header
  if (!lng) {
    lng = acceptLanguage.get(req.headers.get('Accept-Language')) ?? fallbackLng;
  }

  // 3. Redirect if no locale in path
  const pathnameHasLocale = languages.some(
    (loc) => req.nextUrl.pathname.startsWith(`/${loc}/`) || req.nextUrl.pathname === `/${loc}`
  );

  if (!pathnameHasLocale) {
    return NextResponse.redirect(new URL(`/${lng}${req.nextUrl.pathname}`, req.url));
  }

  // 4. Set response cookie so the preference persists
  const response = NextResponse.next();
  const lngInPath = languages.find((loc) => req.nextUrl.pathname.startsWith(`/${loc}`));
  if (lngInPath) response.cookies.set(COOKIE_NAME, lngInPath);
  return response;
}
This gives you the best of both worlds: automatic detection on the first visit (SEO-friendly URL), with the user's explicit override persisted in a cookie for subsequent visits.
Root layout: setting html lang and the i18n provider
Set the <html lang> attribute for accessibility and SEO, and wrap the app in an i18n provider to make translations available in Client Components. The generateStaticParams function tells Next.js which locale paths to pre-render at build time.
The example below uses the Next.js 15 App Router typing where params is a Promise. If you are on Next.js 13 or 14, params is a plain object and you can remove the Promise<...> wrapper plus the await params line.
// app/[lang]/layout.tsx
import { languages } from '../i18n/settings';

export async function generateStaticParams() {
  return languages.map((lng) => ({ lang: lng }));
}

export default async function RootLayout({
  children,
  params,
}: {
  children: React.ReactNode;
  params: Promise<{ lang: string }>;
}) {
  const { lang } = await params;

  return (
    <html lang={lang} dir={lang === 'ar' || lang === 'he' ? 'rtl' : 'ltr'}>
      <body>{children}</body>
    </html>
  );
}
Using translations in Server Components
Now, you can use the useTranslation function from app/i18n/index.ts to load translations in Server Components. It returns a t function that you can use to get translated strings.
// app/[lang]/page.tsx
import { useTranslation } from '../i18n';

export default async function Home({
  params,
}: {
  params: Promise<{ lang: string }>;
}) {
  const { lang } = await params;
  const { t } = await useTranslation(lang, 'common');

  return (
    <main>
      <h1>{t('hero.title')}</h1>
      <p>{t('hero.subtitle')}</p>
    </main>
  );
}
Using translations in Client Components
Client Components use the synchronous useT hook from app/i18n/client.ts, which reads the current language from the URL via the component props (or useParams() in deeper components).
// components/LanguageSwitcher.tsx
'use client';

import { useRouter, usePathname } from 'next/navigation';
import { languages } from '../app/i18n/settings';
import { useT } from '../app/i18n/client';

const languageNames: Record<string, string> = {
  en: 'English',
  es: 'Español',
  de: 'Deutsch',
};

export default function LanguageSwitcher({ currentLang }: { currentLang: string }) {
  const router = useRouter();
  const pathname = usePathname();
  const { t } = useT(currentLang, 'common');

  const switchLanguage = (newLang: string) => {
    // Replace current lang segment in URL
    const newPath = pathname.replace(`/${currentLang}`, `/${newLang}`);
    router.push(newPath);
  };

  return (
    <nav aria-label={t('languageSwitcher.label')}>
      {languages.map((lng) => (
        <button
          key={lng}
          onClick={() => switchLanguage(lng)}
          aria-current={lng === currentLang ? 'true' : undefined}
          className={`px-3 py-1 rounded ${lng === currentLang ? 'font-bold' : 'text-muted'}`}
        >
          {languageNames[lng]}
        </button>
      ))}
    </nav>
  );
}
Adding hreflang tags for multilingual SEO
Without hreflang, search engines may treat /en/rooms and /de/rooms as competing duplicate pages. The tag tells Google which version to serve to which audience.
Add it to your root layout or generate it dynamically in generateMetadata:
// app/[lang]/layout.tsx (excerpt)
import type { Metadata } from 'next';
import { languages } from '../i18n/settings';

export async function generateMetadata({
  params,
}: {
  params: Promise<{ lang: string }>;
}): Promise<Metadata> {
  const { lang } = await params;
  const baseUrl = 'https://www.pillow-hostel.com';

  return {
    alternates: {
      canonical: `${baseUrl}/${lang}`,
      languages: Object.fromEntries(
        languages.map((l) => [l, `${baseUrl}/${l}`])
      ),
    },
  };
}
Next.js renders this as <link rel="alternate" hreflang="…"> tags in the <head>. For a full explanation of the attribute and common mistakes, see what is hreflang and how to use it.
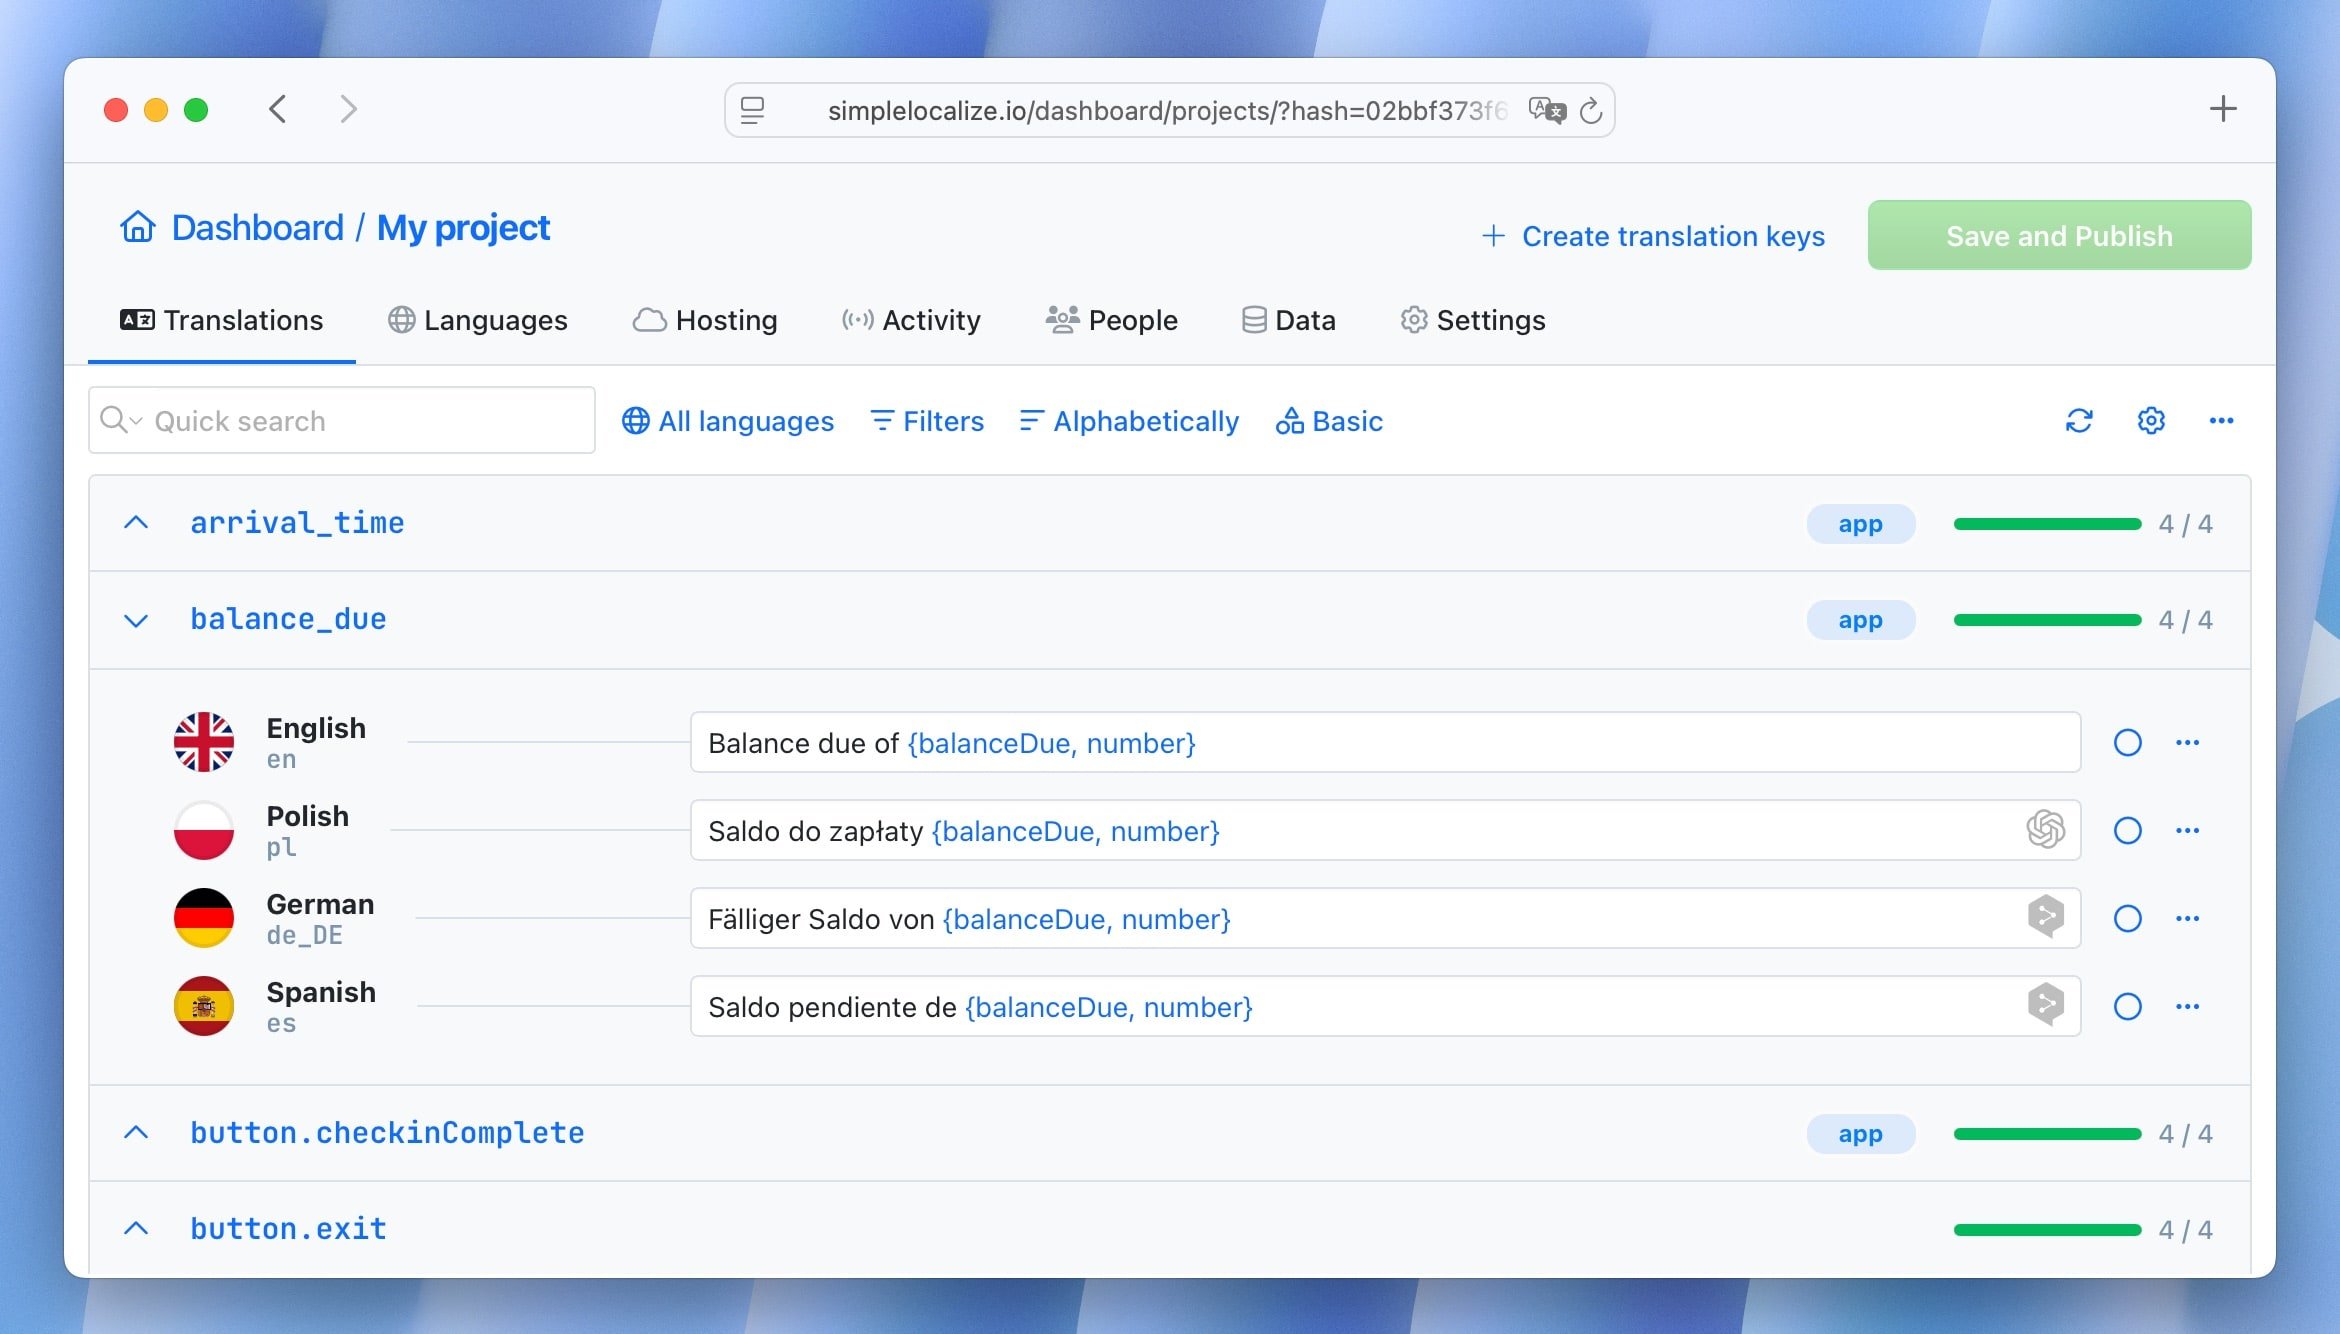
Managing translations with SimpleLocalize
SimpleLocalize manages translations for your app, providing a user-friendly interface for translators and a CLI tool to sync translations between your codebase and the SimpleLocalize platform. This workflow keeps translation management separate from development, which is especially beneficial as your app scales and you add more languages.
Install the CLI
With SimpleLocalize CLI, you can upload source strings from your codebase, manage translations in the SimpleLocalize editor, and download completed translations back to your project. Install it globally or as a dev dependency:
# macOS / Linux / Windows (WSL)
curl -s https://get.simplelocalize.io/2.11/install | bash

# Windows (PowerShell)
. { iwr -useb https://get.simplelocalize.io/2.11/install-windows } | iex;

# npm
npm install @simplelocalize/cli
Configure simplelocalize.yml
Create simplelocalize.yml in the project root. Get your Project API key from the project Settings / Credentials page.
# simplelocalize.yml
apiKey: YOUR_PROJECT_API_KEY
uploadFormat: single-language-json
uploadLanguageKey: en
uploadPath: ./public/locales/en/{ns}.json
uploadOptions:
  - UPDATE_TRANSLATIONS
downloadFormat: single-language-json
downloadLanguageKeys: ['es', 'de']
downloadPath: ./public/locales/{lang}/{ns}.json
Daily workflow
# Push your source (English) strings to SimpleLocalize
simplelocalize upload

# Pull completed translations back to your repo
simplelocalize download

# Optional: kick off auto-translation for new/changed keys
simplelocalize auto-translate
This replaces the Axios-based saveMissing approach from older guides. Instead of pushing missing keys from the running browser app, you upload source files intentionally from the CLI, a cleaner separation that never exposes your API key in client-side code.
CDN delivery for live updates
SimpleLocalize's Translation Hosting CDN lets translators publish updates without a code deployment. Rather than importing local JSON files, point i18next at the CDN endpoint:
// app/i18n/index.ts (CDN variant)
const CDN_BASE = 'https://cdn.simplelocalize.io';
const PROJECT_TOKEN = process.env.SIMPLELOCALIZE_PROJECT_TOKEN;
const ENVIRONMENT = '_latest'; // or '_production'

// Use fetch in the resourcesToBackend callback
resourcesToBackend(async (language: string, namespace: string) => {
  const res = await fetch(
    `${CDN_BASE}/${PROJECT_TOKEN}/${ENVIRONMENT}/${language}/${namespace}`
  );
  return res.json();
})
This is useful when marketing copy changes frequently and waiting for a Next.js build would be too slow. For app UI strings tied to code changes, bundled local JSON files are usually the right default.
If you need to choose between CDN reads and management API usage, this guide to runtime localization architecture patterns covers the tradeoffs in detail.
Use cases
i18next supports a wide range of translation features. Here are some common use cases and how to implement them in this Next.js App Router setup.
Namespaces
Namespaces split your translations into logical groups, reducing the payload for any given page. Each page loads only what it needs.
// In a Server Component
const { t } = await useTranslation(lang, 'rooms');
// In a Client Component
const { t } = useT(lang, 'rooms');
Corresponding translation file: public/locales/en/rooms.json
{
  "roomMixedDorm": "4 Bed Mixed Dormitory",
  "roomStandardDouble": "Standard Double Room",
  "availableRooms_one": "Only {{count}} room left",
  "availableRooms_other": "{{count}} rooms available"
}
Interpolation (variables)
Variables are passed as an object to the t function and referenced in the translation string with {{variableName}} syntax:
t('greeting', { name: 'Kinga' })
// → "Hello, Kinga!"
Translation file:
{
  "greeting": "Hello, {{name}}!"
}
Pluralization
i18next handles plural forms using a _one / _other suffix convention (or _zero, _two, _few, _many for languages that need them). Pass count to trigger selection:
t('availableRooms', { count: 1 })  // → "Only 1 room left"
t('availableRooms', { count: 5 })  // → "5 rooms available"
For languages with more complex plural rules, like Polish with three forms, add the appropriate keys in the translation file and i18next selects the correct one based on the count value. See how to handle pluralization across languages for a full breakdown.
ICU message format
For richer formatting (dates, select, nested plurals), install the i18next-icu plugin and switch to ICU syntax. See ICU message format guide for details.
i18next alternatives for Next.js
If you prefer a library that is designed specifically for Next.js App Router rather than wired on top of it:
- next-i18next: wraps i18next with
getT()/useT()for the App Router,serverSideTranslations/appWithTranslationfor Pages Router, and a built-in middleware proxy. Lowest boilerplate if you are happy with the i18next API. - next-intl: purpose-built for Next.js App Router, strong TypeScript support, and a clean async API for Server Components. Not i18next-based. For a direct trade-off breakdown, see react-i18next vs next-intl.
- next-translate: ultra-lightweight with a simple file-convention approach.
For a hands-on setup with request config, localized routing, and SimpleLocalize CLI sync, read next-intl guide for Next.js.
CI/CD integration
Add translation sync to your GitHub Actions workflow so translations are always up to date before a build:
# .github/workflows/localization.yml
- name: Install SimpleLocalize CLI
  run: curl -s https://get.simplelocalize.io/2.11/install | bash

- name: Download translations
  run: simplelocalize download
  env:
    SIMPLELOCALIZE_API_KEY: ${{ secrets.SIMPLELOCALIZE_API_KEY }}
See the localization workflow for developers for a complete CI/CD pipeline walkthrough.
Conclusion
Localizing a Next.js App Router project with i18next involves four connected pieces: a [lang] segment in the route structure, an async server-side initializer for Server Components, a synchronous client-side hook for Client Components, and middleware that detects the user's language and enforces locale-prefixed URLs. Add hreflang tags so each locale is indexed independently, and manage the translation files with the SimpleLocalize CLI rather than browser-side API calls.
As the number of translation keys grows, consider lazy loading namespaces on demand, lazy loading translations in React with code-splitting explains how to keep the initial payload small as the project scales.


