How to localize React app using i18next
React app internationalization (i18n) is a key feature for any app that wants to reach a global audience. In this step-by-step guide, you will learn how to localize your React app from scratch using Next.js and i18next with react-i18next. If you'd like to understand the broader i18n concepts and architectural decisions behind what we'll implement here, our complete technical guide to internationalization and software localization is the right place to start.
This guide will cover internationalization from the ground up, including:
- Creating a new Next.js app
- Installing i18next and react-i18next
- Configuring i18next
- Adding translations using SimpleLocalize
- Switching between languages
The goal is to create a localized Next.js app that can be easily translated into multiple languages.
This guide was built by a complete beginner with very basic knowledge of React, so it's a great starting point for anyone who wants to learn how to localize a React app using i18next.
Table of contents
React app internationalization and localization
Internationalization (i18n) adapts your app for different languages and regions, while localization (l10n) focuses on translating content. We will use i18next for i18n and SimpleLocalize for l10n.

React is a popular JavaScript library for building user interfaces and is widely used for building web apps. It provides a component-based architecture that makes it easy to create reusable UI components.
For React app, we will use Next.js, which is a React framework that provides server-side rendering and other features that make it easier to build React apps.

React app internationalization can be achieved using one of the many i18n libraries available for React, such as i18next with react-i18next, react-intl, formatjs and more. In this guide, we will use i18next and react-i18next for internationalizing our Next.js app.
i18next and react-i18next
i18next is a popular and flexible JavaScript library for internationalization, supporting multiple languages, language detection, interpolation, and more.

react-i18next is a React-specific extension of i18next. It integrates seamlessly with React through hooks and components, making it easy to add translations to your app.
Key differences:
- i18next: A general-purpose i18n library for JavaScript
- react-i18next: A React wrapper for i18next with React-specific tools (hooks, HOCs, components) that simplify working with i18next in React.
SimpleLocalize
SimpleLocalize is a translation management and localization platform that helps you manage translations for your app. It provides a web-based customizable translation editor for adding, editing, and organizing translations in multiple languages.
SimpleLocalize also offers auto-translation features to automatically translate content using Google Translate, DeepL, or OpenAI, and translation hosting for serving translations to your app.
In this guide, we will use SimpleLocalize to add translations to our Next.js app and to host our translation files for easy access.
Setting up a new Next.js app
For this guide, we will create a new Next.js app with the App Router directory, using Tailwind CSS. It will be a simple app with a few pages and components to demonstrate how to localize a Next.js app with i18next.

If you already have a Next.js app set up, you can skip this step and go to the next section.
Create a new Next.js app
We will use Next.js automatic installation with create-next-app to create a new Next.js app.
npx create-next-app@latest
Follow the prompts to set up your new Next.js app. Here are the prompts and answers we will use for this guide:
What is your project named? pillow-hostel
Would you like to use TypeScript? Yes
Would you like to use ESLint? Yes
Would you like to use Tailwind CSS? Yes
Would you like your code inside a `src/` directory? No
Would you like to use App Router? (recommended) Yes
Would you like to customize the import alias (`@/*` by default)? No
Start the Next.js app
Once the app is created, open the project directory and start the Next.js app:
npm run dev
This will start the Next.js development server, and you should see the app running at http://localhost:3000.
Add a few pages and components
Next, let's add a few pages and components to our Next.js app. It will be a simple hostel website with a home page, rooms page, and contact page. We will also add header and footer components and other components for the pages.
You can see the structure of the Next.js app below:
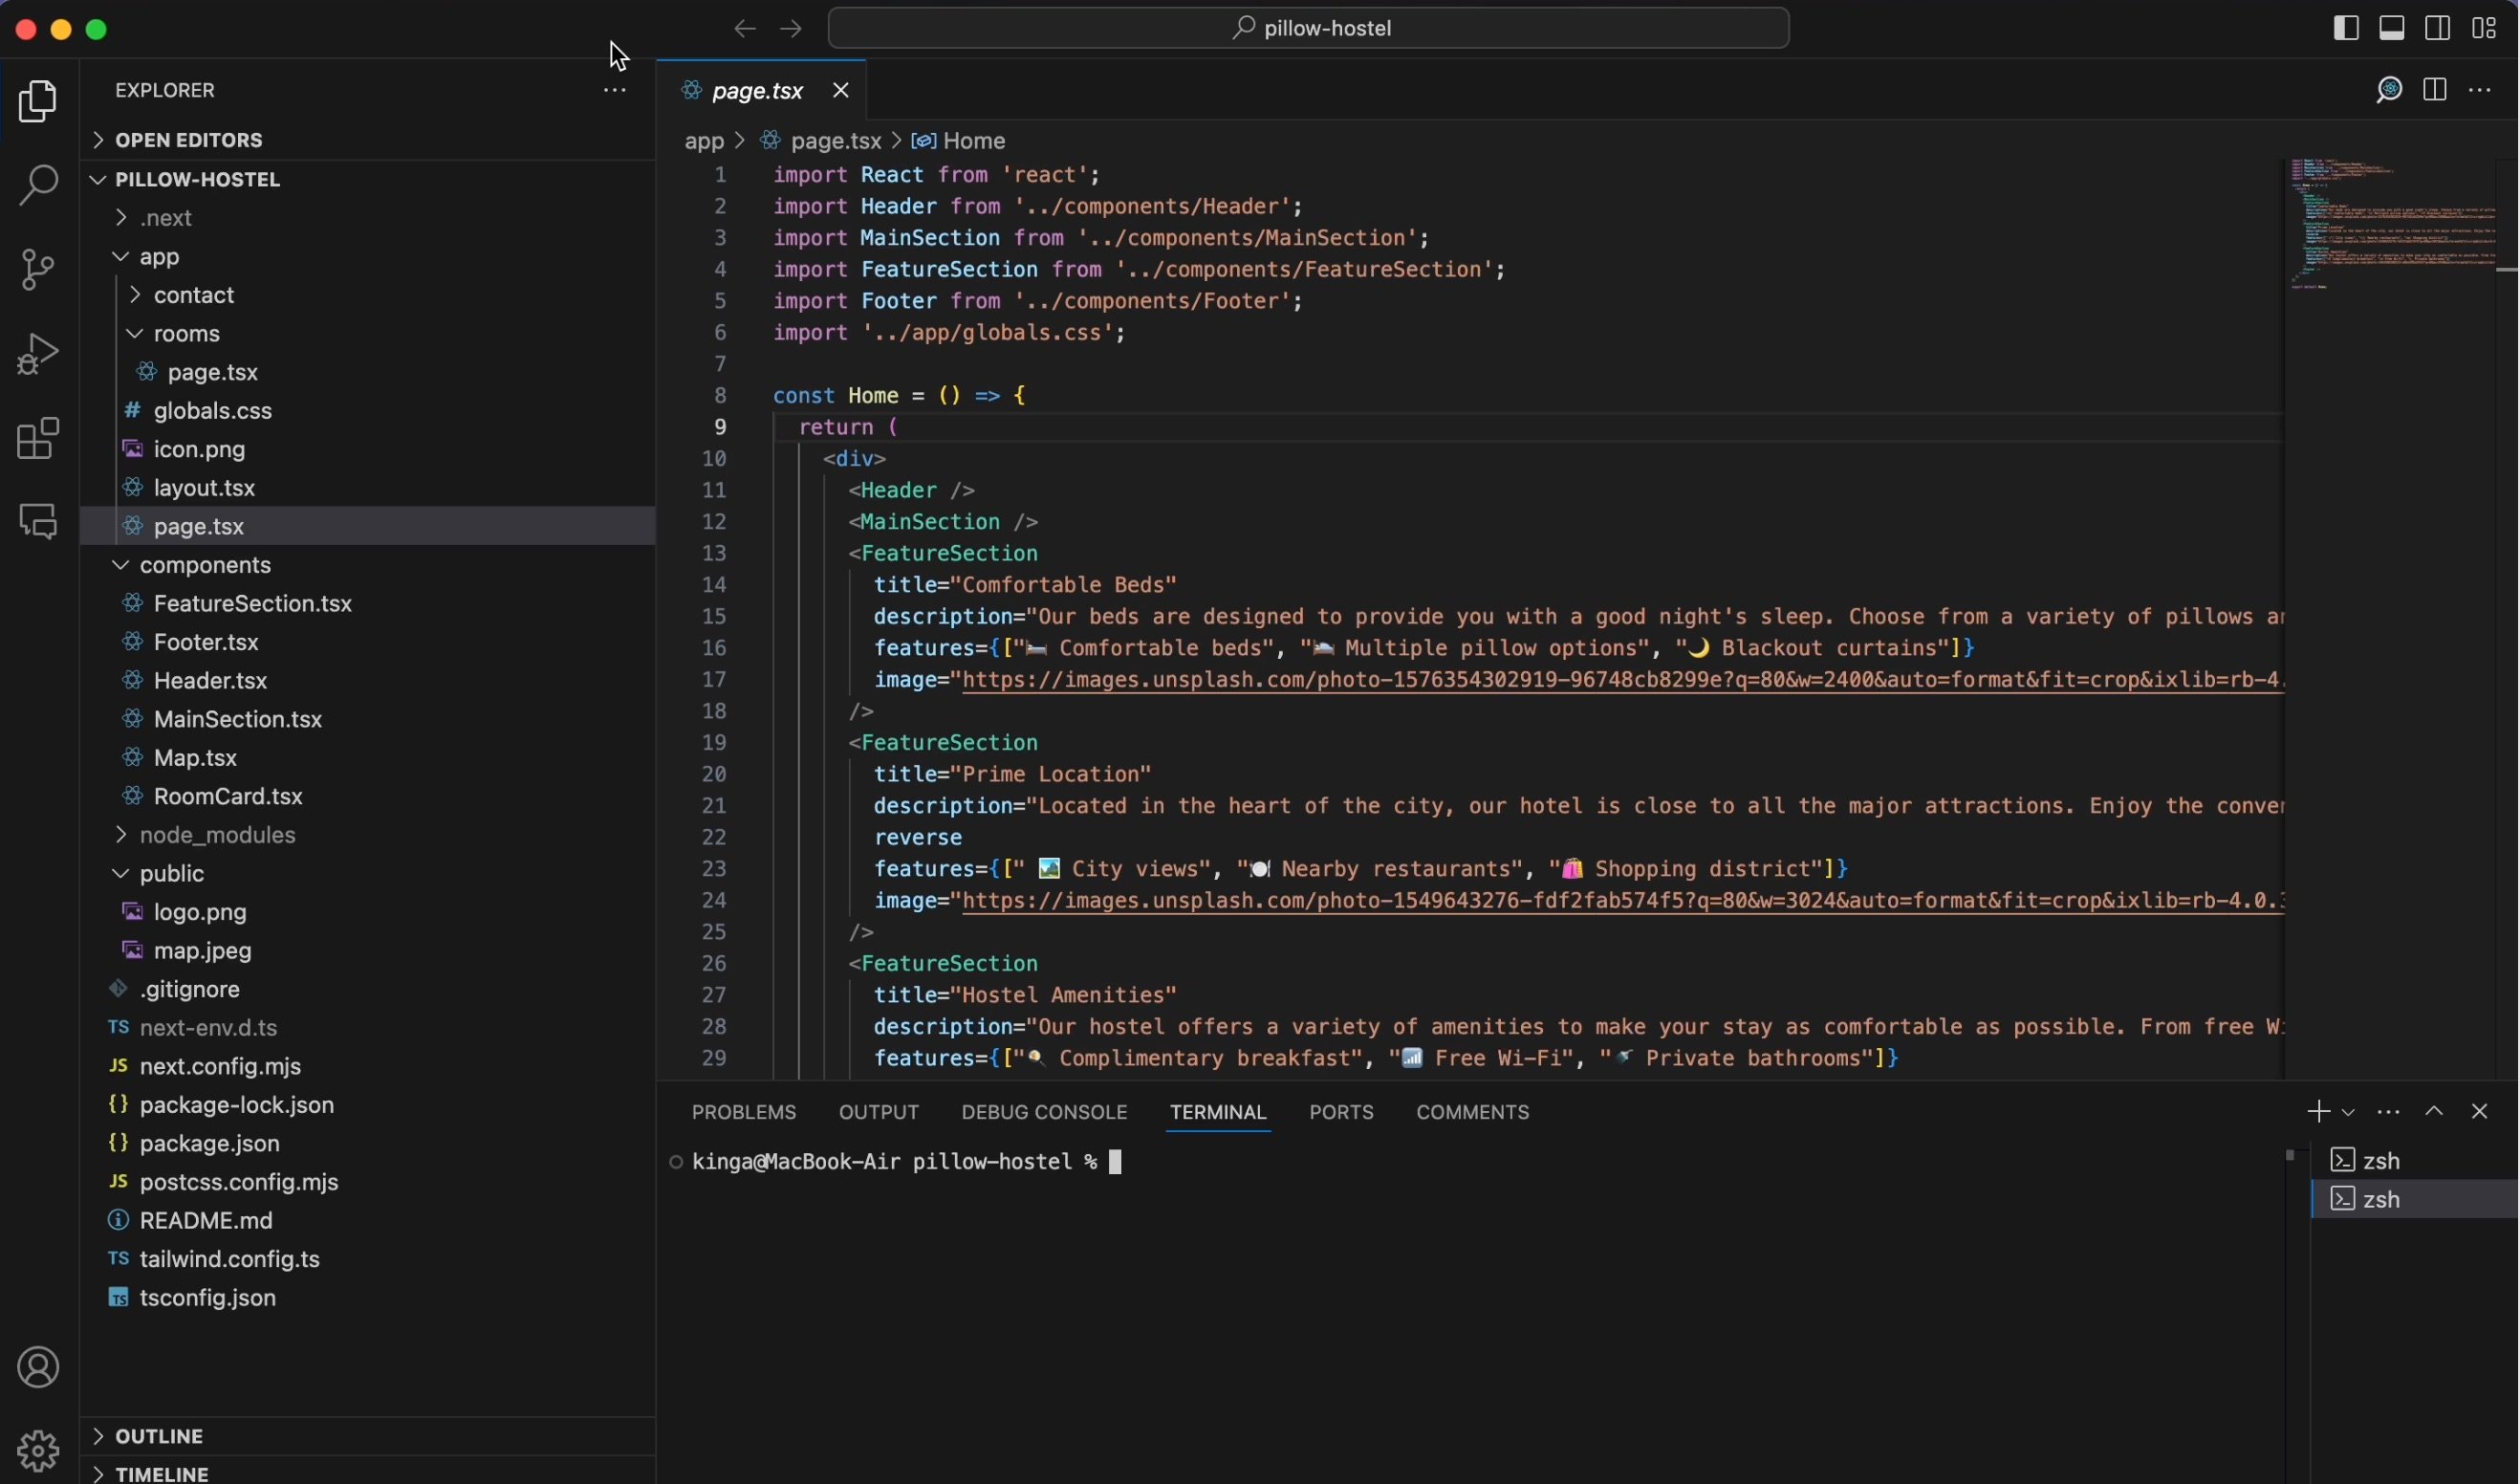
And the final app will look like this:
Our tips:
- Use Tailwind CSS classes for styling
- Use Next.js
Linkcomponent for navigation - Make sure to create a correct folder structure for pages and components
Add language switcher
When localizing a React app, it's important to provide a way for users to switch between languages. Let's add a simple language switcher to the header component of our Next.js app.
For that, let's create two buttons for switching between English and Spanish.
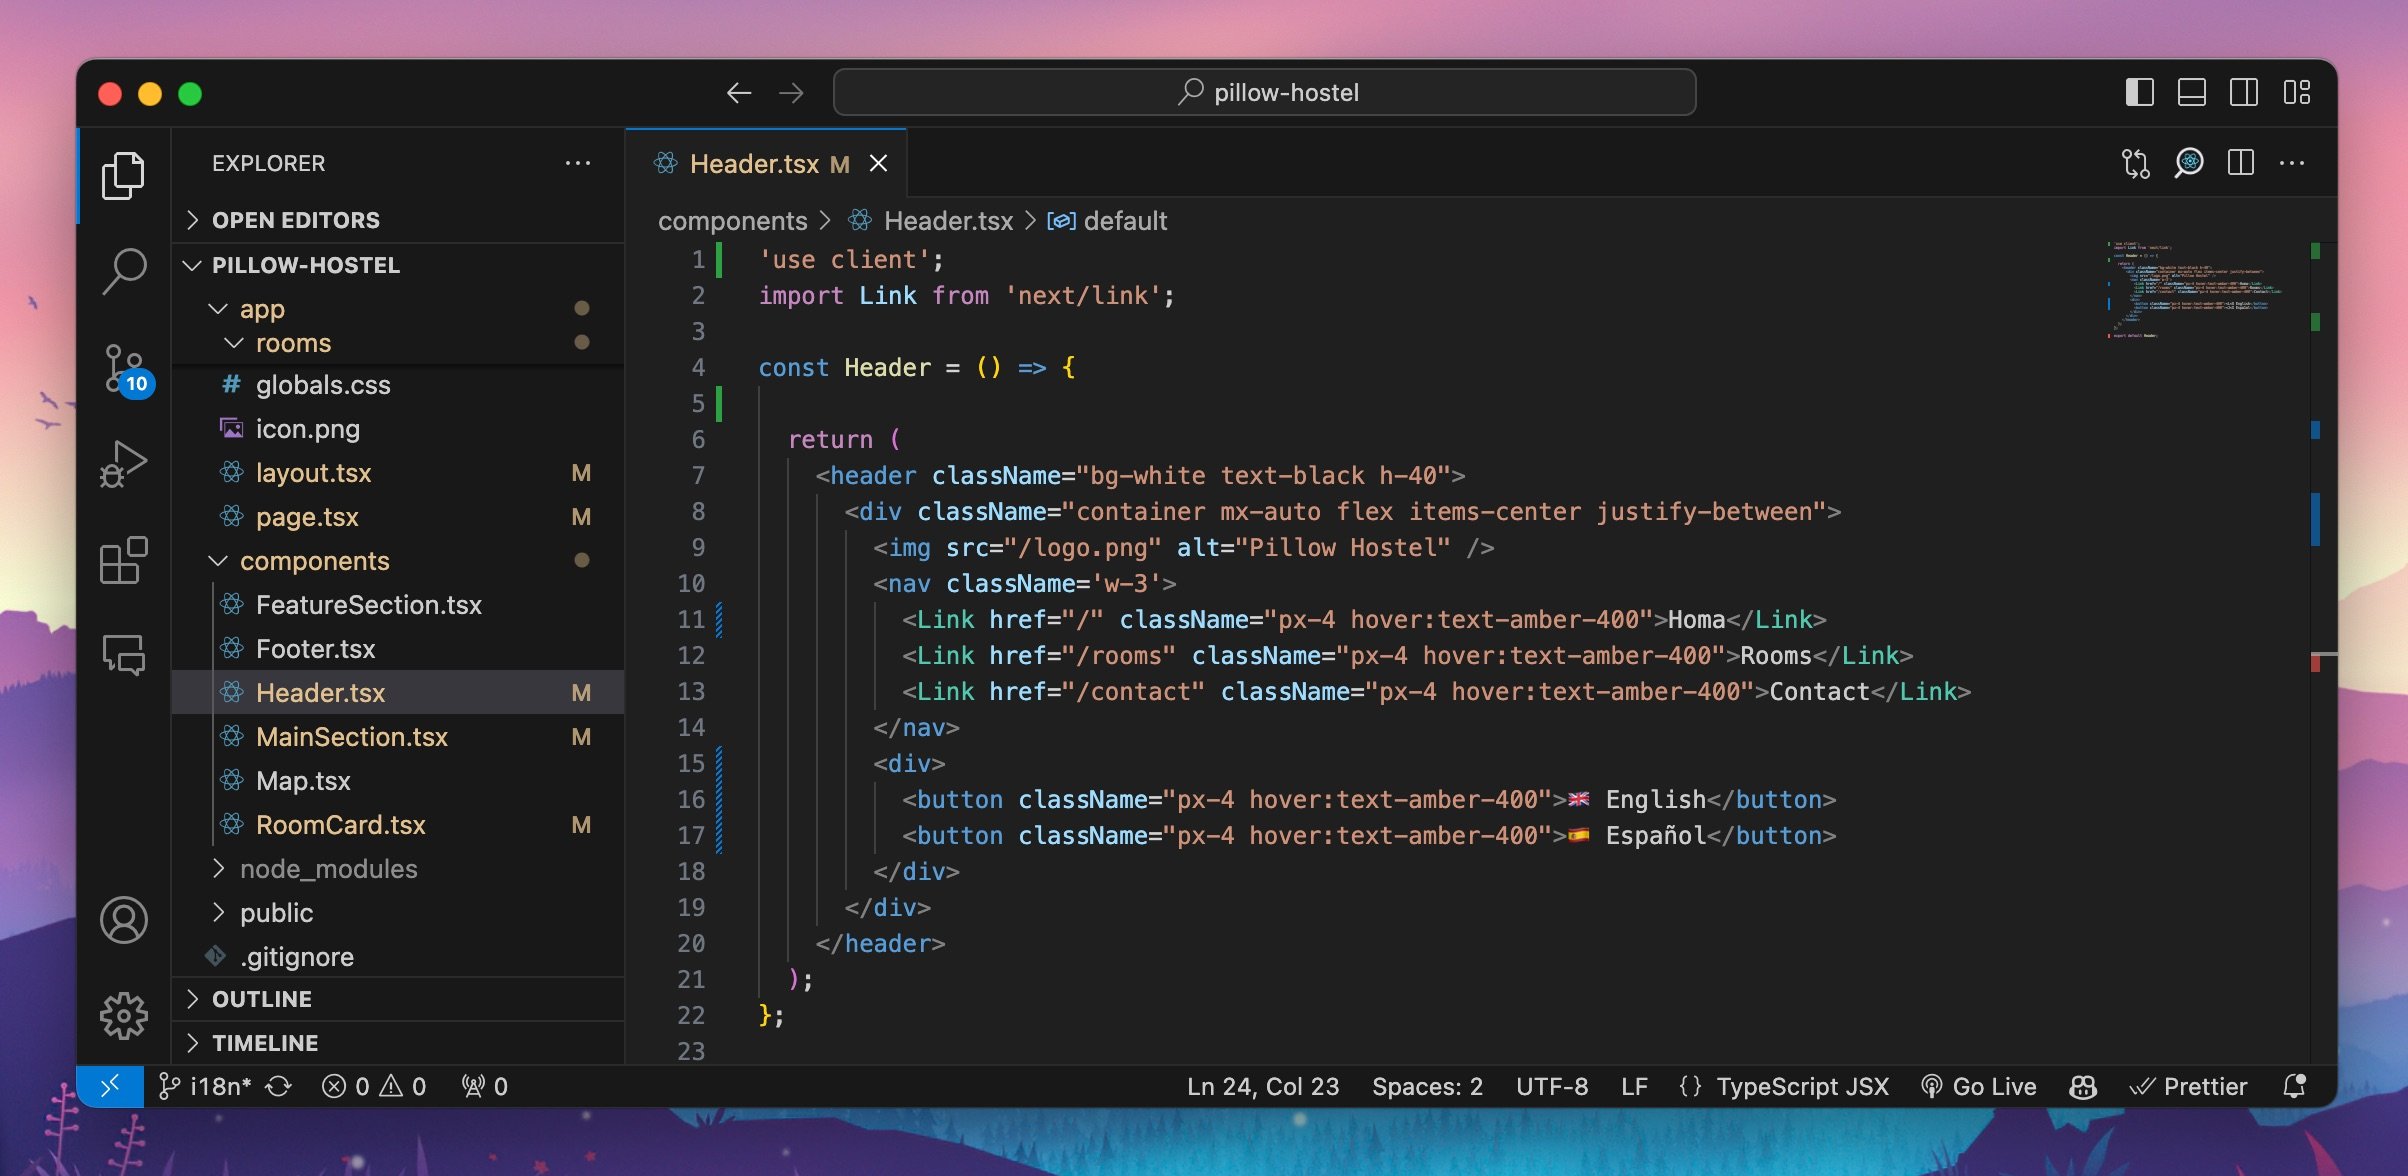
Here is a preview of the language switcher in the app:

In the next steps, we will configure i18next and react-i18next to handle the language switching functionality, or go to the switching between languages section.
For more advanced language switcher, check our guide on how to build a language selector using Tailwind CSS.
Installing i18next and react-i18next
To use i18next and react-i18next in our Next.js app, we need to install the necessary packages. We will also install the i18next-http-backend package to load translations from a JSON file for live-updating translations.
Install dependencies
Install the following packages using npm:
react-i18next: React-specific i18next libraryi18next: i18next libraryi18next-http-backend: i18next backend for loading translationsi18next-browser-languagedetector: i18next language detectoraxios: Promise-based HTTP client for making requests
npm install --save react-i18next i18next i18next-http-backend i18next-browser-languagedetector axios
Configuring i18next
Now, we are ready to configure i18next in our Next.js app. We will set up i18next with the i18next-http-backend and i18next-browser-languagedetector plugins to load translations from a JSON file and detect the user's language.
Create i18n configuration file
Create a new configuration file for i18next called i18n (i18n.ts in our case) in the root of your project and add the following code:
import i18n from 'i18next';
import { initReactI18next } from 'react-i18next';

import Backend from 'i18next-http-backend';
import LanguageDetector from 'i18next-browser-languagedetector';

i18n
  .use(Backend)
  .use(LanguageDetector)
  .use(initReactI18next)
  .init({
    fallbackLng: 'en',
    debug: true,
    interpolation: {
      escapeValue: false,
    }
  });

export default i18n;
Create translation keys
Next, we need to create translation keys for our app and assign default translations. Translation keys are unique identifiers for each piece of text that needs to be translated. To create them in i18next, we will implement the useTranslation hook in our components.
To create a translation key, we will use the t function from the useTranslation hook. Here is an example of how to create a translation key for the header component:
The default scheme for key creation is:
- import
{ useTranslation }from 'react-i18next'; - add
const { t } = useTranslation();to the component - use
t("translationKey")to create a translation key - add
defaultValueto thetfunction to set the default translation
Syntax for creating translation keys using t function:
{t("home", { defaultValue: "Home" })}
Other ways to create translation keys in i18next are also available:
- using withTranslation HOC
- using Translation (render prop)
- using Trans component
Once the translation keys are created, we can add translations to our app using SimpleLocalize.
Create JSON file with translations
As we are using SimpleLocalize for translation management and hosting, there is no need to create a JSON file manually. We will push translations to SimpleLocalize and get them back in real-time. Head to the next section to learn how to configure SimpleLocalize with i18next.
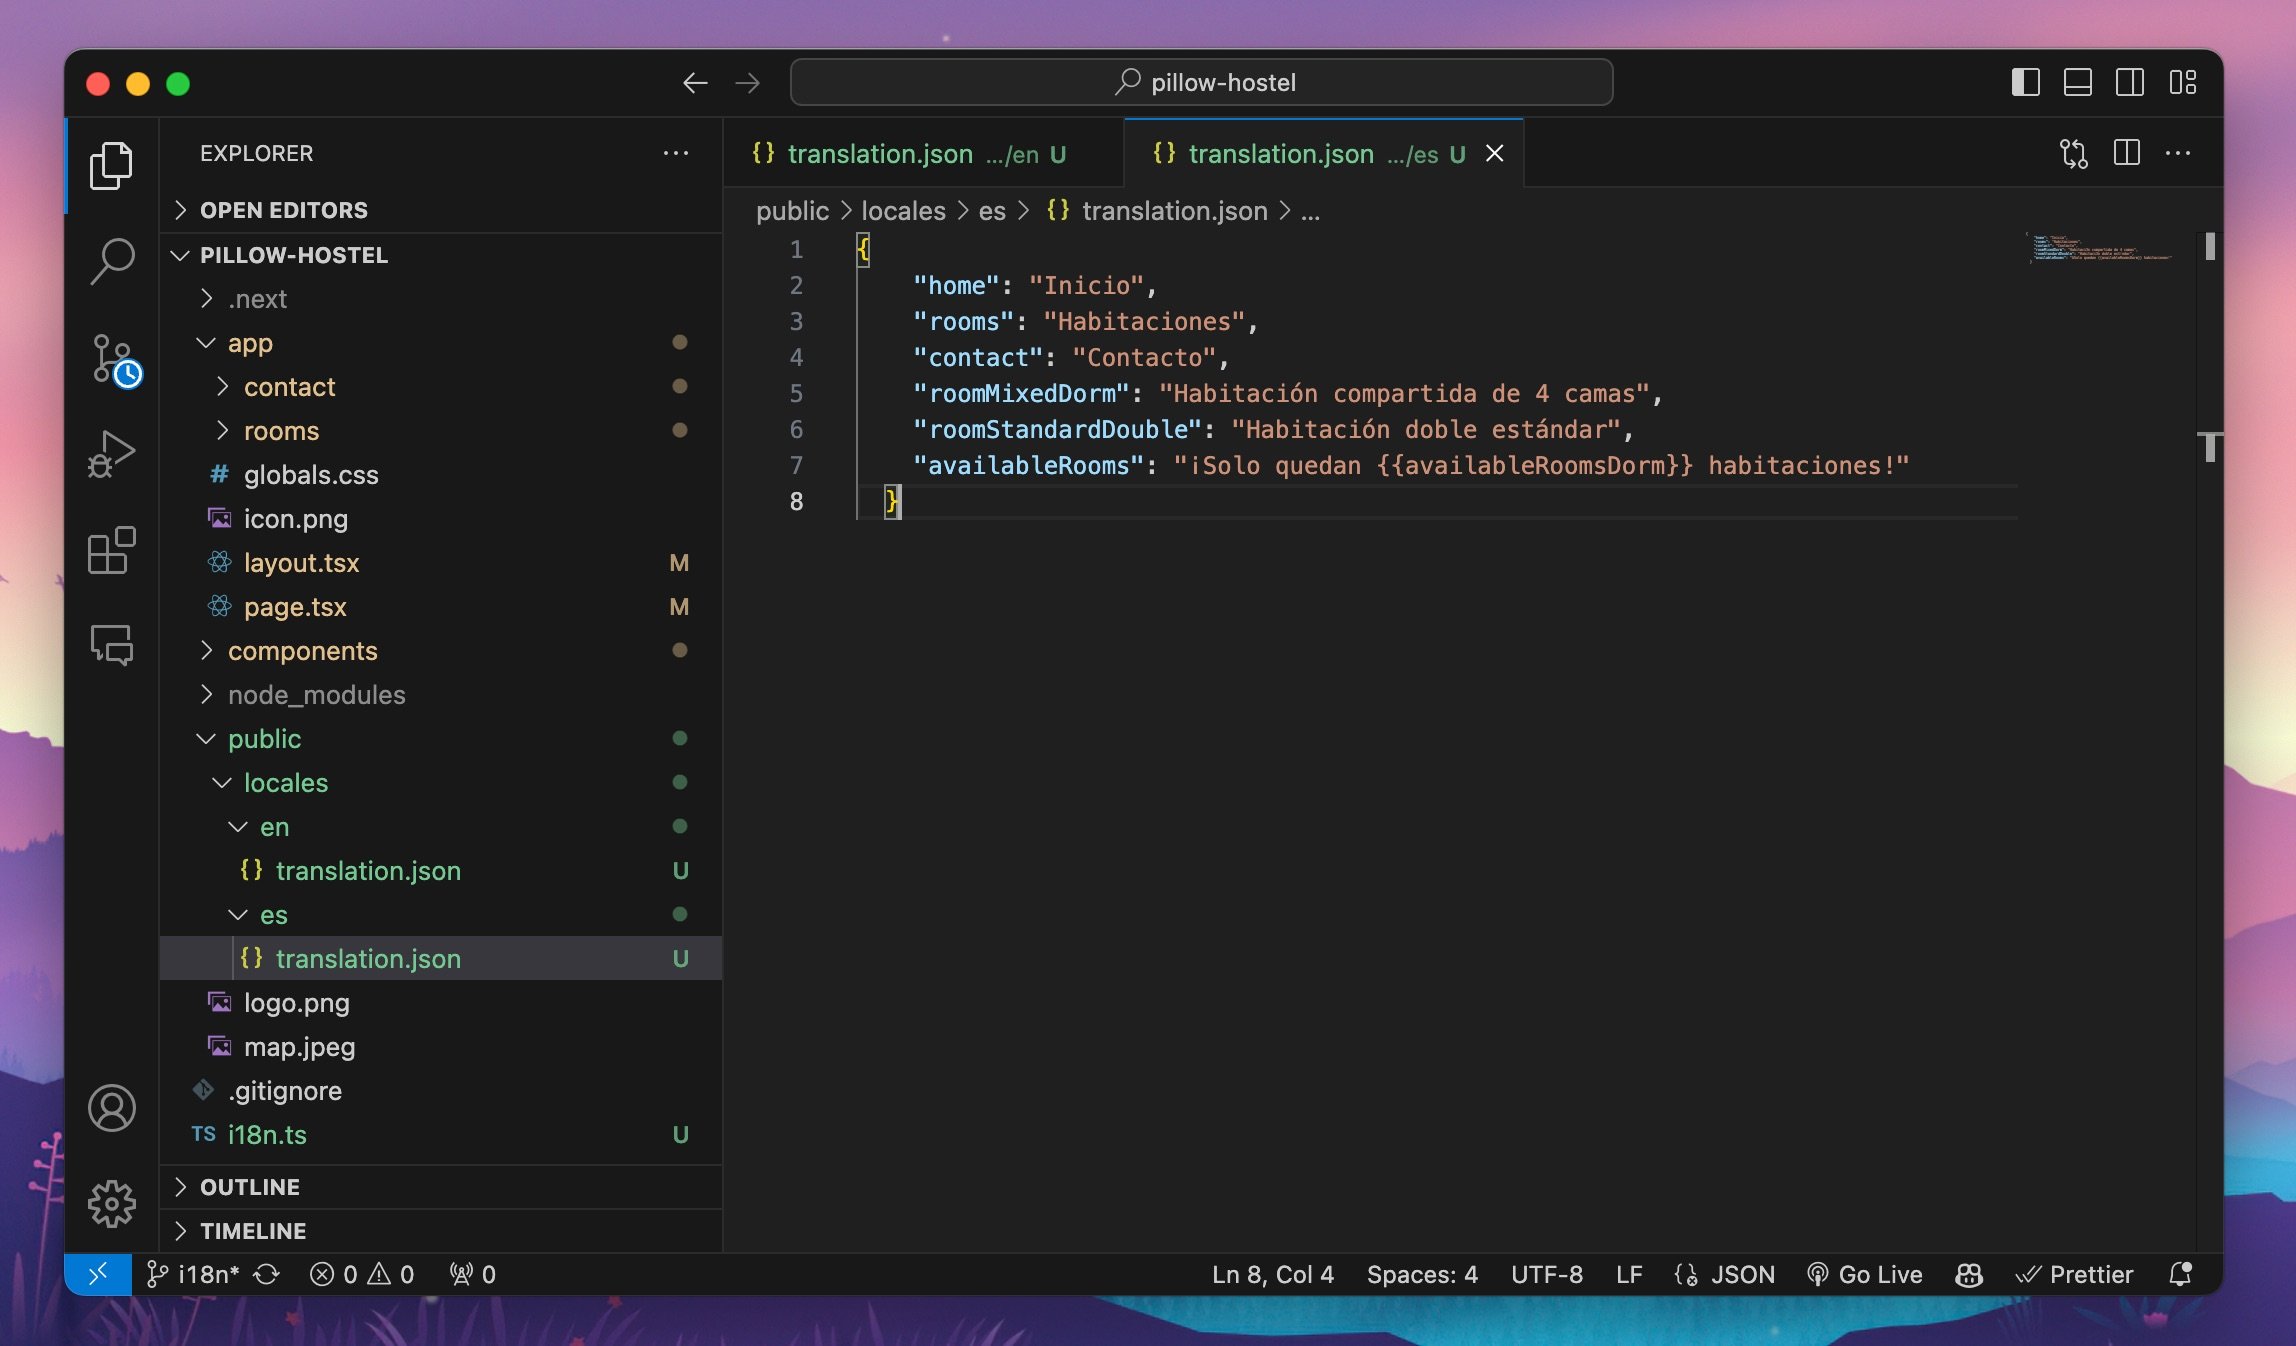
If you prefer to manage JSON files manually, we need to create a JSON file with translations for each language. The JSON file should contain translation keys and their translations for each language. Here is an example of a JSON file with translations for English:
{
  "home": "Home",
  "rooms": "Rooms",
  "contact": "Contact",
  "roomMixedDorm": "4 Bed Mixed Dormitory Room",
  "roomStandardDouble": "Standard Double Room",
  "availableRooms": "Only {{availableRoomsDorm}} rooms left!"
}
Save the JSON file with translations in the public/locales directory of your Next.js app.
Next, head to the language switcher section to learn how to switch between languages in your Next.js app.
Configuring SimpleLocalize
SimpleLocalize will be the hub for managing translations for our Next.js app. We will use SimpleLocalize to add, edit, and organize translations. With live updating, we can see the changes in our app in real-time.
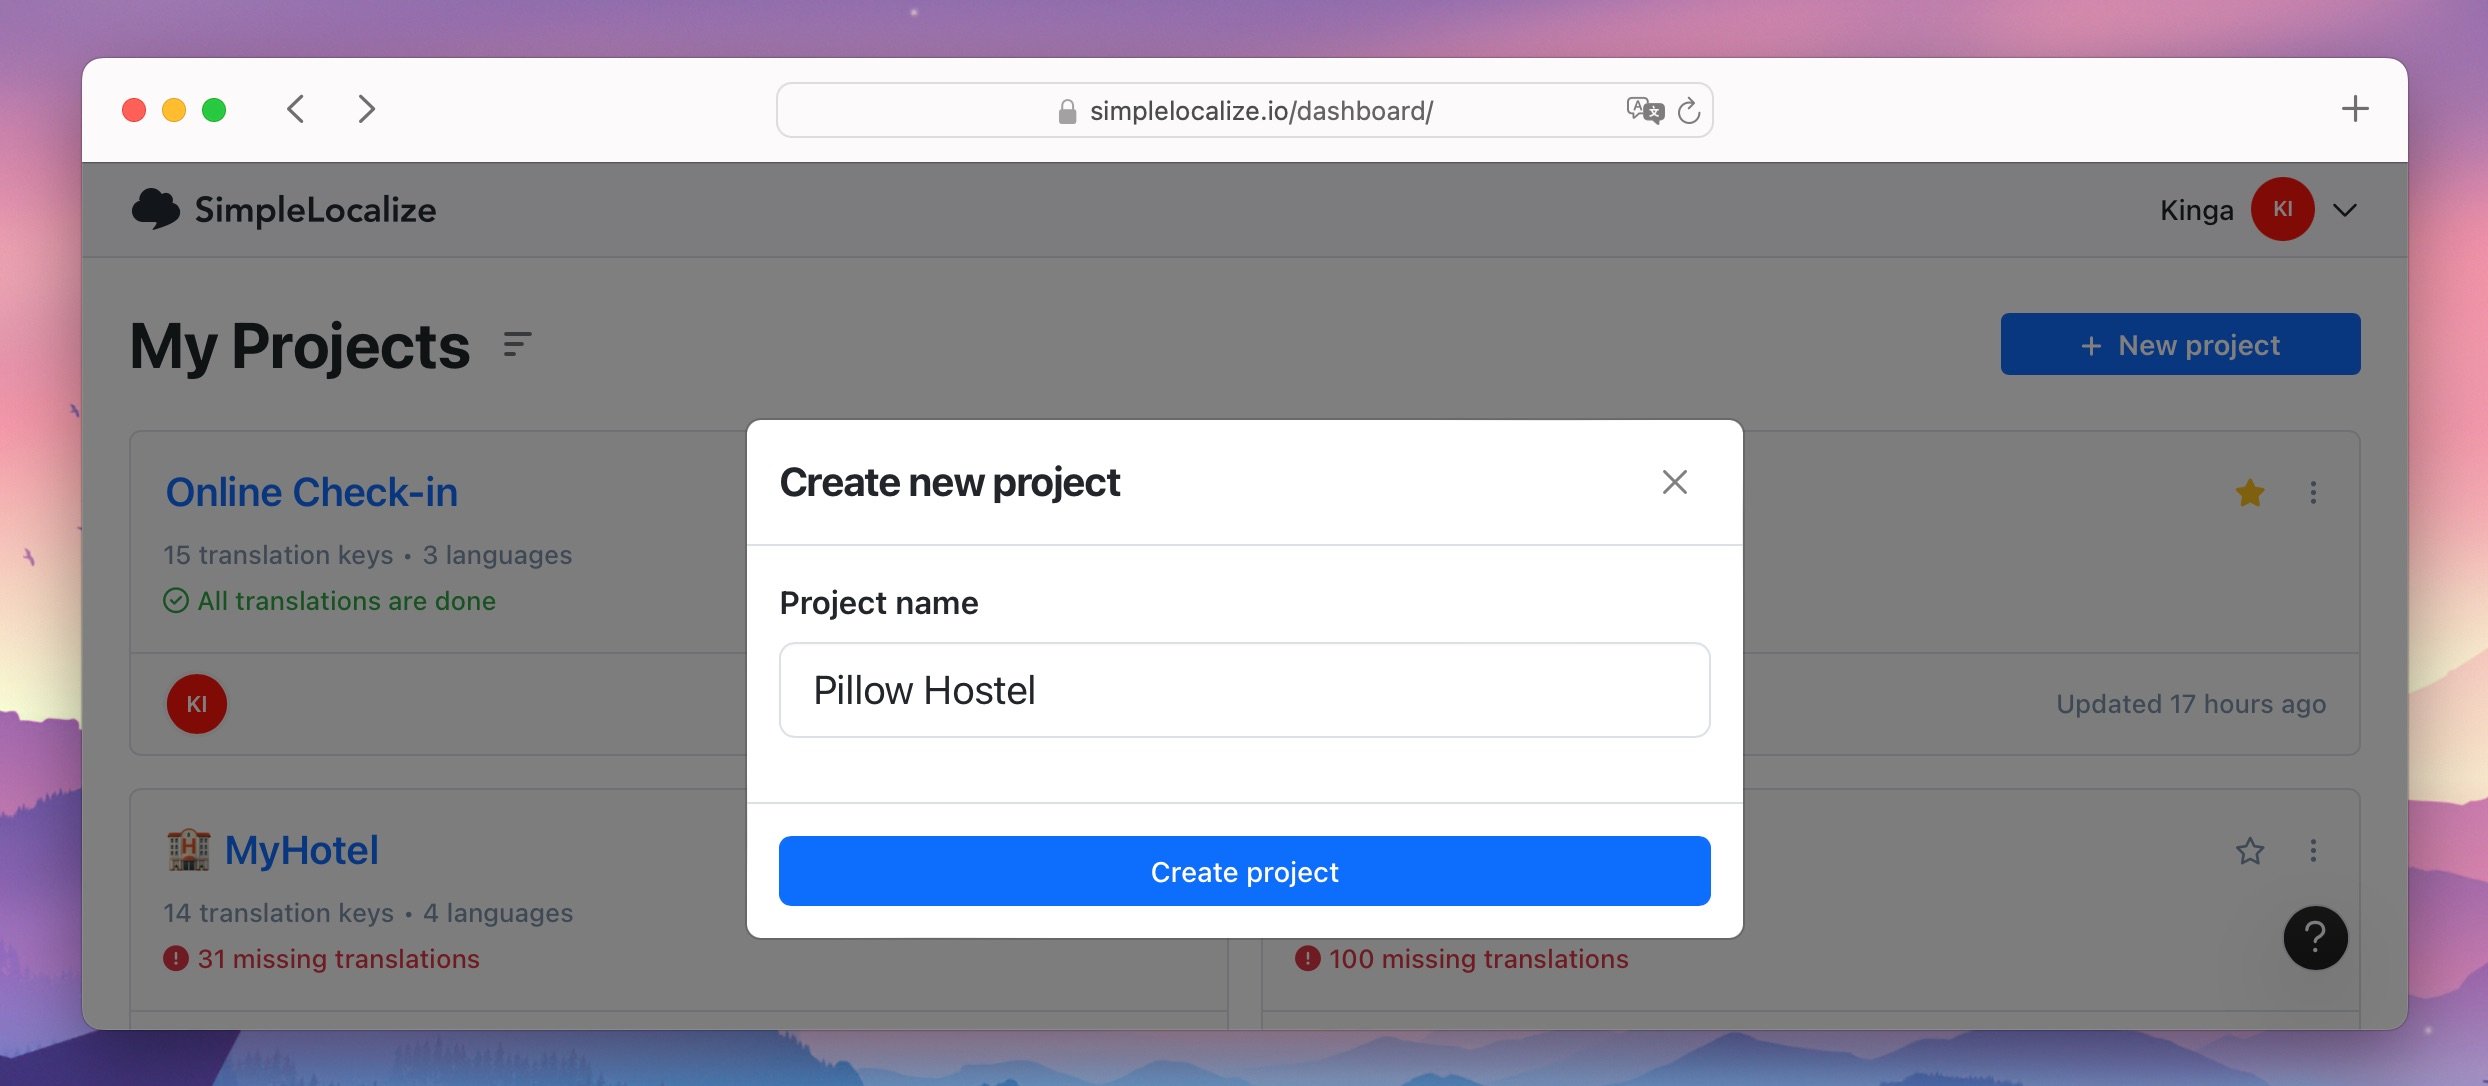
First, create an account in SimpleLocalize and create a new project for your Next.js app.
Next, we need to configure i18next to push translations to SimpleLocalize. We will use the i18next-http-backend plugin to load translations from a JSON file, push them to SimpleLocalize and get the translations back.
i18n configuration
To push translations to SimpleLocalize and get them back to our app, we need to configure i18next to use the SimpleLocalize API. We will use the i18next-http-backend plugin to load translations from a JSON file and push them to SimpleLocalize.
Thanks to this configuration, we can save missing translations to SimpleLocalize and get them back in real-time.
import i18n from 'i18next'
import Backend from 'i18next-http-backend'
import LanguageDetector from 'i18next-browser-languagedetector'
import {initReactI18next} from 'react-i18next'
import axios from "axios";

const isProductionCode = process.env.NODE_ENV === 'production';
const fallbackLanguage = 'en'

const projectToken = "XXXXXXXXXX"; // YOUR PROJECT TOKEN
const apiKey = "XXXXXXXXXXXXXXXX"; // YOUR API KEY

const apiBaseUrl = "https://api.simplelocalize.io/api";
const cdnBaseUrl = "https://cdn.simplelocalize.io";
const environment = "_latest"; // or "_production"
const loadPath = `${cdnBaseUrl}/${projectToken}/${environment}/{{lng}}`;
const configuration = {
    headers: {
        'X-SimpleLocalize-Token': apiKey
    }
};

const createTranslationKeys = async (requestBody: { translationKeys: { key: string; }[]; }) => axios.post(`${apiBaseUrl}/v1/translation-keys/bulk`, requestBody, configuration)
const updateTranslations = async (requestBody: { translations: { key: string; language: string; text: string; }[]; }) => axios.patch(`${apiBaseUrl}/v2/translations/bulk`, requestBody, configuration)

const missing: { translationKey: string; language: string; fallbackValue: string; }[] = [];
const saveMissing = async () => {
    if (missing.length === 0 || isProductionCode) {
        return;
    }
    console.info(`Saving ${missing.length} missing translation keys`);

    const translationKeys = missing.map((element) => ({
        key: element.translationKey,
    }));

    await createTranslationKeys({translationKeys})
        .catch((error) => console.error(`Error during creating translation keys: ${error}`));

    const translations = missing.map((element) => ({
        key: element.translationKey,
        language: element.language,
        text: element.fallbackValue,
    }));
    await updateTranslations({translations})
        .catch((error) => console.error(`Error during updating translations: ${error}`));
    missing.length = 0;
}

// You can control how often missing translation keys are sent to SimpleLocalize.
// Lowering this value may lead to hitting rate-limiter, 30 seconds is a sweet spot.
const SYNC_INTERVAL = 30 * 1000; // 30 seconds
setInterval(async () => {
    await saveMissing();
}, SYNC_INTERVAL);

i18n
    .use(Backend)
    .use(LanguageDetector)
    .use(initReactI18next)
    .init({
        fallbackLng: fallbackLanguage,
        backend: {
            loadPath: loadPath, // or loadPathWithNamespaces if you use namespaces
        },
        saveMissing: !isProductionCode, // save missing keys only in development mode
        missingKeyHandler: async (languages, namespace, translationKey, fallbackValue) => {
            console.debug(`[${namespace}][${translationKey}] not available in Translation Hosting`);
            missing.push({
                translationKey: translationKey,
                language: languages[0] ?? fallbackLanguage,
                fallbackValue: fallbackValue ?? ""
            });
        }
    })
export default i18n;
This code:
- sets up the SimpleLocalize API configuration with your project token and API key
- creates functions to create translation keys and update translations in SimpleLocalize
- sets up a
saveMissingfunction to save missing translations to SimpleLocalize - sets up an interval to call
saveMissingevery 30 seconds - configures i18next to use the SimpleLocalize API for loading translations and saving missing translations
Note:
- You can get your project token and API key from the SimpleLocalize Integrations page
- Push missing translations to SimpleLocalize only in development mode
- The code above doesn't include namespace management. If you use namespaces, follow the instructions in the Namespaces section
Upload translations
Uploading translations to SimpleLocalize is automatic with the configuration above. When a translation key is missing in the app, it will be saved to SimpleLocalize, and then you can add translations in the SimpleLocalize editor.
You may need to open all pages to push all missing translations.
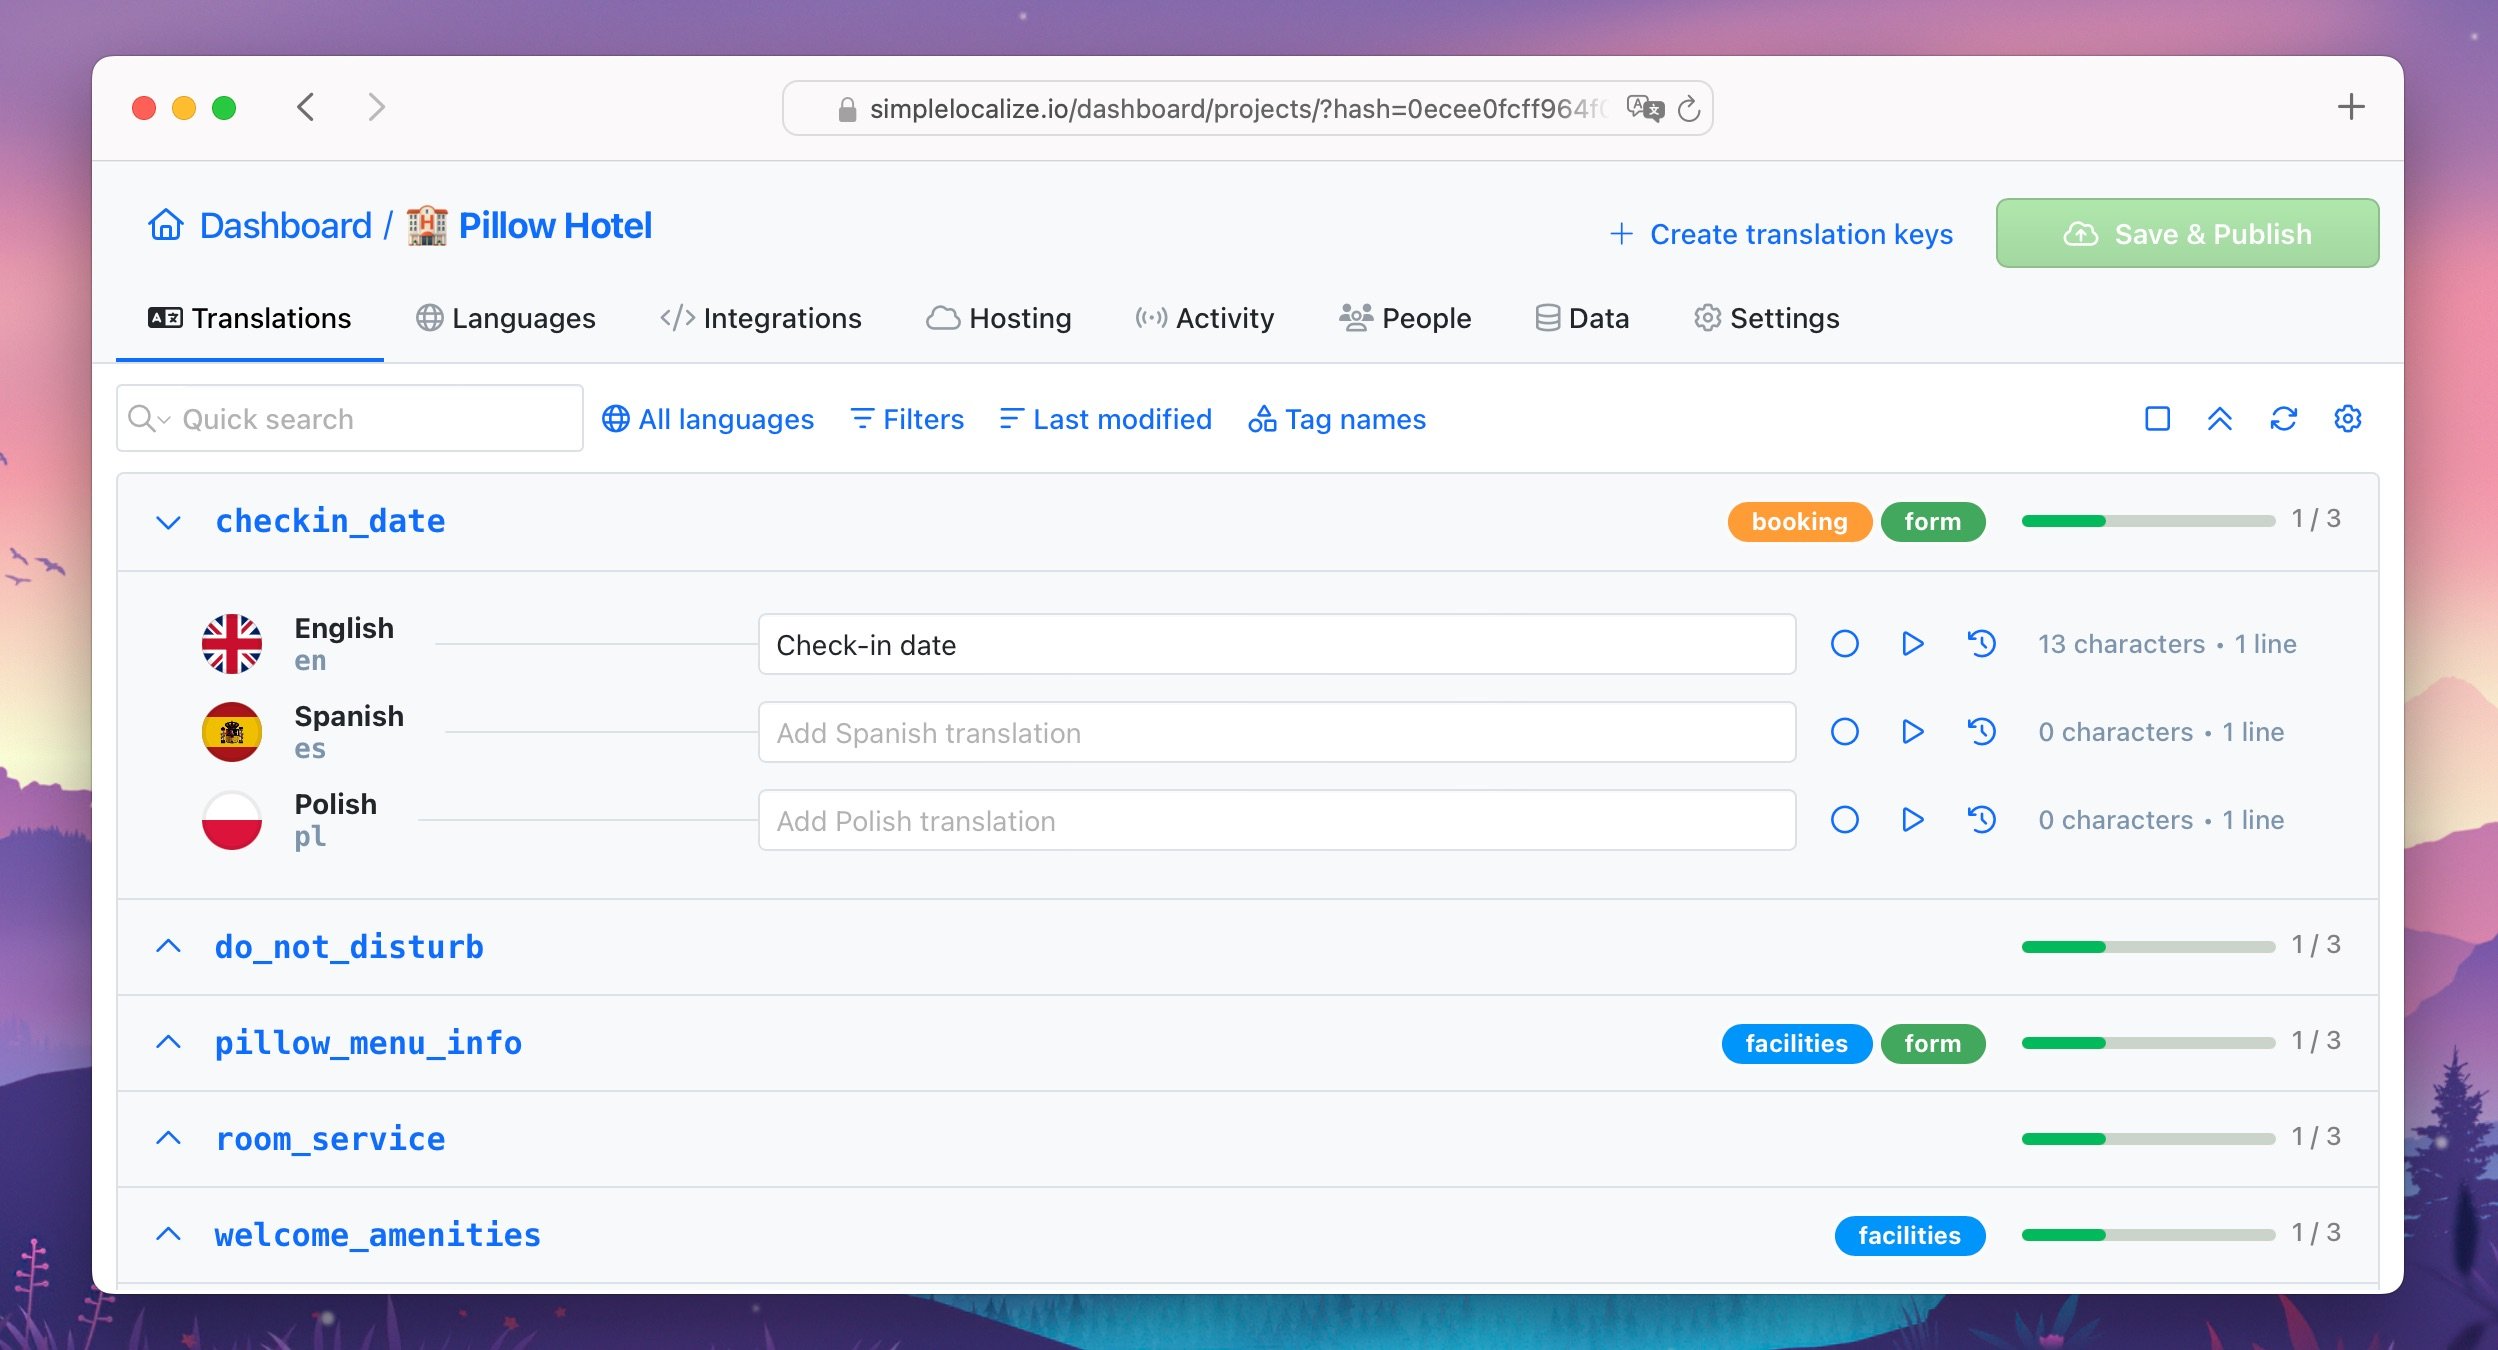
Translate content
Now that the translations are in SimpleLocalize, you can start translating the content.
- Create languages. Go to the Languages tab and add the languages you want to translate your app into.
- Translate content. Go to the Translations tab and start translating the content for each language in the translation editor.
There are several ways to translate content in SimpleLocalize:
- Manual translation: Add translations manually in the translation editor
- Machine translation: Use the built-in auto-translation feature to automatically translate content using Google Translate, DeepL, or OpenAI
- Import translations: Import translations from a CSV, JSON file, or other formats
Switching between languages
Now that we have set up i18next and SimpleLocalize, we can switch between languages in our Next.js app. Open your language switcher component and insert the i18n.changeLanguage function to switch between languages.
Here is my language switcher component:
<div>
  <button onClick={() => i18n.changeLanguage("en")} className="px-4 hover:text-amber-400">🇬🇧 English</button>
  <button onClick={() => i18n.changeLanguage("es")} className="px-4 hover:text-amber-400">🇪🇸 Español</button>
</div>
Now you can switch between languages in your Next.js app. On the language switch, the app will automatically load the translations for the selected language from SimpleLocalize and update the content in real-time.
Use cases
Translations can be used in various ways in your Next.js app. Besides the basic translation of text content, your translations can include namespaces, variables, plurals, and other features. See below how to use them in your Next.js app.
Using namespaces
Namespaces are a way to organize translations in i18next. They allow you to group translations by a specific category or section of your app. To use namespaces in your translations, you can define them in the i18next configuration and use them in your translation keys.
For namespaces to work, you need to define them in the i18n configuration file. Here is a complete configuration file to support namespaces:
import i18n from 'i18next'
import Backend from 'i18next-http-backend'
import LanguageDetector from 'i18next-browser-languagedetector'
import {initReactI18next} from 'react-i18next'
import axios from "axios";

const isProductionCode = process.env.NODE_ENV === 'production';
const fallbackLanguage = 'en'

const projectToken = "XXXXXXXXXX"; // YOUR PROJECT TOKEN
const apiKey = "XXXXXXXXXXXXXXXX"; // YOUR API KEY

const apiBaseUrl = "https://api.simplelocalize.io/api";
const cdnBaseUrl = "https://cdn.simplelocalize.io";
const environment = "_latest"; // or "_production"
const loadPath = `${cdnBaseUrl}/${projectToken}/${environment}/{{lng}}`;
const loadPathWithNamespaces = `${cdnBaseUrl}/${projectToken}/${environment}/{{lng}}/{{ns}}`;
const configuration = {
    headers: {
        'X-SimpleLocalize-Token': apiKey
    }
};

const createTranslationKeys = async (requestBody: { translationKeys: { key: string; }[]; }) => axios.post(`${apiBaseUrl}/v1/translation-keys/bulk`, requestBody, configuration)
const updateTranslations = async (requestBody: { translations: { key: string; language: string; text: string; }[]; }) => axios.patch(`${apiBaseUrl}/v2/translations/bulk`, requestBody, configuration)

const missing: { translationKey: string; language: string; fallbackValue: string; namespace: string; }[] = [];
const saveMissing = async () => {
    if (missing.length === 0 || isProductionCode) {
        return;
    }
    console.info(`Saving ${missing.length} missing translation keys`);

    const translationKeys = missing.map((element) => ({
        key: element.translationKey,
        namespace: element.namespace,
    }));

    await createTranslationKeys({translationKeys})
        .catch((error) => console.error(`Error during creating translation keys: ${error}`));

    const translations = missing.map((element) => ({
        key: element.translationKey,
        namespace: element.namespace,
        language: element.language,
        text: element.fallbackValue,
    }));
    await updateTranslations({translations})
        .catch((error) => console.error(`Error during updating translations: ${error}`));
    missing.length = 0;
}

// You can control how often a missing translation keys are sent to SimpleLocalize.
// Lowering this value may lead to hitting rate-limiter, 30 seconds is a sweet spot.
const SYNC_INTERVAL = 30 * 1000; // 30 seconds
setInterval(async () => {
    await saveMissing();
}, SYNC_INTERVAL);

i18n
    .use(Backend)
    .use(LanguageDetector)
    .use(initReactI18next)
    .init({
        fallbackLng: fallbackLanguage,
        backend: {
            loadPath: loadPathWithNamespaces,
        },
        saveMissing: !isProductionCode, // save missing keys only in development mode
        missingKeyHandler: async (languages, namespace, translationKey, fallbackValue) => {
            console.debug(`[${namespace}][${translationKey}] not available in Translation Hosting`);
            missing.push({
                translationKey: translationKey,
                namespace: namespace ?? "",
                language: languages[0] ?? fallbackLanguage,
                fallbackValue: fallbackValue ?? ""
            });
        }
    })
export default i18n;
Next, you need to define namespaces in your Next.js app. You can do that by adding i18n configuration to the useTranslation hook in your components and passing the namespace as an argument.
Here is an example of how to use namespaces in your Next.js app:
const { t, i18n } = useTranslation("rooms");
const availableRoomsDorm = 5

<RoomCard
  roomName={t("roomMixedDorm", { defaultValue: "4 Bed Mixed Dormitory Room" })}
  availability={t("availableRooms", { availableRoomsDorm, defaultValue: "Only {{availableRoomsDorm}} rooms left!" })}
/>
The defined namespace in the useTranslation hook will be used to group translations in the SimpleLocalize editor, e.g., for our rooms page.
Notes:
- If there is no namespace defined, i18next will use the default namespace
translation. - It makes sense to use namespaces when you have a large number of translations or when you want to group translations by a specific category or section of your app.
- Add namespaces to all components that use translations.
Using variables (interpolation)
You can use variables in your translations by passing them as objects to the t function. In my example, I want to display current room availability as a variable:
const availableRoomsDorm = 5

<RoomCard
  roomName={t("roomMixedDorm", { defaultValue: "4 Bed Mixed Dormitory Room" })}
  availability={`Only ${availableRoomsDorm} rooms left!`}
/>
First, we need to create a translation key for the availability text with variable. Before adding the defaultValue (default translation), we need to pass the variable so it can be used in the translation:
const availableRoomsDorm = 5

<RoomCard
  roomName={t("roomMixedDorm", { defaultValue: "4 Bed Mixed Dormitory Room" })}
  availability={t("availableRooms", { availableRoomsDorm, defaultValue: "Only {{availableRoomsDorm}} rooms left!" })}
/>
This way, we use the t function to display the availability text with the variable availableRoomsDorm.
Syntax for i18next interpolation:
t("translationKey", { variableName: variableValue })
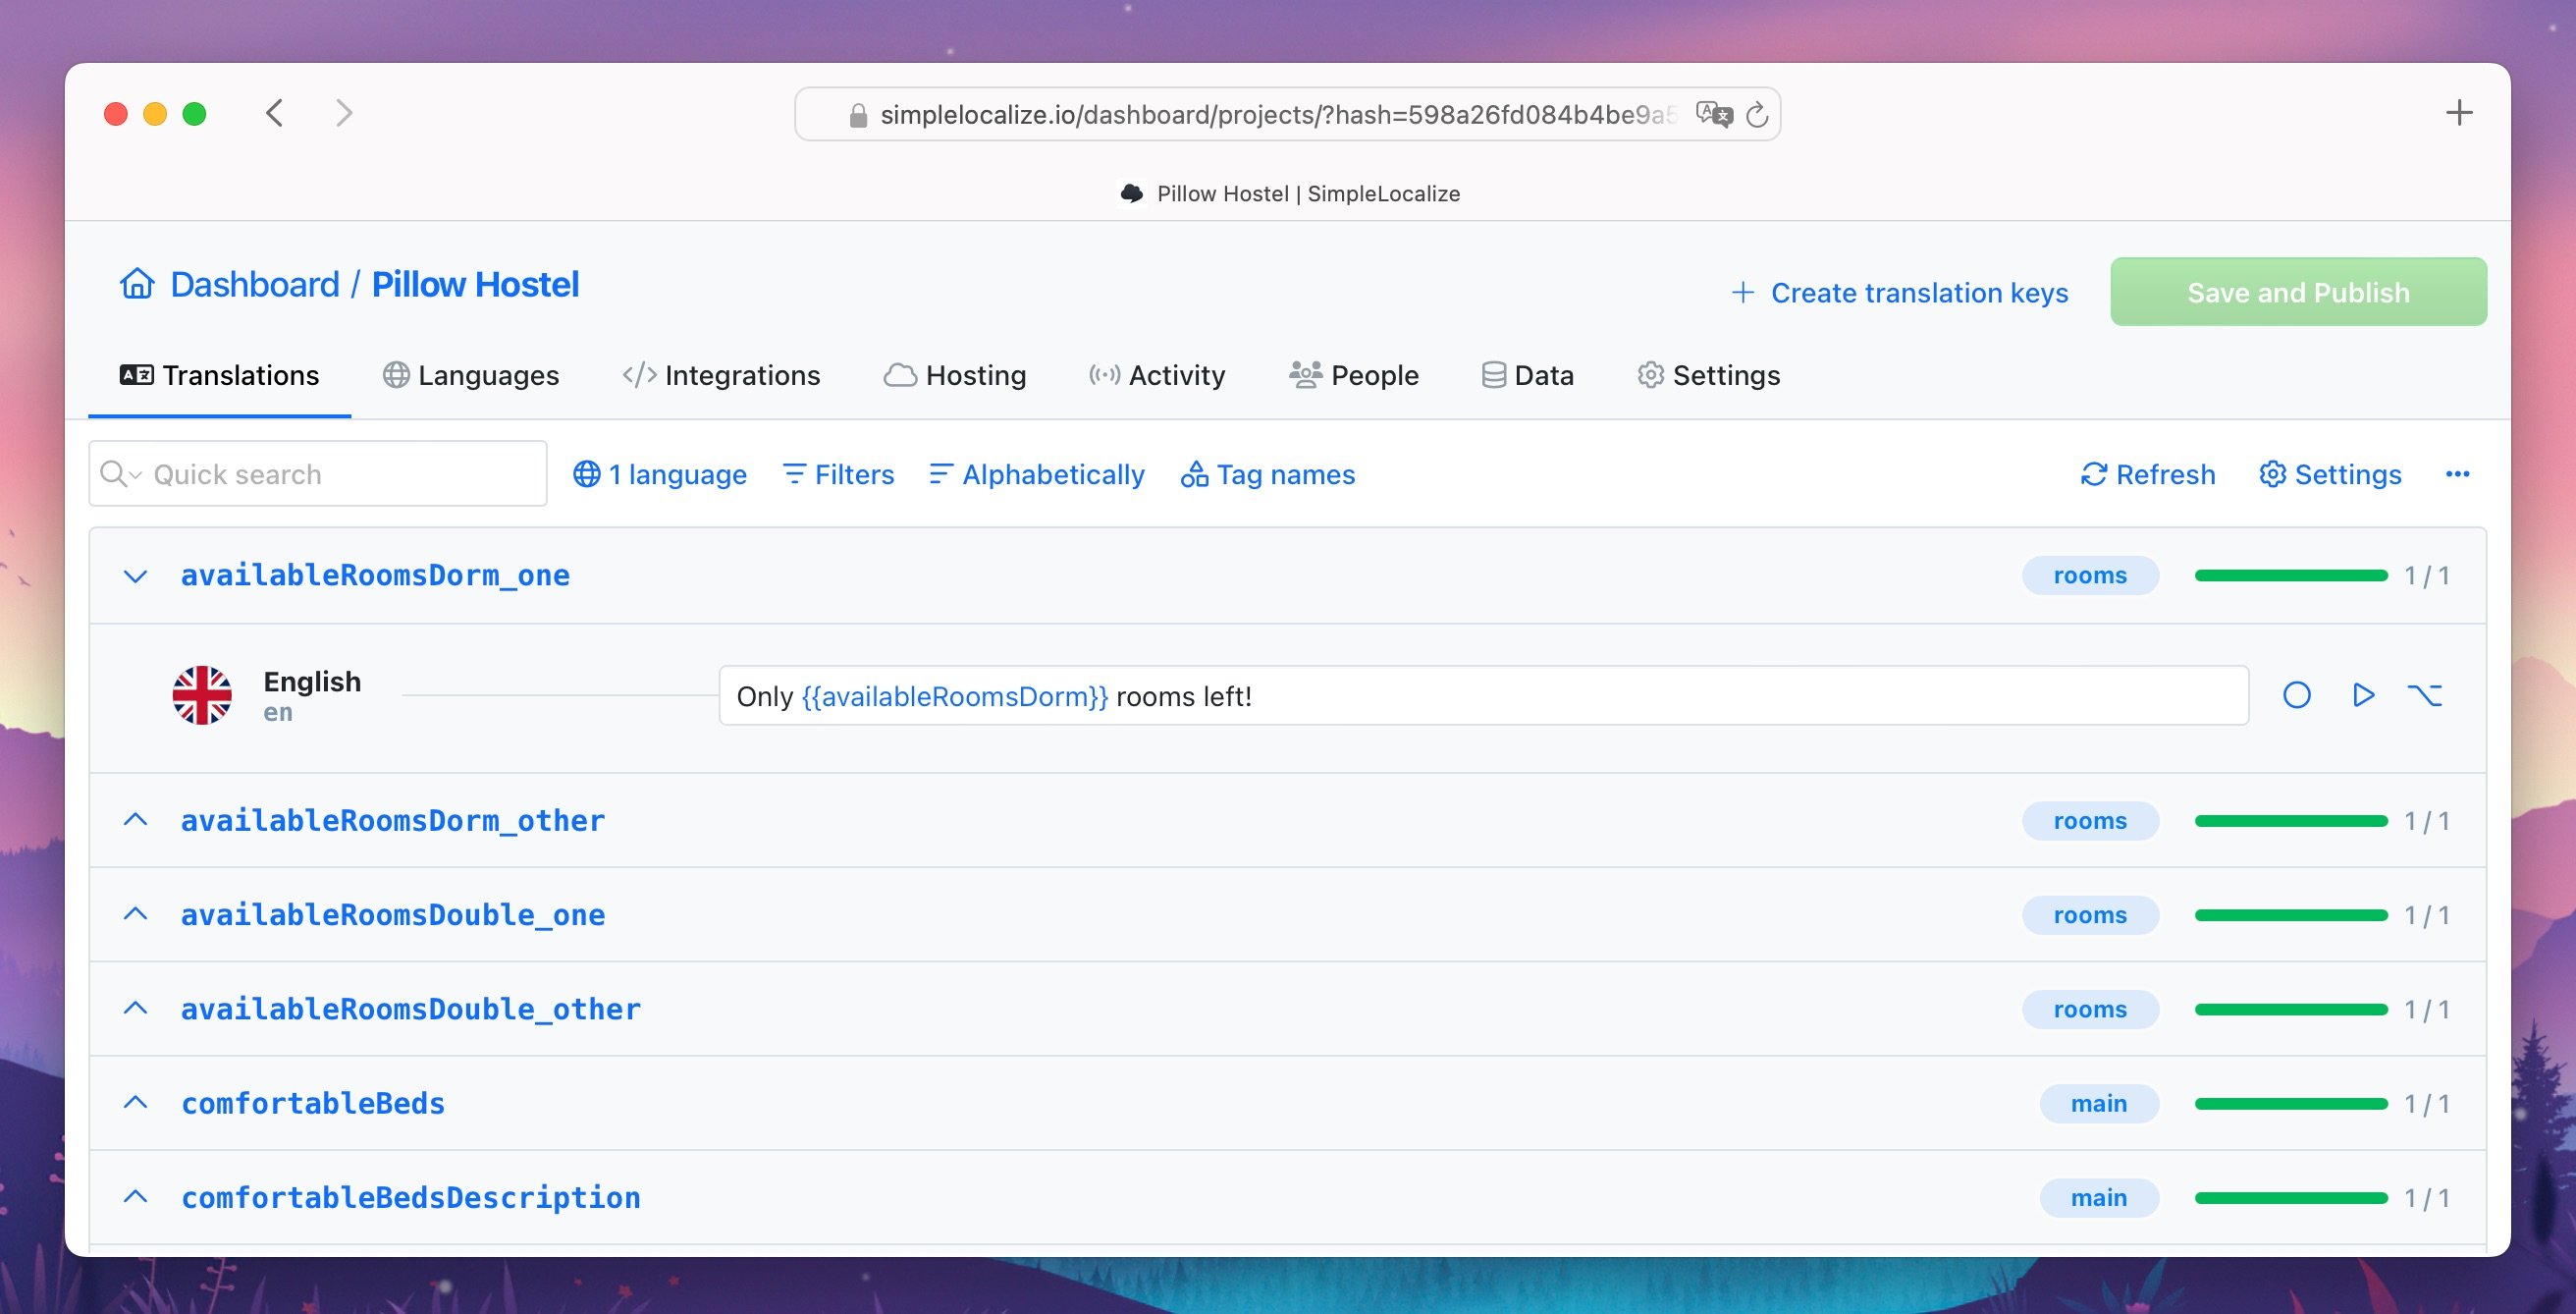
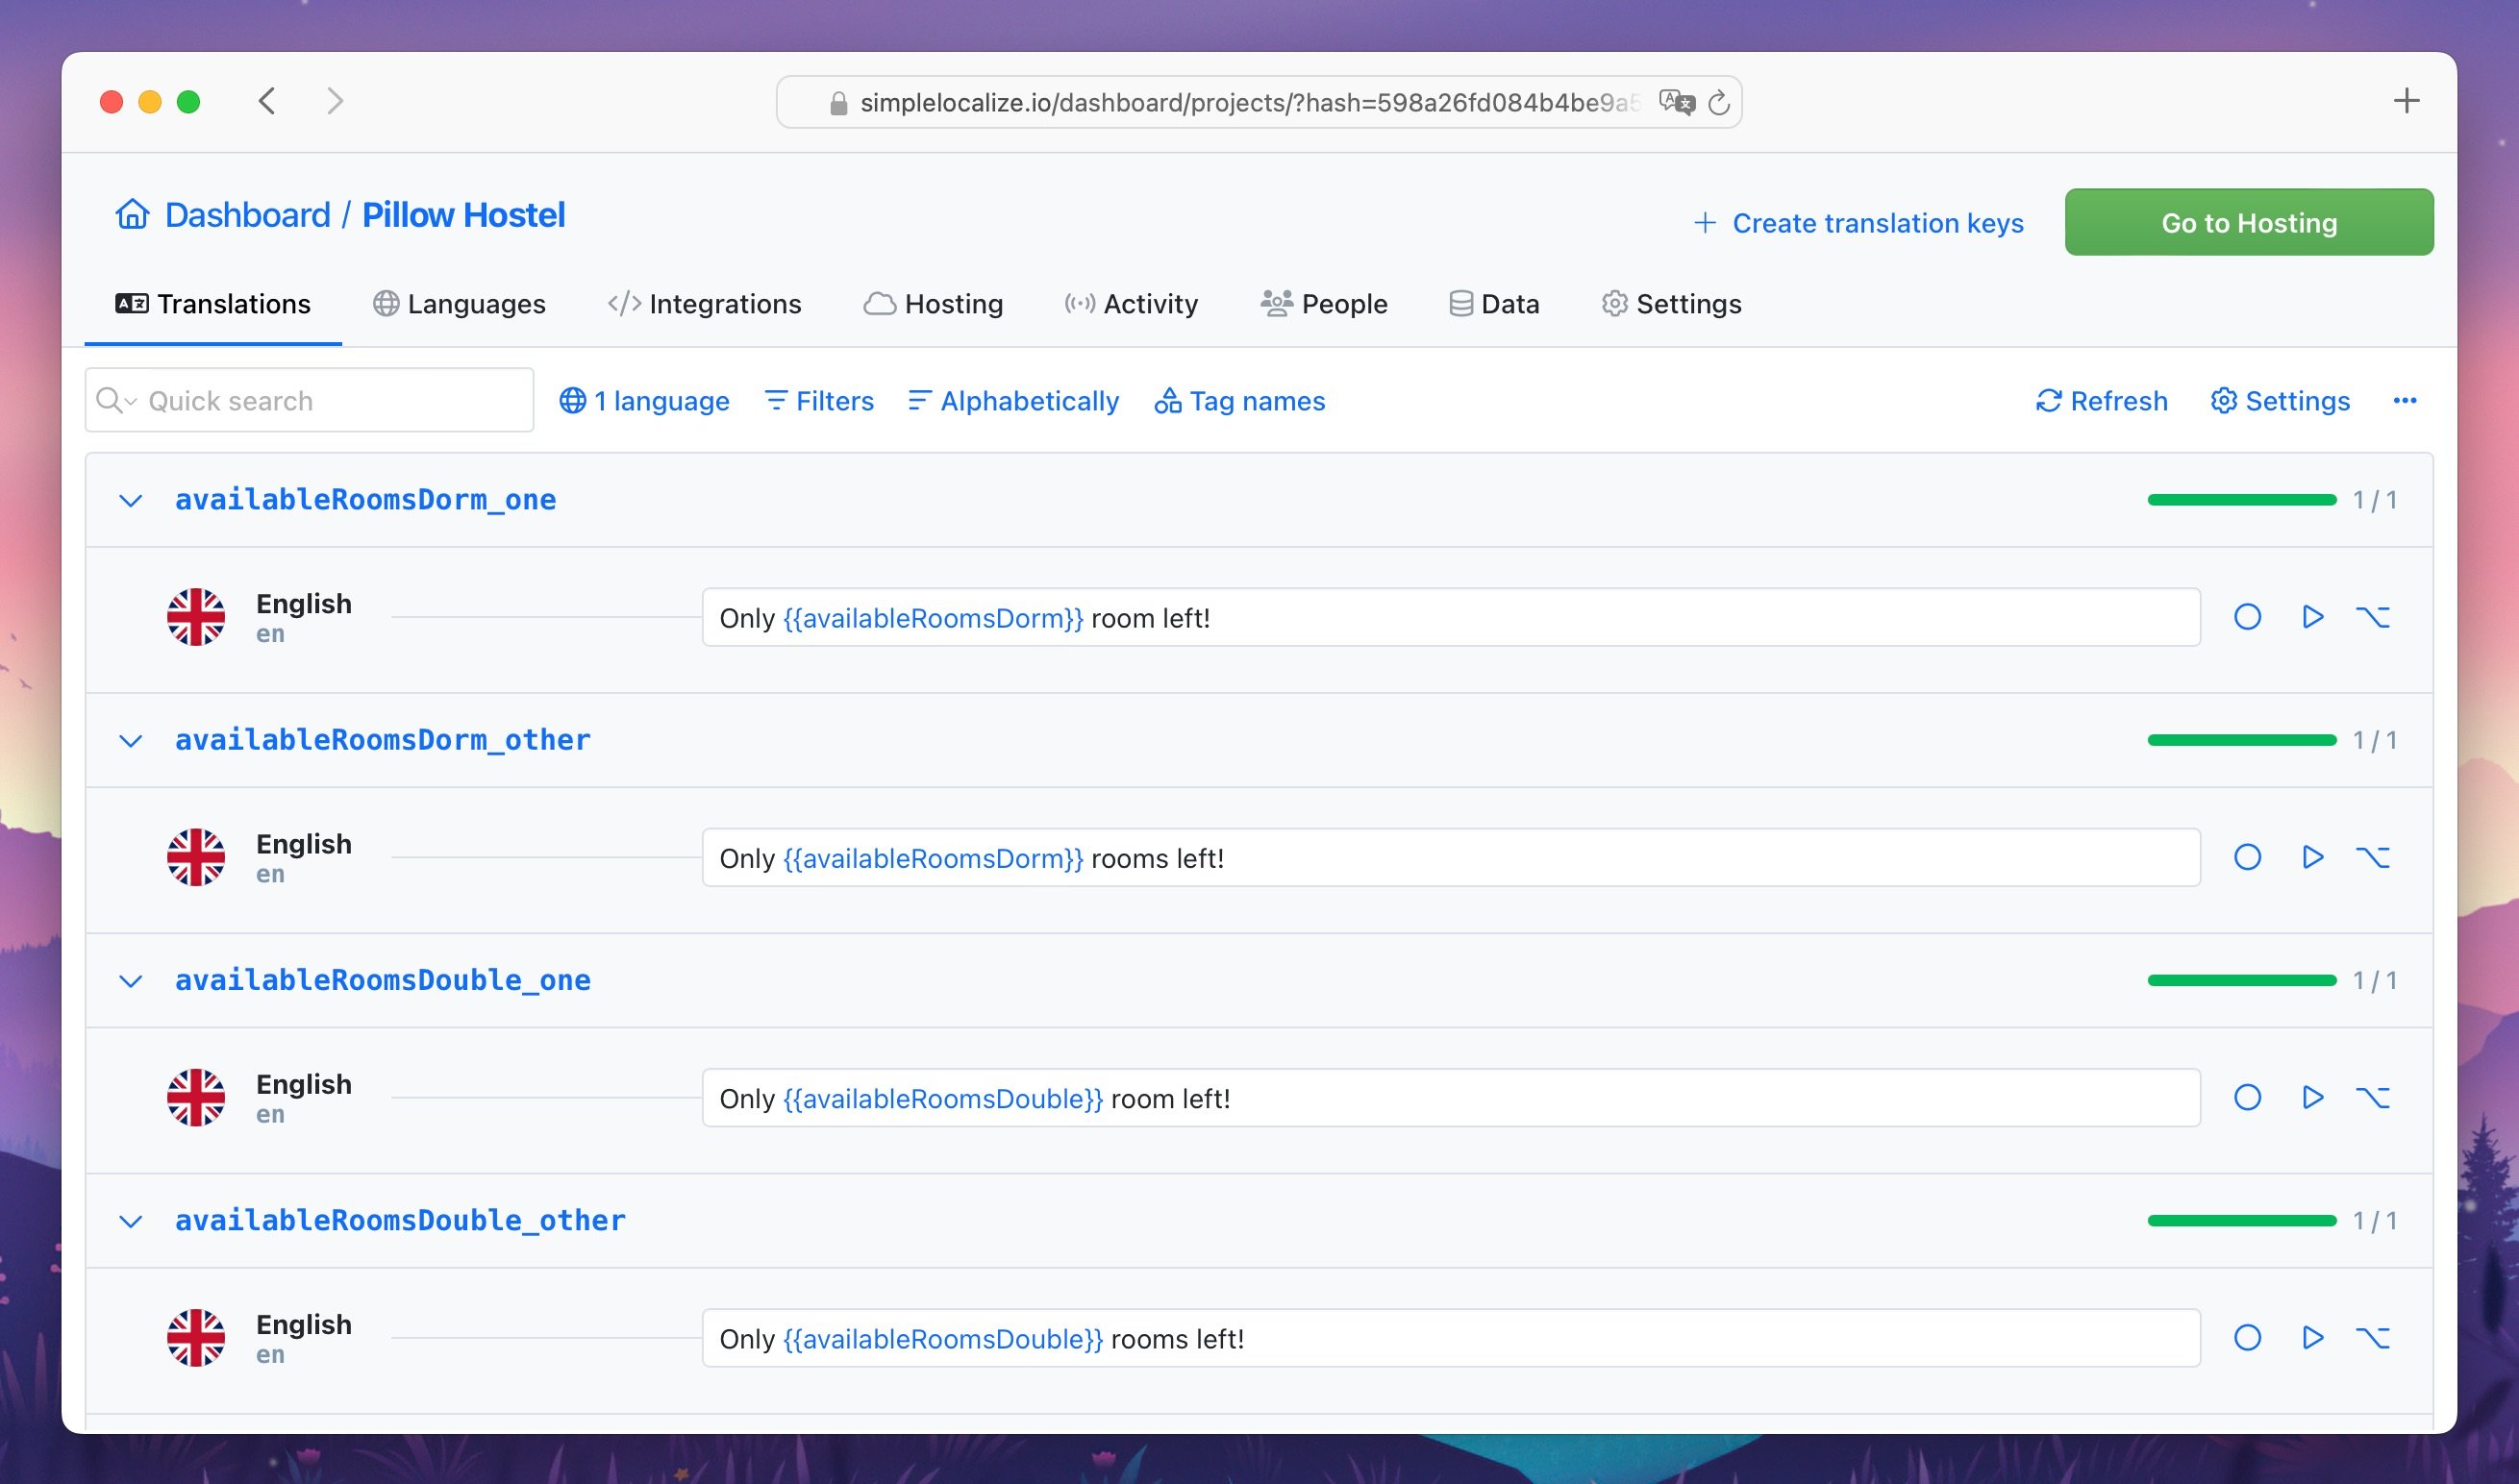
Using plurals
i18next supports plurals for languages that have different forms for singular and plural. To use plurals in your translations, you can pass a count variable to the t function.
Here you can see an example of how to use plurals in your translations with i18next:
const availableRoomsDorm = 5
const availableRoomsDouble = 1;


<RoomCard
  roomName={t("roomMixedDorm", { defaultValue: "4 Bed Mixed Dormitory Room" })}
  availability={t("availableRoomsDorm", { availableRoomsDorm, count: availableRoomsDorm, defaultValue: "Only {{availableRoomsDorm}} rooms left!" })}
/>

<RoomCard
  roomName={t("roomStandardDouble", { defaultValue: "Standard Double Room" })}
  availability={t("availableRoomsDouble", { availableRoomsDouble, count: availableRoomsDouble, defaultValue: "Only {{availableRoomsDouble}} rooms left!" })}
/>
The count variable is used to determine the plural form of the translation. In the example above, we use the count variable to display the correct plural form of the availability text based on the number of available rooms.
i18Next will automatically select the correct plural form based on the count variable, and it will create the translation key for each plural form.
Syntax for i18next plurals:
t("translationKey", { count: variableValue })
i18next alternatives
i18next with react-i18next is a popular choice for internationalizing React apps, but there are other libraries available that you can use for internationalization. Here are some alternatives to i18next:
- formatjs with react-intl: A powerful i18n library for React applications.
- next-translate: A Next.js library for internationalization.
- next-i18next: A Next.js library based on i18next for internationalization.
- LinguiJS: A modern internationalization library for React and other frameworks.
Each of these libraries has its own features and benefits, so you can choose the one that best fits your needs.
Conclusion
In this guide, we have learned how to localize a Next.js app from scratch using i18next and react-i18next. We have set up i18next with the i18next-http-backend plugin to load translations from a JSON file and detect the user's language. We have also configured SimpleLocalize to manage translations for our app and push missing translations to SimpleLocalize. Finally, we have added a language switcher to switch between languages in our Next.js app.
By following this guide, you should now have a fully localized Next.js app with i18next and react-i18next. You can use the techniques and best practices learned in this guide to internationalize your React apps and reach a global audience.


