How to translate a Next.js app with next-i18next
Next.js is one of the most popular React frameworks, and localization is one of the first engineering problems you hit when expanding to new markets. This guide covers the two approaches you will encounter depending on which router your project uses.
Pages Router projects use next-i18next, a library built specifically for it. It wraps i18next and react-i18next and handles the Next.js-specific wiring: loading translations server-side via getStaticProps or getServerSideProps, injecting them as props, and exposing useTranslation to every component.
App Router projects do not need next-i18next. The recommended approach from the next-i18next maintainers is to use i18next and react-i18next directly, with a small middleware for locale detection and helper functions for the server/client split.
If you're deciding between i18next-based App Router wiring and a Next.js-native option, see react-i18next vs next-intl for a focused comparison.
If you choose next-intl, use our practical next-intl guide for Next.js for a full App Router and SimpleLocalize setup.
Both setups are covered here using the same example app. If you want to understand the underlying architecture before jumping into the code, the complete technical guide to internationalization and software localization covers the patterns that apply across every framework.
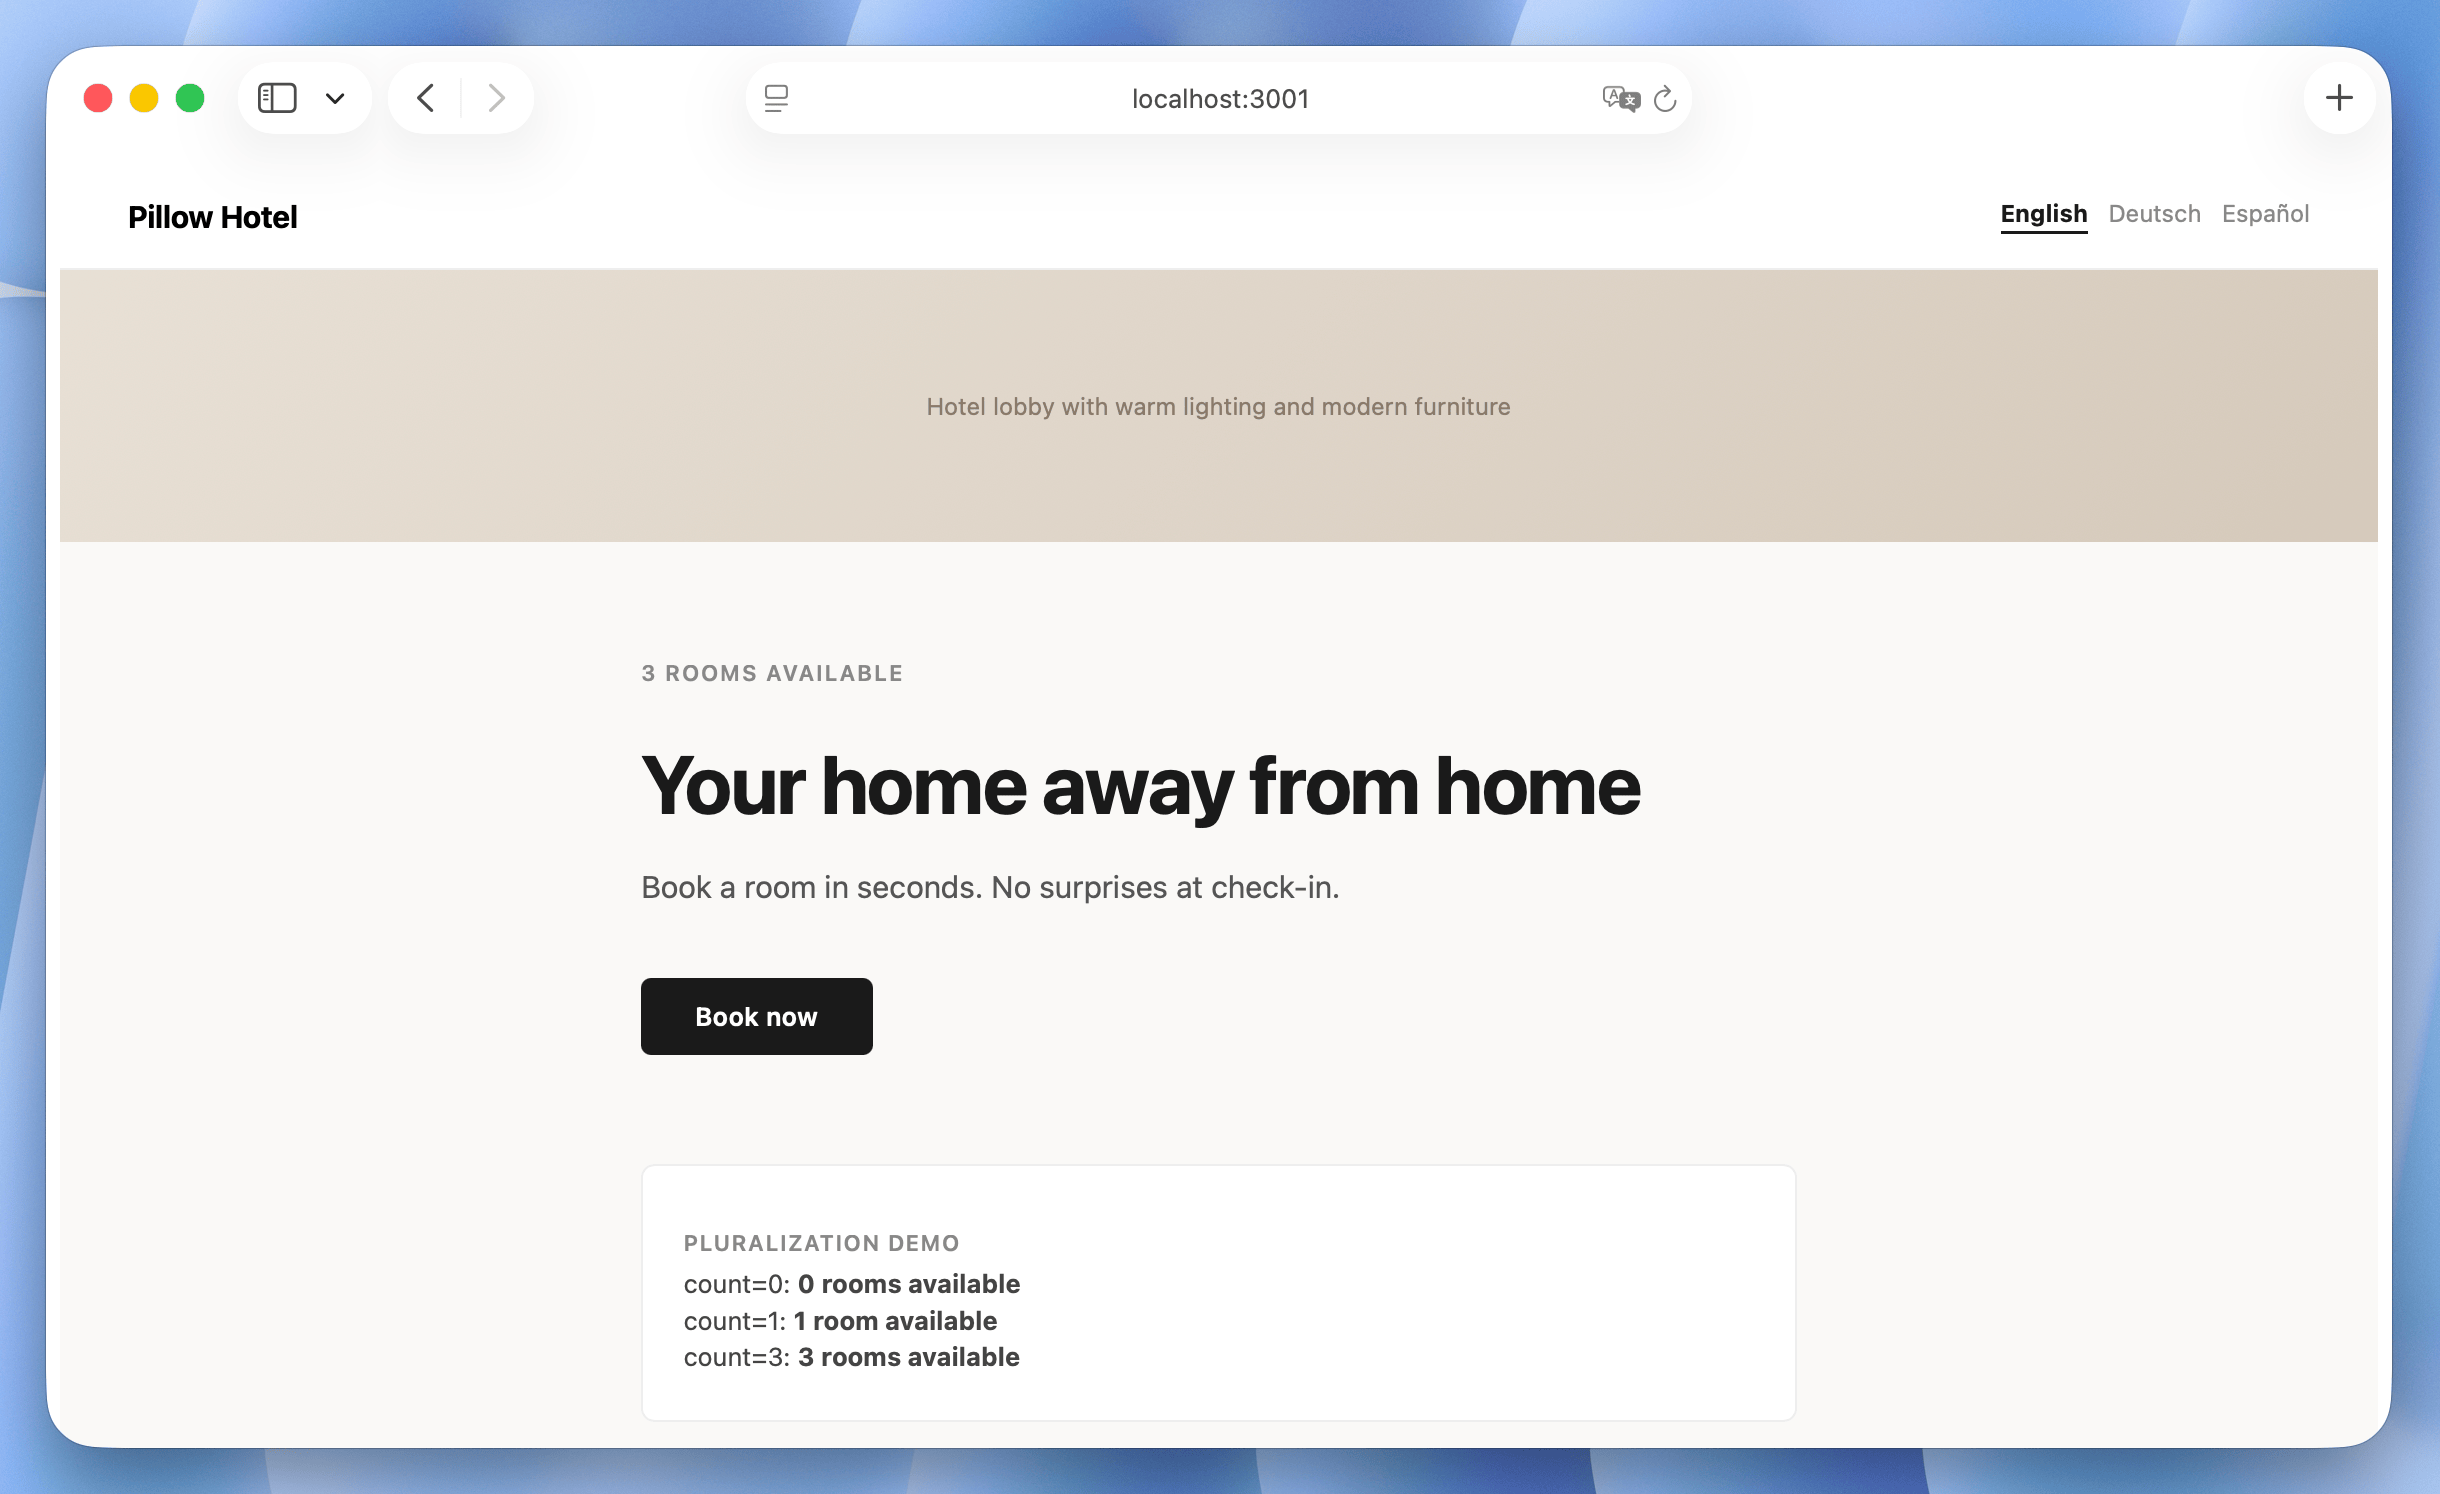
The example app: Pillow Hotel
Throughout this guide we build a minimal hotel booking landing page. The page has a headline, a short description, a room counter with pluralization, and a language selector. It supports English, German, and Spanish.
The base English translation file:
{
  "hero_title": "Your home away from home",
  "hero_subtitle": "Book a room in seconds. No surprises at check-in.",
  "rooms_available_one": "{{count}} room available",
  "rooms_available_other": "{{count}} rooms available",
  "book_now": "Book now",
  "language_selector": "Language",
  "hero_image_alt": "Hotel lobby with warm lighting and modern furniture"
}
Part 1: Pages Router with next-i18next
Install dependencies
npm install next-i18next react-i18next i18next
Create translation files
next-i18next expects translations at public/locales/{lang}/{namespace}.json by default:
public/
  locales/
    en/
      common.json
    de/
      common.json
    es/
      common.json
Configure next-i18next
Create next-i18next.config.js at the project root:
// next-i18next.config.js
/** @type {import('next-i18next').UserConfig} */
module.exports = {
  i18n: {
    defaultLocale: 'en',
    locales: ['en', 'de', 'es'],
  },
}
Then pass the i18n object into next.config.js to enable locale-aware routing:
// next.config.js
const { i18n } = require('./next-i18next.config')

/** @type {import('next').NextConfig} */
const nextConfig = {
  reactStrictMode: true,
  i18n,
}

module.exports = nextConfig
This is all the routing configuration next-i18next needs. Next.js handles locale-prefixed URLs (/de, /es) automatically once i18n is in the config.
Wrap the app
// pages/_app.tsx
import type { AppProps } from 'next/app'
import { appWithTranslation } from 'next-i18next'

function MyApp({ Component, pageProps }: AppProps) {
  return <Component {...pageProps} />
}

export default appWithTranslation(MyApp)
appWithTranslation adds the i18next provider to the React tree. Every page and component below it can access translations via useTranslation.
Load translations in a page
Each page that uses translations needs serverSideTranslations in getStaticProps or getServerSideProps. This loads the translation files for the requested locale and passes them as props.
// pages/index.tsx
import type { GetStaticProps } from 'next'
import { useTranslation } from 'next-i18next'
import { serverSideTranslations } from 'next-i18next/serverSideTranslations'
import Head from 'next/head'
import LanguageSelector from '../components/LanguageSelector'

const ROOM_COUNT = 3

export default function Home() {
  const { t } = useTranslation('common')

  return (
    <>
      <Head>
        <title>{t('hero_title')}</title>
        <meta name="description" content={t('hero_subtitle')} />
      </Head>

      <header>
        <LanguageSelector />
      </header>

      <main>
        <div role="img" aria-label={t('hero_image_alt')} />

        <h1>{t('hero_title')}</h1>
        <p>{t('hero_subtitle')}</p>
        <p>{t('rooms_available', { count: ROOM_COUNT })}</p>
        <a href="/booking">{t('book_now')}</a>
      </main>
    </>
  )
}

export const getStaticProps: GetStaticProps = async ({ locale }) => ({
  props: {
    ...(await serverSideTranslations(locale ?? 'en', ['common'])),
  },
})
The second argument to serverSideTranslations is the list of namespaces to load. Only namespaces listed here are sent to the client for that page.
Language selector
The Pages Router has built-in locale switching via the locale prop on <Link>. Next.js rewrites the URL and updates the active locale automatically.
// components/LanguageSelector.tsx
import { useRouter } from 'next/router'
import Link from 'next/link'
import { useTranslation } from 'next-i18next'

const languages = [
  { code: 'en', label: 'English' },
  { code: 'de', label: 'Deutsch' },
  { code: 'es', label: 'Español' },
]

export default function LanguageSelector() {
  const router = useRouter()
  const { t } = useTranslation('common')

  return (
    <nav aria-label={t('language_selector')}>
      {languages.map(({ code, label }) => (
        <Link
          key={code}
          href={router.pathname}
          locale={code}
          style={{ fontWeight: router.locale === code ? 700 : 400 }}
        >
          {label}
        </Link>
      ))}
    </nav>
  )
}
Check out or tips for creating a language selector and language selector examples for more ideas.
Pluralization
Since i18next v21, the old _plural suffix is deprecated. Use _one and _other (ICU plural categories) instead. i18next picks the correct form automatically based on the count value and the CLDR rules for each language.
// en/common.json
{
  "rooms_available_one": "{{count}} room available",
  "rooms_available_other": "{{count}} rooms available"
}
// de/common.json
{
  "rooms_available_one": "{{count}} Zimmer verfügbar",
  "rooms_available_other": "{{count}} Zimmer verfügbar"
}
// es/common.json
{
  "rooms_available_one": "{{count}} habitación disponible",
  "rooms_available_other": "{{count}} habitaciones disponibles"
}
In the component, pass count. i18next selects the correct form:
t('rooms_available', { count: 1 })  // "1 room available"
t('rooms_available', { count: 3 })  // "3 rooms available"
For languages with more plural forms (Polish, Arabic, Russian), add _few and _many as needed. Our guide on handling pluralization across languages covers the full set of rules with examples.
Learn more about ICU message format.
File structure
Here is the file structure for the Pages Router setup. The App Router structure is different and covered in the next section.
public/
  locales/
    en/common.json
    de/common.json
    es/common.json
pages/
  _app.tsx
  index.tsx
components/
  LanguageSelector.tsx
next-i18next.config.js
next.config.js
Part 2: App Router with i18next and react-i18next
For App Router projects, use i18next and react-i18next directly. The setup involves a middleware for locale detection, a server helper that reads the locale from a request header, and a client hook that reads it from the URL.
Install dependencies
npm install i18next react-i18next i18next-resources-to-backend i18next-browser-languagedetector accept-language
Create translation files
app/
  i18n/
    locales/
      en/common.json
      de/common.json
      es/common.json
Use the same JSON structure shown at the top of this guide.
i18n settings
// app/i18n/settings.ts
export const fallbackLng = 'en'
export const languages = ['en', 'de', 'es']
export const defaultNS = 'common'
export const cookieName = 'NEXT_LOCALE'
export const headerName = 'x-i18next-current-language'
i18next instance
// app/i18n/i18next.ts
import i18next from 'i18next'
import LanguageDetector from 'i18next-browser-languagedetector'
import resourcesToBackend from 'i18next-resources-to-backend'
import { initReactI18next } from 'react-i18next/initReactI18next'
import { fallbackLng, languages, defaultNS } from './settings'

const runsOnServerSide = typeof window === 'undefined'

i18next
  .use(initReactI18next)
  .use(LanguageDetector)
  .use(
    resourcesToBackend(
      (language: string, namespace: string) =>
        import(`./locales/${language}/${namespace}.json`)
    )
  )
  .init({
    supportedLngs: languages,
    fallbackLng,
    lng: undefined,
    fallbackNS: defaultNS,
    defaultNS,
    detection: {
      order: ['path', 'htmlTag', 'cookie', 'navigator'],
    },
    preload: runsOnServerSide ? languages : [],
  })

export default i18next
resourcesToBackend uses dynamic imports so translation files are bundled at build time. This is what makes the setup work on serverless platforms like Vercel, where public/locales/ files may not be available on the filesystem at runtime. The path inside import() must match your downloadPath in simplelocalize.yml exactly. A mismatch builds without errors but fails silently at runtime.
Server-side helper
// app/i18n/index.ts
import { headers } from 'next/headers'
import i18next from './i18next'
import { headerName } from './settings'

export async function getT(ns?: string) {
  const headerList = await headers()
  const lng = headerList.get(headerName) ?? 'en'

  if (lng && i18next.resolvedLanguage !== lng) {
    await i18next.changeLanguage(lng)
  }

  if (ns && !i18next.hasLoadedNamespace(ns)) {
    await i18next.loadNamespaces(ns)
  }

  return {
    t: i18next.getFixedT(lng, ns ?? 'common'),
    i18n: i18next,
    lng,
  }
}
Client-side hook
// app/i18n/client.ts
'use client'

import { useParams } from 'next/navigation'
import { useEffect, useState } from 'react'
import { useTranslation } from 'react-i18next'
import i18next from './i18next'

const runsOnServerSide = typeof window === 'undefined'

export function useT(ns?: string) {
  const params = useParams()
  const lng = typeof params?.lng === 'string' ? params.lng : 'en'

  if (runsOnServerSide && i18next.resolvedLanguage !== lng) {
    i18next.changeLanguage(lng)
  } else {
    // eslint-disable-next-line react-hooks/rules-of-hooks
    const [activeLng, setActiveLng] = useState(i18next.resolvedLanguage)

    // eslint-disable-next-line react-hooks/rules-of-hooks
    useEffect(() => {
      if (activeLng === i18next.resolvedLanguage) return
      setActiveLng(i18next.resolvedLanguage)
    }, [activeLng])

    // eslint-disable-next-line react-hooks/rules-of-hooks
    useEffect(() => {
      if (!lng || i18next.resolvedLanguage === lng) return
      i18next.changeLanguage(lng)
    }, [lng])
  }

  return useTranslation(ns ?? 'common')
}
Middleware
// middleware.ts
import { NextResponse } from 'next/server'
import type { NextRequest } from 'next/server'
import acceptLanguage from 'accept-language'
import { fallbackLng, languages, cookieName, headerName } from './app/i18n/settings'

acceptLanguage.languages(languages)

export const config = {
  matcher: [
    '/((?!api|_next/static|_next/image|assets|favicon.ico|sw.js|site.webmanifest).*)',
  ],
}

export function middleware(req: NextRequest) {
  let lng: string | null = null

  // 1. Cookie
  if (req.cookies.has(cookieName)) {
    lng = acceptLanguage.get(req.cookies.get(cookieName)?.value)
  }

  // 2. Accept-Language header
  if (!lng) lng = acceptLanguage.get(req.headers.get('Accept-Language'))

  // 3. Fallback
  if (!lng) lng = fallbackLng

  const lngInPath = languages.find((loc) =>
    req.nextUrl.pathname.startsWith(`/${loc}`)
  )

  // Pass locale to Server Components via header
  const reqHeaders = new Headers(req.headers)
  reqHeaders.set(headerName, lngInPath ?? lng)

  // Redirect if no locale prefix in path
  if (!lngInPath && !req.nextUrl.pathname.startsWith('/_next')) {
    return NextResponse.redirect(
      new URL(`/${lng}${req.nextUrl.pathname}${req.nextUrl.search}`, req.url)
    )
  }

  // Update cookie from referer
  if (req.headers.has('referer')) {
    const refererUrl = new URL(req.headers.get('referer')!)
    const lngInReferer = languages.find((l) =>
      refererUrl.pathname.startsWith(`/${l}`)
    )
    const response = NextResponse.next({ headers: reqHeaders })
    if (lngInReferer) response.cookies.set(cookieName, lngInReferer)
    return response
  }

  return NextResponse.next({ headers: reqHeaders })
}
The matcher pattern is important. Without it, the middleware runs on static files too, causing /favicon.ico to redirect to /en/favicon.ico and breaking site icons.
The middleware detects locale in priority order: URL path prefix, cookie from a previous visit, Accept-Language header, then fallback. It sets x-i18next-current-language as a custom header so Server Components can read the active locale without parsing the URL themselves.
Root layout
All localized routes live under app/[lng]/. In Next.js 15+, params is a Promise, so you must await it before accessing lng. This is a common pitfall when migrating from Next.js 13 or 14.
// app/[lng]/layout.tsx
import { languages } from '../i18n/settings'
import { getT } from '../i18n'

export async function generateStaticParams() {
  return languages.map((lng) => ({ lng }))
}

export async function generateMetadata({
  params,
}: {
  params: Promise<{ lng: string }>
}) {
  const { lng } = await params
  const { t } = await getT('common')
  const hreflangs: Record<string, string> = {}
  for (const l of languages) {
    hreflangs[l] = `https://pillowhotel.com/${l}`
  }
  return {
    title: t('hero_title'),
    description: t('hero_subtitle'),
    alternates: { languages: hreflangs },
  }
}

export default async function RootLayout({
  children,
  params,
}: {
  children: React.ReactNode
  params: Promise<{ lng: string }>
}) {
  const { lng } = await params

  return (
    <html lang={lng}>
      <body>{children}</body>
    </html>
  )
}
alternates.languages in generateMetadata produces <link rel="alternate" hreflang="de" href="..." /> tags in the page head, which tell search engines the relationship between your localized URLs. For a full explanation see our guide on hreflang for multilingual websites.
Server Component page
// app/[lng]/page.tsx
import { getT } from '../i18n'
import LanguageSelector from './components/LanguageSelector'

const ROOM_COUNT = 3

export default async function Home() {
  const { t } = await getT('common')

  return (
    <>
      <header>
        <LanguageSelector />
      </header>

      <main>
        <div role="img" aria-label={t('hero_image_alt')} />

        <h1>{t('hero_title')}</h1>
        <p>{t('hero_subtitle')}</p>
        <p>{t('rooms_available', { count: ROOM_COUNT })}</p>
        <a href="/booking">{t('book_now')}</a>
      </main>
    </>
  )
}
getT() reads the language from the header the middleware set on the request — no locale needs to be passed manually. The aria-label on the image element is translated the same way as any other string. It is easy to skip when localizing a page and worth making a habit of, since it affects accessibility and how search engines index images for each locale.
Language selector (Client Component)
// app/[lng]/components/LanguageSelector.tsx
'use client'

import { useRouter, usePathname } from 'next/navigation'
import { useT } from '../../i18n/client'

const languages = [
  { code: 'en', label: 'English' },
  { code: 'de', label: 'Deutsch' },
  { code: 'es', label: 'Español' },
]

export default function LanguageSelector() {
  const router = useRouter()
  const pathname = usePathname()
  const { t } = useT('common')

  function switchLanguage(newLng: string) {
    const segments = pathname.split('/')
    segments[1] = newLng
    router.push(segments.join('/'))
    router.refresh()
  }

  return (
    <nav aria-label={t('language_selector')}>
      {languages.map(({ code, label }) => (
        <button key={code} onClick={() => switchLanguage(code)}>
          {label}
        </button>
      ))}
    </nav>
  )
}
router.refresh() after router.push() is required. Without it, Next.js may serve a cached page on soft navigation and skip the middleware, so the locale cookie would not update.
For a switcher with no custom logic, using <Link> is preferable for SEO because it renders crawlable <a> tags. router.push is the right choice when you need to run logic before navigating. If third-party scripts do not reinitialize after switching language, window.location.pathname = newPath forces a full page reload. Treat this as a last resort.
File structure
app/
  i18n/
    settings.ts
    i18next.ts
    index.ts          ← server helper (getT)
    client.ts         ← client hook (useT)
    locales/
      en/common.json
      de/common.json
      es/common.json
  [lng]/
    layout.tsx
    page.tsx
    components/
      LanguageSelector.tsx
middleware.ts
Migrating from Pages Router to App Router
If you are currently using next-i18next on the Pages Router and moving to the App Router, you don't have to migrate everything at once. Next.js supports using both routers side-by-side.
1. Move your translation files
The biggest change is moving translations from public/locales/ to app/i18n/locales/.
Why? The App Router setup uses dynamic import() statements (the resourceLoader pattern). This ensures translations are bundled as code, which is more reliable on serverless platforms than reading from the public folder via the filesystem.
2. Update your Configuration
You will transition from the next-i18next.config.js file to the app/i18n/settings.ts file.
Pro Tip: Keep your namespace names and JSON structures identical. This ensures that even as you change the "how" (the library setup), the "what" (your keys and values) remains the same in SimpleLocalize.
3. Replace the Hooks
The migration at the component level is straightforward:
- In Pages Router components, you use:
import { useTranslation } from 'next-i18next'. - In App Router Client components, you will use:
import { useT } from '@/i18n/client'. - In App Router Server components, you stop using hooks entirely and switch to:
const { t } = await getT('common').
4. SimpleLocalize adjustment
When you move your files, remember to update your simplelocalize.yml. You can temporarily use two different uploadPath entries if you are running a hybrid setup during the migration period.
Managing translations with SimpleLocalize
Once the app runs locally, connect it to SimpleLocalize so translators can work in a proper editor, auto-translation fills gaps, and CI/CD keeps files in sync with every release.
You can use SimpleLocalize CLI to upload and download translations. The CLI reads your simplelocalize.yml config file, so you can set up the file structure and naming conventions that match your i18next backend configuration.
Install the CLI
curl -s https://get.simplelocalize.io/2.11/install | bash
Create the config file
# simplelocalize.yml
apiKey: YOUR_PROJECT_API_KEY

# Pages Router
uploadFormat: single-language-json
uploadPath: ./public/locales/{lang}/{ns}.json
downloadFormat: single-language-json
downloadPath: ./public/locales/{lang}/{ns}.json

# App Router — replace the paths above with these.
# downloadPath must match the import() path in app/i18n/i18next.ts exactly.
# uploadPath: ./app/i18n/locales/{lang}/{ns}.json
# downloadPath: ./app/i18n/locales/{lang}/{ns}.json
The {lang} and {ns} placeholders are resolved automatically. A project with three languages and two namespaces uploads and downloads six files in one command.
Upload, translate, download
simplelocalize upload
simplelocalize download
Log in to SimpleLocalize, open your project, and use the online editor to manage translations. You can invite translators with scoped access, run auto-translation with DeepL, Google Translate, or any AI model via OpenRouter, and set up translation automations to auto-translate new keys on upload.
Adding descriptions to ambiguous keys helps both translators and auto-translation. A key named rooms_available with the description "Hotel homepage, refers to guest rooms not spreadsheet rows" avoids mistranslations. Read more about context in localization.
Automate in CI/CD
# .github/workflows/build.yml
- name: Download translations
  run: simplelocalize download
  env:
    SIMPLELOCALIZE_API_KEY: ${{ secrets.SIMPLELOCALIZE_API_KEY }}
The GitHub App provides a direct repository connection as an alternative to the CLI step. For the full pipeline pattern, see the localization workflow for developers.
Pages Router vs App Router: quick comparison
Check out the table below for a high-level comparison of the two setups.
| Pages Router (next-i18next) | App Router (i18next direct) | |
|---|---|---|
| Library | next-i18next | i18next + react-i18next |
| Server translation | serverSideTranslations in getStaticProps | getT() async helper |
| Client translation | useTranslation() | useT() custom hook |
| Locale routing | Built-in Next.js i18n routing | middleware.ts |
| Translation files | public/locales/ | app/i18n/locales/ with dynamic imports |
| Serverless (Vercel) | Works | Works |
| SEO metadata | <Head> with useTranslation | generateMetadata with getT() |
Troubleshooting
Translations missing on first render (Pages Router)
Make sure serverSideTranslations is called in getStaticProps or getServerSideProps on every page that uses translations, and that the namespace list matches what you pass to useTranslation.
Translations not loading on Vercel (App Router)
The App Router setup uses dynamic imports inside resourcesToBackend, which bundles the files at build time. Make sure the path inside import() in app/i18n/i18next.ts and your downloadPath in simplelocalize.yml are identical. A mismatch builds without errors but fails at runtime.
Favicon redirecting to /en/favicon.ico
The middleware matcher pattern excludes static files. Copy it exactly. Without the exclusion pattern, every static file request goes through locale detection and gets redirected.
Language not detected on first visit (App Router)
Check that middleware.ts is at the project root (not inside app/) and that the matcher covers your localized routes.
Plural forms not working
Use _one and _other key suffixes. The old _plural suffix is deprecated since i18next v21. For languages with more plural forms (Polish, Arabic), add _few and _many as required by that language's CLDR rules.
useT() called inside a Server Component
useT() is a client-side hook and cannot run in a Server Component. Use the async getT() helper from app/i18n/index.ts instead.
Next steps
With translations working, a common next question is how to structure locale detection: should the locale live in the URL path, a subdomain, or a cookie? The locale detection strategies guide walks through the trade-offs with code examples. For the broader technical picture, the complete i18n guide covers translation key design, CI/CD automation, RTL support, and pluralization across languages.


")
