The article describes how to configure a custom hosting server to store translations. If you are looking for a managed solution, please refer to the custom hosting providers for translation hosting section, where you can find a list of hosting providers that are natively supported by SimpleLocalize.
Custom storage server via GitHub Actions
Using a GitHub Actions workflow, you can automate the process of pulling translations from SimpleLocalize and uploading them to any other hosting server that's not natively supported by SimpleLocalize.
Generate GitHub personal access token
Create a new GitHub Personal Access Token (classic) with repo scope.
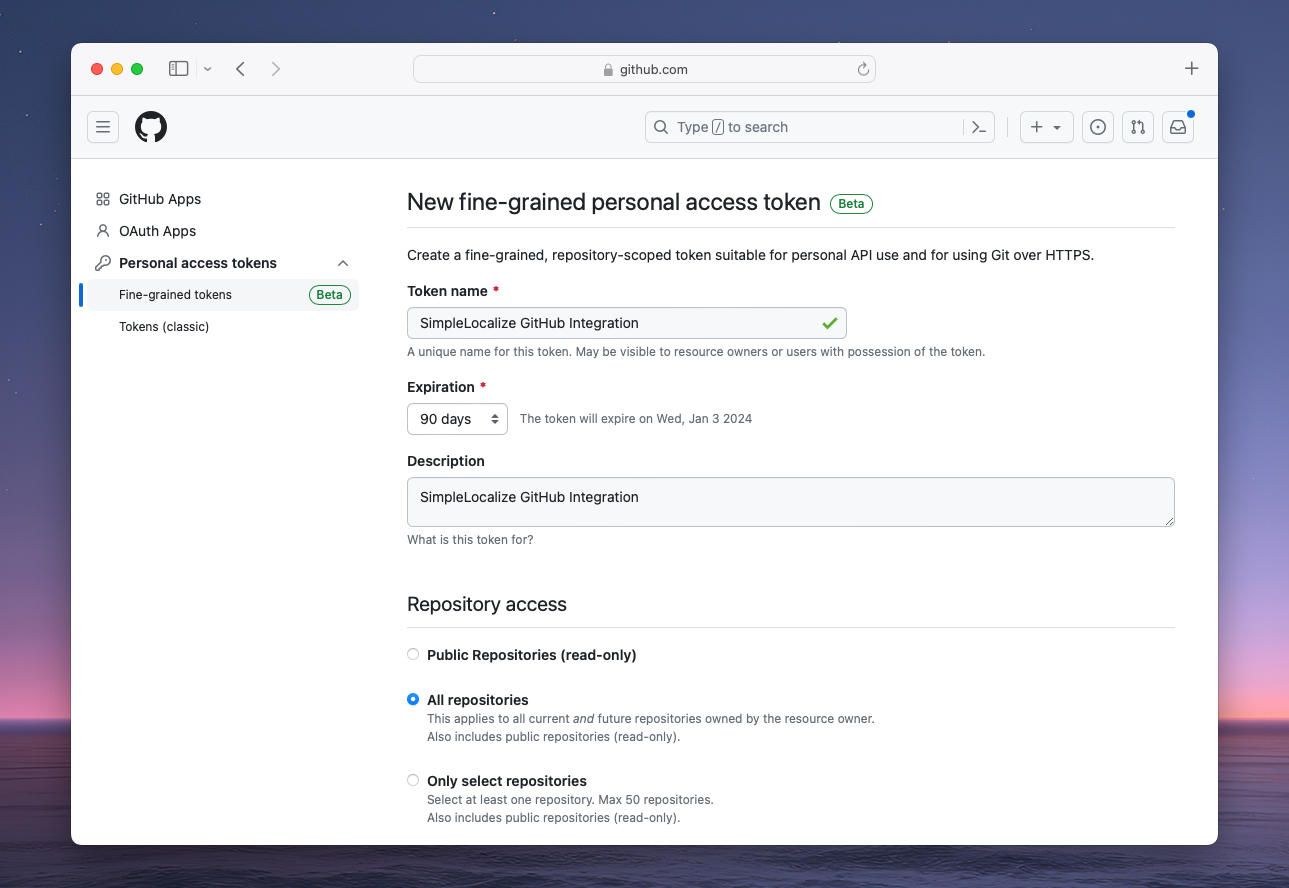
Learn more about GitHub Personal Access Tokens
Set up a webhook
In SimpleLocalize project, go to 'Settings > Webhooks' and set a new webhook.
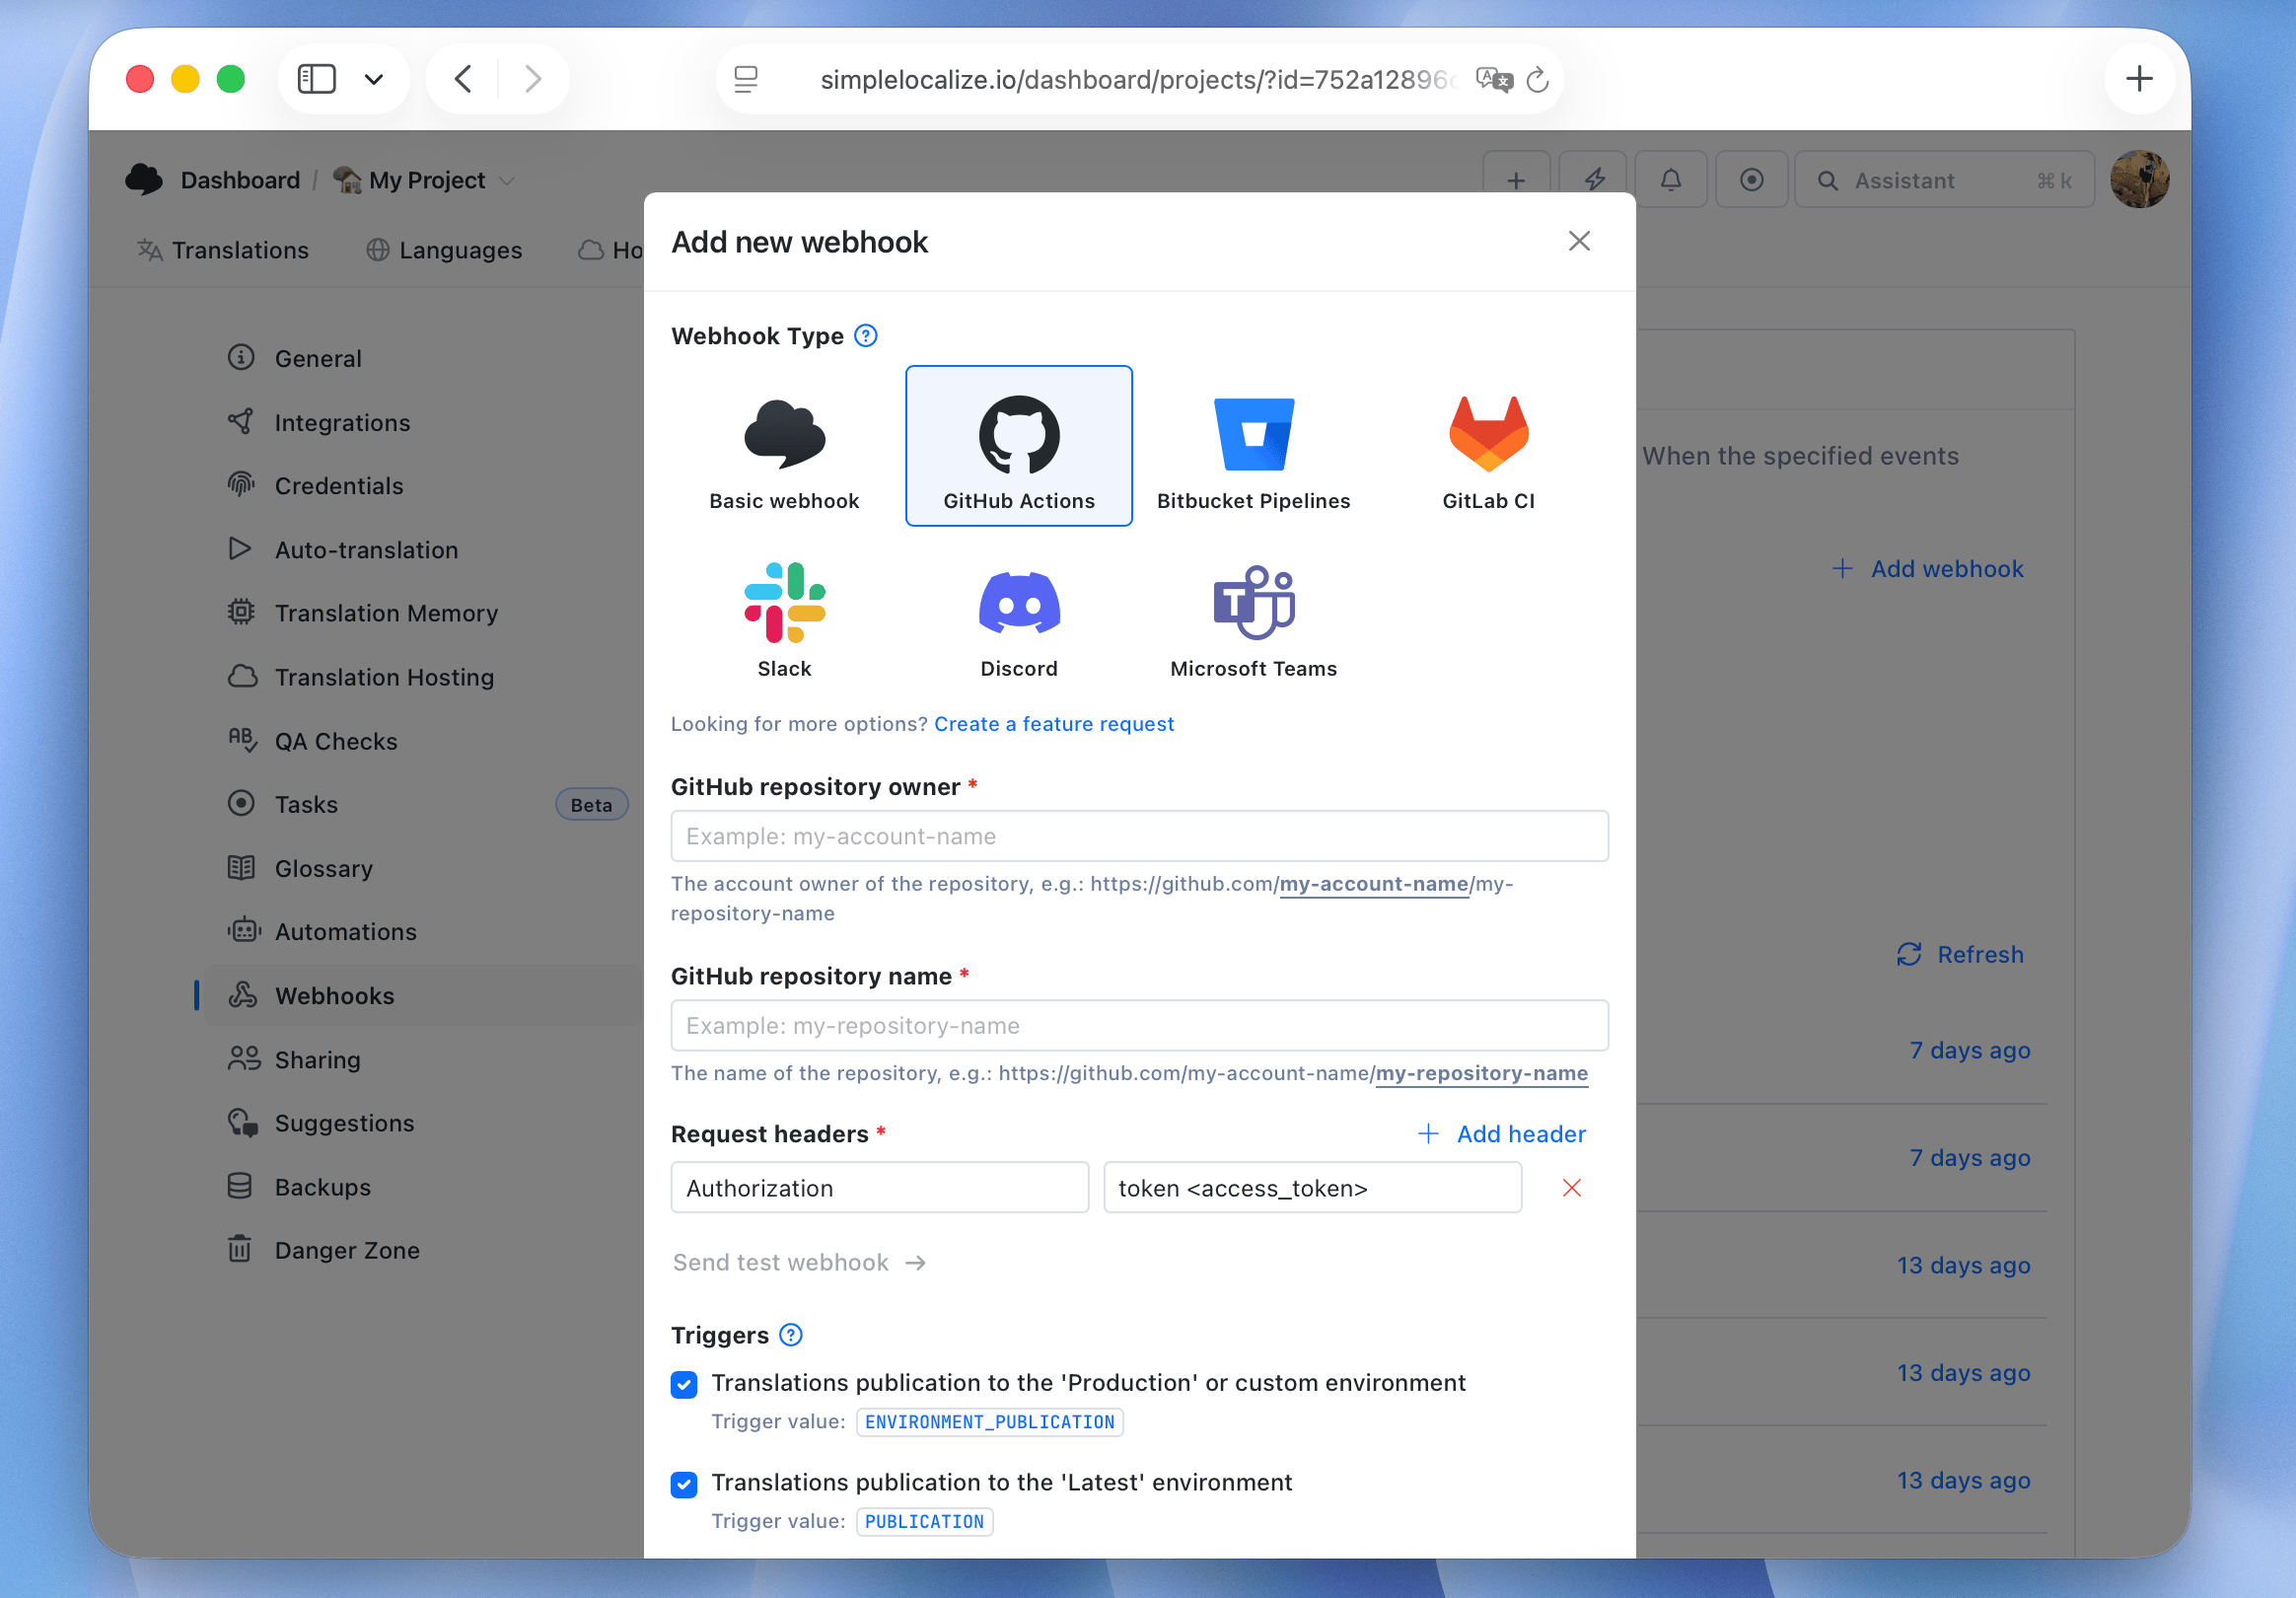
Choose a 'GitHub Actions' request type, set your repository owner name, repository name and Authorization header with token generated in previous step:
Authorization: token {your_token}
Check triggers you want to use, for example:
PUBLICATIONto get resources from the_latestenvironmentENVIRONMENT_PUBLICATIONto get resources from_productionor any other custom environment
in this example, we will use ENVIRONMENT_PUBLICATION to get resources from the _production environment, because we want to publish translations to our server only when they are ready to be published.
Create GitHub Actions workflow
Create a new workflow in your GitHub repository. Go to 'Actions' tab and click 'New workflow' or just create a workflow file in .github/workflows directory.
# .github/workflows/simplelocalize-production-translations.yml
name: SimpleLocalize GitHub Action
on:
  # Allows external webhook trigger: https://api.github.com/repos/{owner}/{repo}/dispatches
  repository_dispatch:
    types:
      - simplelocalize_environment_publication # ENVIRONMENT_PUBLICATION

env:
  cli-version: '2.5.1'

jobs:
  build:
    runs-on: ubuntu-latest
    steps:
      # Pull translations for the environment that was published
      - name: Pull '_production' or custom environment translations
        uses: simplelocalize/github-action-cli@v3
        with:
          api-key: ${{ secrets.SIMPLELOCALIZE_API_KEY }}
          command: 'pull'
          cli-version: ${{ env.cli-version }}
          args: "--pullPath ./hosting-resources/ --environment ${{ github.event.client_payload.environment }}"

      # upload translations to S3 Bucket
      - uses: shallwefootball/s3-upload-action@master
        with:
          aws_key_id: ${{ secrets.AWS_KEY_ID }}
          aws_secret_access_key: ${{ secrets.AWS_SECRET_ACCESS_KEY}}
          aws_bucket: ${{ secrets.AWS_BUCKET }}
          source_dir: './hosting-resources/'
In this example, we used a custom GitHub Action to upload files to S3 Bucket, but you can use any other GitHub Action to upload files to your hosting server.
Now, once we publish translations to the _production environment, SimpleLocalize will trigger the GitHub Action pipeline, and it will pull translations from SimpleLocalize and upload them to S3 Bucket.
You can use any other hosting server to store translation resources, for example:
(optional) Pull latest translations
We can use the same workflow to pull translations from the _latest environment, but we need to change the on.repository_dispatch section, and
we can simplify the pull translations step and set the environment key.
# .github/workflows/simplelocalize-latest-translations.yml
name: SimpleLocalize GitHub Action
on:
  # Allows external webhook trigger: https://api.github.com/repos/{owner}/{repo}/dispatches
  repository_dispatch:
    types:
      - simplelocalize_publication # PUBLICATION
env:
  cli-version: '2.5.1'

jobs:
  build:
    runs-on: ubuntu-latest
    steps:
      # Pull translations for the environment that was published
      - name: Pull '_latest' translations
        uses: simplelocalize/github-action-cli@v3
        with:
          api-key: ${{ secrets.SIMPLELOCALIZE_API_KEY }}
          command: 'pull'
          cli-version: ${{ env.cli-version }}
          args: "--pullPath ./hosting-resources/ --environment _latest"
      # upload translations to S3 Bucket
      - uses: shallwefootball/s3-upload-action@master
        with:
          aws_key_id: ${{ secrets.AWS_KEY_ID }}
          aws_secret_access_key: ${{ secrets.AWS_SECRET_ACCESS_KEY}}
          aws_bucket: ${{ secrets.AWS_BUCKET }}
          source_dir: './hosting-resources/'
Note: Trigger 'PUBLICATION' does not contain information about the environment, so we need to set the environment key manually.
(optional) Cancel previous workflow to avoid stacking
pre-job:
    name: Pre-job
    runs-on: ubuntu-latest

    steps:
      - uses: technote-space/auto-cancel-redundant-workflow@v1
      - name: Cancel redundant workflows
        run: echo "Cancel redundant workflows finished"
In this example, we used a custom GitHub Action to cancel previous workflow.
Custom storage server via webhooks
Another way of integrating SimpleLocalize with your custom hosting server that is not natively supported by SimpleLocalize is to use webhooks.
Set up a webhook
SimpleLocalize provides a webhook mechanism to notify your server about changes in Translation Hosting resources. Go to 'Settings > Webhooks' and set a new webhook.
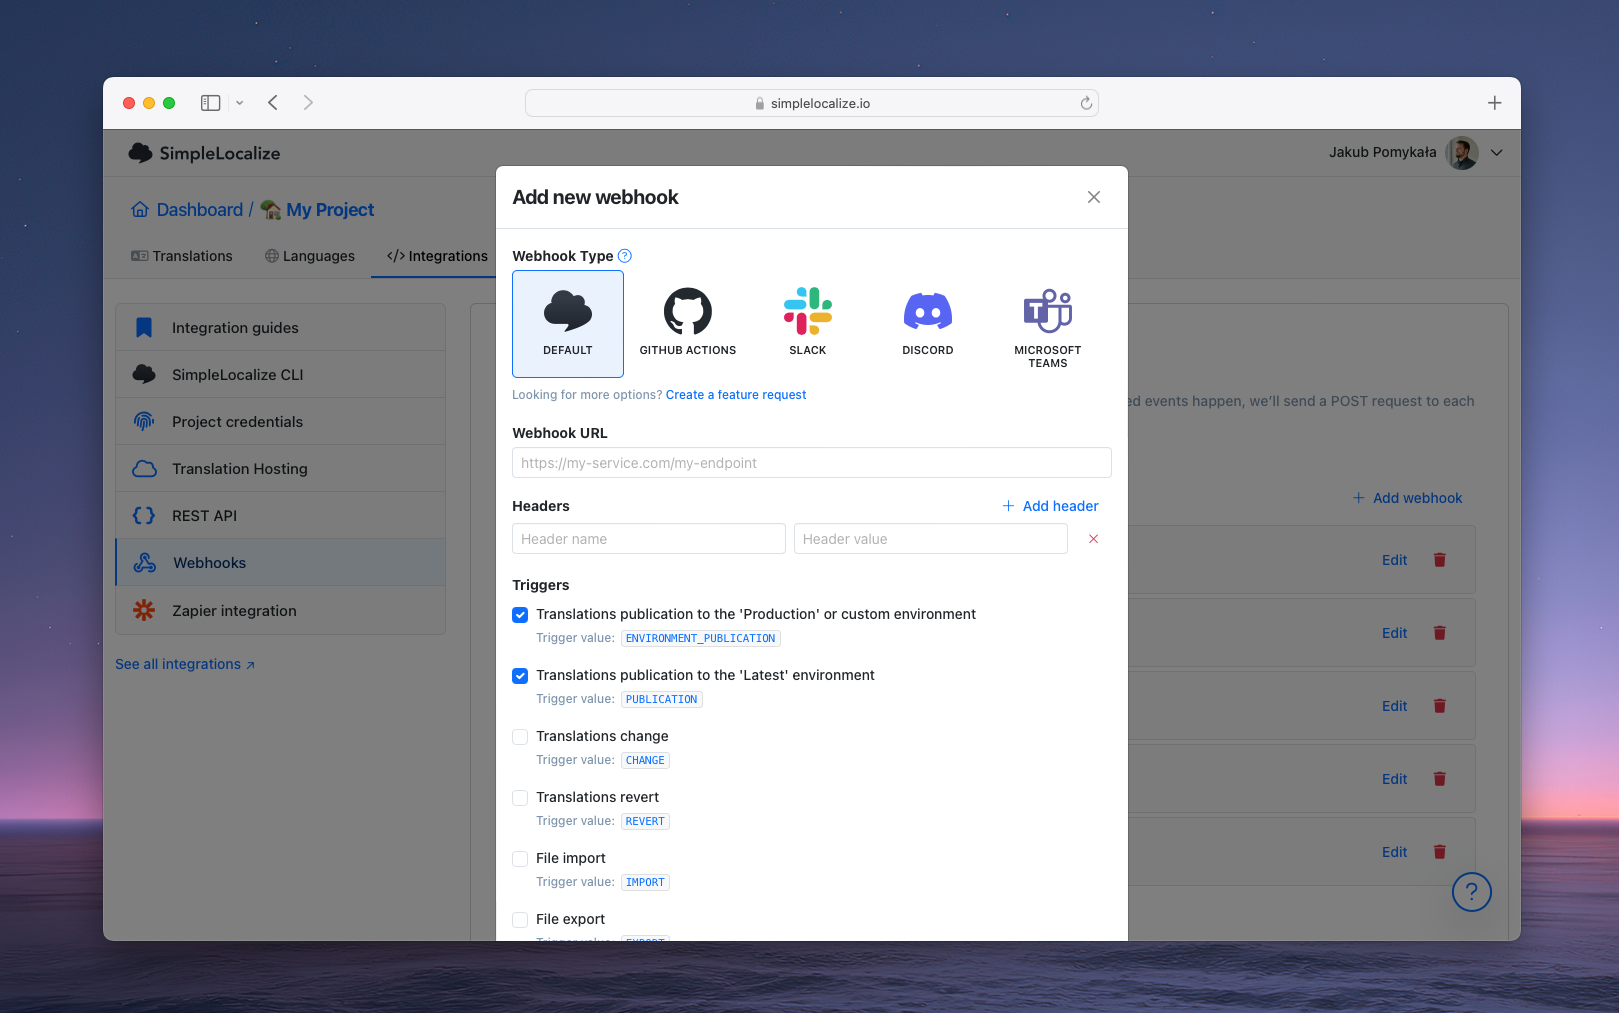
Once you set a new webhook, SimpleLocalize will send a POST request to your server with a payload containing information about the change. You can use that information to fetch translations from SimpleLocalize API and deploy them to your server.
Fetch translation resources
To do that, you need to use SimpleLocalize API to get a list of downloadable environment resources. You can do it by calling GET /projects/{project_id}/translations/hosting/{environment_id}/resources endpoint.
The endpoint will respond with an environment summery and a list of downloadable resources. Each resource contains a URL to download the resource.
Sample response
{
  "msg": "OK",
  "status": 200,
  "data": {
    "numberOfKeys": 81,
    "numberOfLanguages": 6,
    "numberOfNonEmptyTranslations": 471,
    "createdAt": "2023-10-05T12:55:20.987Z",
    "resources": [
      {
        "link": "752a12896c194846aac2bac83efc6c79/_latest/_index",
        "size": 9333
      },
      {
        "link": "752a12896c194846aac2bac83efc6c79/_latest/pl_PL/login",
        "language": "pl_PL",
        "namespace": "login",
        "size": 385
      }
    // cut for brevity...
    ]
  }
}
Use the link property,
append a https://cdn.simplelocalize.io/{link} prefix to it
and iterate over resources to download them or upload them directly to your server.
You can also filter resources by language, namespace, or customer.
Upload translation resources to S3 Bucket
In this example, we will use AWS S3 Bucket to store translation resources. You can use any other hosting server.
const axios = require('axios');
const AWS = require('aws-sdk');
const s3 = new AWS.S3();

async function uploadResourcesToS3() {
  const environmentKey = '_latest';
  const response = await axios.get(`https://api.simplelocalize.io/api/v2/environments/${environmentKey}`, {
    headers: {
      "x-simplelocalize-token": "project-api-key"
    }
  });
  const resources = response.data.resources;

  await Promise.all(
    resources.map(async (resource) => {
      const fullLink = `https://cdn.simplelocalize.io/${resource.link}`;
      const key = resource.link;
      const params = {
        Bucket: 'your-s3-bucket-name',
        Key: key,
        Body: await axios.get(fullLink, { responseType: 'stream' }),
      };
      await s3.upload(params).promise();
      console.log(`Uploaded ${key} to S3`);
    })
  );

  console.log('All resources uploaded to S3 successfully');
}

uploadResourcesToS3();
The code above is just a template to show you how to download resources and upload files to S3 Bucket, and you should adjust it to your needs.